****
Learn how much foundation repair costs in 2026, including crack repairs, waterproofing, underpinning, and foundation replacement. Compare average prices and key cost factors****
Uncategorized Articles - POM Plumbing Blog
Foundation problems can affect the safety, stability, and value of a home. Whether the issue involves minor cracking, water intrusion, or significant structural movement, repairs should be addressed before the damage worsens. Many homeowners begin their research by asking how much does foundation repair cost, but there is no single answer that applies to every property. Repair costs in 2026 depend on the severity of the damage, the foundation type, local labour rates, soil conditions, and the repair methods required. This guide explains the factors that influence pricing, common repair solutions, and what Canadian homeowners can expect when budgeting for foundation repairs.
Foundation Repair Costs in 2026: An Overview
Foundation repair costs vary widely depending on the nature of the problem. A small crack may require only a simple repair, while structural settlement can involve extensive stabilisation work and excavation.
Repair Type
Typical Cost Range
Crack Repairs
$500–$3,000
Waterproofing and Moisture Control
$2,000–$12,000
Foundation Leveling
$3,000–$15,000
Structural Reinforcement
$5,000–$25,000+
Underpinning and Pier Installation
$10,000–$50,000+
Drainage Improvements
$2,000–$15,000
The earlier a problem is identified, the lower the overall repair cost is likely to be. Delaying repairs often allows damage to spread to walls, floors, and other structural components.
Signs That Your Foundation May Need Repair
Recognising early warning signs can help prevent more extensive and expensive repairs.
Common symptoms include:
Cracks in drywall or masonry
Uneven floors
Doors and windows that no longer close properly
Gaps around window frames
Bowing basement walls
Water infiltration in the basement
Visible settlement around the property
These issues may indicate that the foundation is shifting, settling, or experiencing moisture-related damage.
The Most Common Types of Foundation Damage
Foundation damage can develop for many reasons, including soil movement, excessive moisture, poor construction practices, and natural aging.
The most common problems include:
Hairline cracks
Structural cracks
Differential settlement
Foundation sinking
Basement wall movement
Water damage
Concrete deterioration
Many structural issues are directly linked to drainage failures. For this reason, contractors often work with plumbing and drainage specialists when diagnosing the underlying cause of foundation movement.
What Factors Affect Foundation Repair Costs?
Homeowners frequently ask what affects foundation repair costs because estimates can vary significantly from one project to another.
Several factors influence pricing:
Type and severity of damage
Foundation design
Accessibility of the repair area
Soil conditions
Labour costs
Equipment requirements
Local regulations
Material costs
Drainage is another major consideration. If excess groundwater is contributing to foundation problems, contractors may recommend upgrading drainage installation services alongside structural repairs.
Repair Type
Typical Complexity
Relative Cost Level
Minor crack repair
Low
Low
Epoxy crack injection
Low to Moderate
Low
Waterproofing repairs
Moderate
Moderate
Slab lifting
Moderate
Moderate
Foundation leveling
High
High
Pier installation
High
High
Underpinning
Very High
Very High
Structural reinforcement
High
High
Average Cost of Foundation Crack Repairs
Cracks are among the most common foundation issues. The final foundation crack repair cost depends on crack size, location, cause, and whether structural movement is still occurring.
Typical repair techniques include:
Epoxy injection: $500–$1,500
Polyurethane injection: $600–$2,000
Carbon fibre reinforcement: $1,500–$5,000
Crack stitching: $2,000–$8,000
Surface sealing: $300–$1,000
Small cosmetic cracks generally require less work than active structural cracks that indicate ongoing movement.
Professional inspections are important because not every crack represents a serious structural concern. Determining the underlying cause helps ensure that repairs address the actual problem rather than simply covering visible damage.
Foundation Leveling and Structural Stabilization Costs
When a foundation begins to settle unevenly, stabilisation measures may be necessary to restore structural integrity.
The foundation leveling cost depends on:
Degree of settlement
Foundation type
Soil conditions
Number of support points required
Repair technology used
Common stabilisation methods include:
Helical piers
Push piers
Slab jacking
Underpinning systems
Structural support beams
Although these repairs can be substantial investments, they often prevent more serious structural failures and preserve property value over the long term.
How Home Size and Foundation Type Impact Pricing
Every property is different, which is why homeowners often ask how much does it cost to fix a house foundation before requesting estimates.
Several factors related to the structure itself affect repair costs:
Total square footage
Number of storeys
Foundation depth
Construction materials
Accessibility
Different foundation systems also require different repair approaches.
Common residential foundation types include:
Concrete slab foundations
Crawl space foundations
Basement foundations
Pier and beam foundations
The basement foundation repair cost is often higher because repairs may involve waterproofing, excavation, wall reinforcement, and moisture control measures.
Similarly, the concrete foundation repair cost may vary depending on whether repairs involve cracking, settlement, spalling, or structural reinforcement.
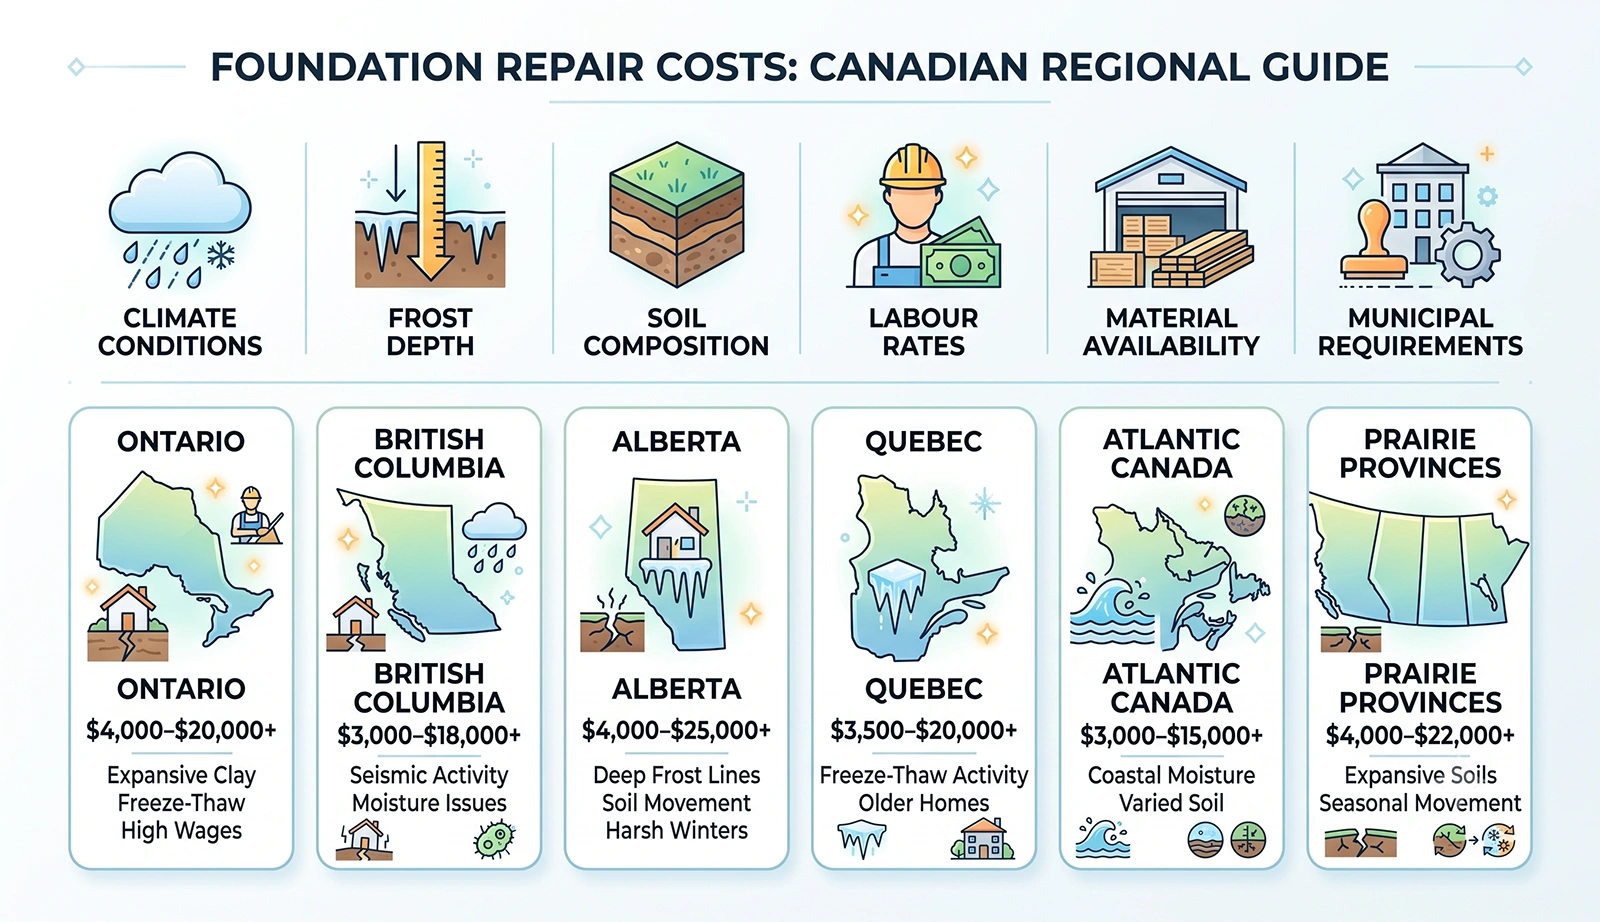
Foundation Repair Costs Across Different Canadian Regions
Regional conditions play a major role in determining repair expenses.
When researching foundation repair cost in Canada, homeowners should consider:
Climate conditions
Frost depth
Soil composition
Labour rates
Material availability
Municipal requirements
Region
Approximate Repair Cost
Why Costs Vary
Ontario
$4,000–$20,000+
Expansive clay soils, freeze-thaw cycles, higher labour costs
British Columbia
$3,000–$18,000+
Seismic considerations, moisture-related foundation issues
Alberta
$4,000–$25,000+
Deep frost lines, soil movement, harsh winters
Quebec
$3,500–$20,000+
Significant freeze-thaw activity and older housing stock
Atlantic Canada
$3,000–$15,000+
Coastal moisture exposure and varying soil conditions
Prairie Provinces
$4,000–$22,000+
Expansive soils and seasonal ground movement
Properties located in regions with expansive clay soils or severe freeze-thaw cycles often experience greater foundation stress than homes in more stable environments.
The average cost of foundation repair can therefore differ considerably between provinces and even between neighbouring cities. Local inspections remain the most reliable way to determine expected costs.
Ways to Reduce Foundation Repair Expenses Without Cutting Corners
Preventive maintenance remains one of the most effective ways to reduce future repair costs.
Homeowners can protect their foundations by:
Maintaining gutters and downspouts
Directing water away from the home
Monitoring cracks regularly
Addressing moisture problems promptly
Scheduling routine inspections
Maintaining proper grading around the property
Installing a properly designed foundation drainage system can also help reduce hydrostatic pressure around foundation walls and minimise future structural issues.
Another useful benchmark when comparing projects is the foundation repair cost per square foot. While this metric should not replace a professional inspection, it can provide a general reference point when reviewing multiple contractor estimates.
How to Choose a Foundation Repair Contractor and Get an Accurate Estimate
Selecting an experienced contractor is critical to the success of any repair project.
Before making a decision, homeowners should:
Verify licensing and insurance
Review previous projects
Check customer reviews
Request detailed inspections
Compare multiple proposals
Ask about warranties
A professional contractor should provide a comprehensive foundation repair estimate that clearly outlines labour, materials, repair methods, project timelines, and any additional work required.
Transparent pricing helps homeowners understand exactly what is included and reduces the risk of unexpected costs during construction.
Conclusion
Foundation repair costs in 2026 depend on many variables, including the type of damage, repair method, foundation design, soil conditions, and regional market factors. Whether the issue involves minor cracks, moisture intrusion, or significant structural settlement, addressing problems early can help avoid larger and more expensive repairs in the future. By understanding common repair methods, comparing professional estimates, and investing in proper drainage and maintenance, homeowners can protect both the structural integrity and long-term value of their property.
FAQ
How much does foundation repair cost in Canada?
Foundation repair costs vary depending on the type of damage, repair method, and location. Minor repairs may be relatively affordable, while major structural stabilization projects typically require a larger investment.
What factors have the biggest impact on foundation repair costs?
The most important factors include the severity of the damage, soil conditions, foundation type, accessibility, labour rates, and whether additional drainage or waterproofing work is required.
How much does foundation leveling cost compared to crack repairs?
Foundation leveling is generally more complex than repairing individual cracks because it often involves underpinning, piers, or other structural support systems. As a result, leveling projects usually cost more than standard crack repairs.
Can foundation problems get worse if they are not repaired?
Yes. Small cracks and minor settlement issues can develop into significant structural problems over time. Early repairs often help prevent more extensive damage and higher future costs.
Is a professional foundation repair estimate necessary before starting repairs?
A professional inspection and detailed estimate are strongly recommended. An assessment helps identify the root cause of the problem and ensures that the proposed repair solution is appropriate for the property’s specific conditions.
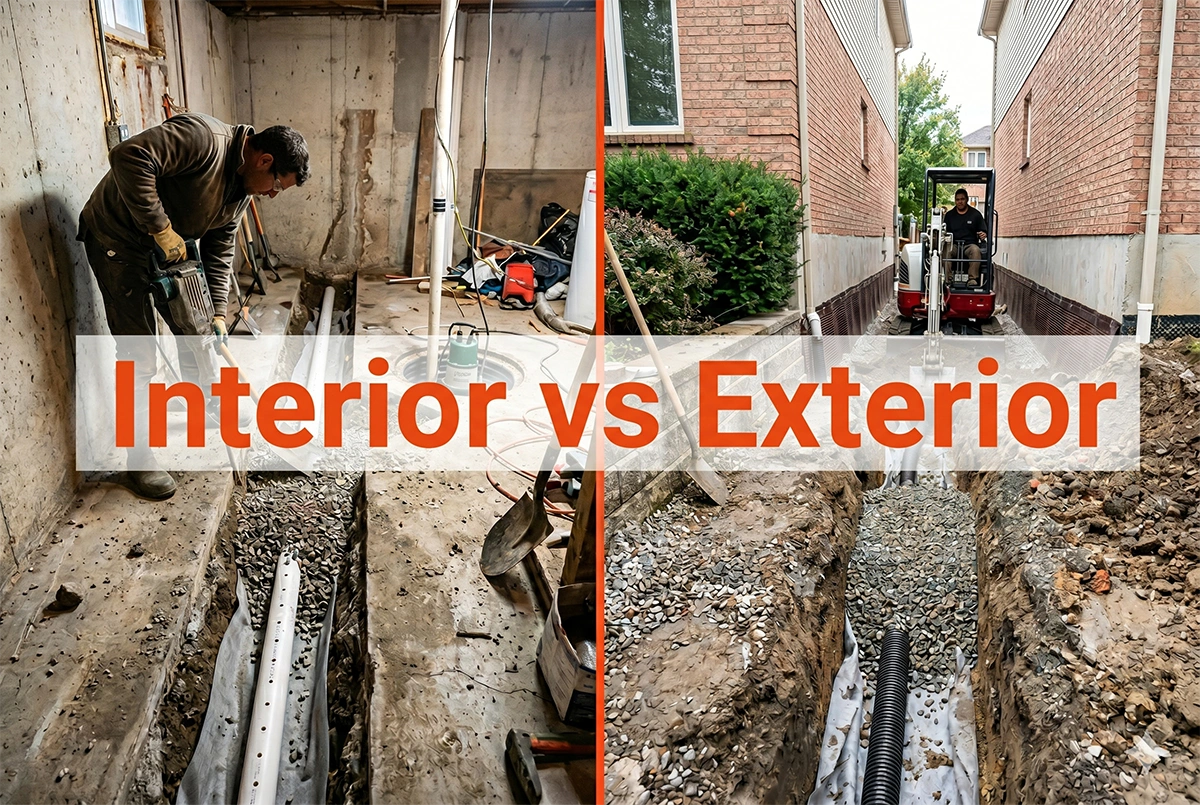
Water is getting into your basement. You search for a solution and land on two options: an interior french drain or an exterior french drain. Both sound like they do the same thing. They do not.
The difference matters because choosing the wrong system means spending thousands of dollars on work that does not fix the actual source of your problem. This guide explains how each system works, where each one fails, and how to figure out which one your situation actually calls for.
Where Is the Water Coming From?
This is the question that determines everything. Before comparing systems, you need to know how water is entering your foundation, because interior and exterior drains solve different problems.
There are three main entry points:
Water seeping through cracks or gaps in the foundation wall, driven by saturated soil pressing against the exterior
Water rising up through the floor slab due to hydrostatic pressure from a high water table below
Surface water pooling against the foundation from poor grading or runoff
An exterior french drain intercepts the first and third scenario before water reaches the wall. An interior french drain handles the second, and also catches wall seepage after it enters. Choosing based on cost or convenience rather than entry point is where most mistakes happen.
How an Interior French Drain Works
An interior system, also called a drain tile or weeping tile system in Ontario, runs along the inside perimeter of the basement floor at the wall-slab joint. A contractor cuts through the concrete, lays a perforated pipe in a gravel bed, and patches the floor. Water that enters through the walls or rises from below drains into the pipe and gets pumped out through a sump pit.
The system does not block water from entering. It captures it the moment it does and removes it before it spreads.
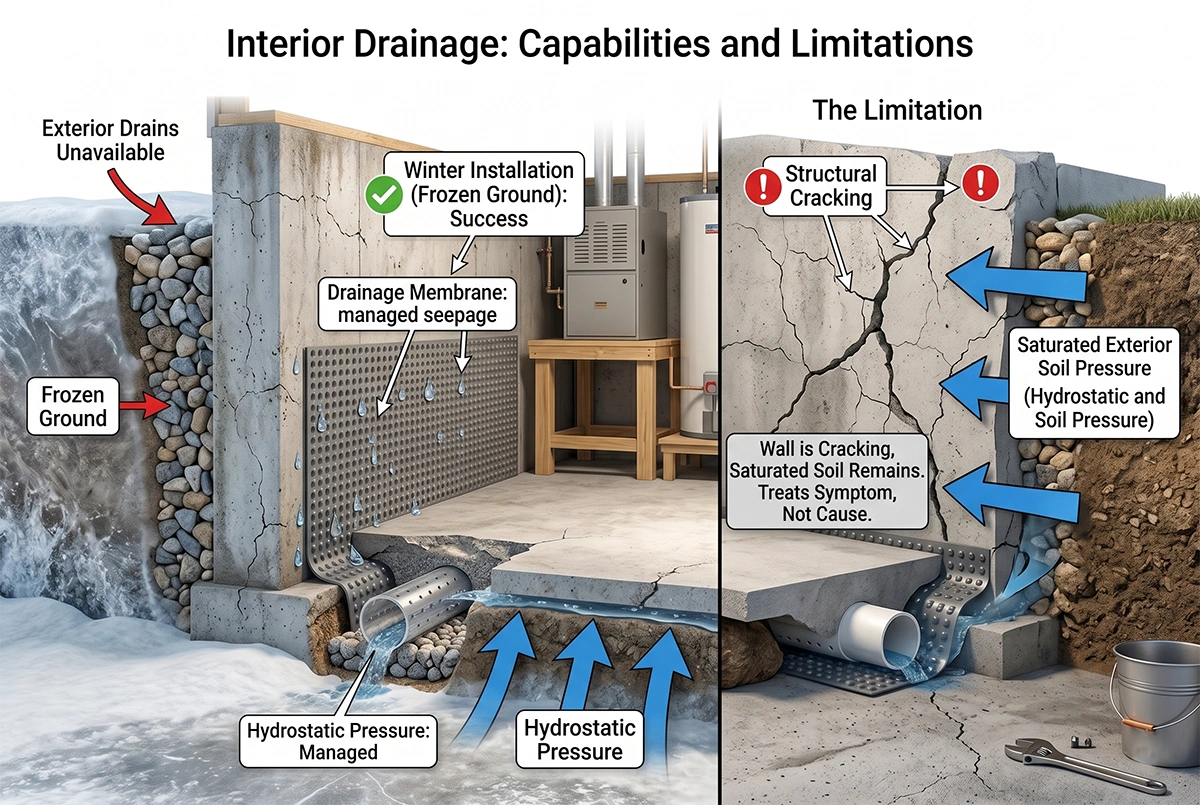
Where interior drainage works well:
Hydrostatic pressure pushing water up through the slab — exterior drains do not address this at all
Seepage through foundation walls in an existing home where excavation is not feasible
Winter installation, when frozen ground makes outdoor excavation impossible in the GTA
Situations where budget is a real constraint
Where it falls short: an interior system does not address saturated soil pressing against your foundation walls. The water still reaches the wall — the system just manages it after entry. If the foundation wall is cracking from exterior water pressure, interior drainage treats the symptom while the structural issue continues.
The other limitation is sump pump dependency. The system only works if the pump does. A battery backup unit is a required part of any complete interior drainage installation. A proper weeping tile installation accounts for pump sizing, pipe slope, and gravel bed depth relative to the actual water volume the system needs to handle.
How an Exterior French Drain Works
An exterior system is installed at footing level, outside the foundation wall. That means excavating six to eight feet deep around the perimeter. A perforated pipe goes in against the footing surrounded by gravel and filter fabric. Before backfilling, a waterproofing membrane is applied to the exposed foundation wall.
The exterior approach stops groundwater before it contacts the wall. It relieves hydrostatic pressure on the exterior side and protects the foundation from long-term water exposure. For new construction, this is the most logical time to install it — the foundation is already exposed and the incremental cost is low.
Where exterior drainage works well:
New construction, where installation happens before backfilling
Foundation walls visibly deteriorating from water contact on the exterior
Properties where surface runoff and poor grading drive water toward the foundation
Situations where stopping water at the source is the priority and site access allows it
Where it falls short: an exterior drain does not solve hydrostatic pressure from below. If your water table rises and pushes water up through the slab, an exterior perimeter drain does nothing about it. For most existing Toronto and GTA homes, exterior excavation is also a major undertaking. Removing interlock, patios, or sections of driveway and restoring all of it adds substantially to the cost. Understanding what proper drainage systems involve is what separates an informed decision from an expensive mistake.
Side-by-Side Comparison
The core difference between an interior and exterior french drain comes down to where in the water’s path each system intervenes.
Feature
Interior French Drain
Exterior French Drain
Stops water at the source
No
Yes
Handles hydrostatic pressure from below
Yes
No
Works for existing homes
Yes
Difficult
Installation season
Year-round
Spring through fall
Sump pump required
Always
Usually
Impact on landscaping
None
Significant
Relative cost
Lower
Higher
Best for
Seepage, hydrostatic pressure, existing builds
New construction, wall deterioration, surface runoff
Neither system is universally better. The right choice depends on the source of your water problem, not on which system costs less upfront.
Which System Is Right for Your Property?
The right choice depends on where water is entering and what site conditions allow.
Interior french drain is the right system when:
Water rises through the slab or seeps through walls in an existing home
Exterior excavation is blocked by a driveway, porch, or hardscaping
Work needs to happen year-round, including winter
Exterior french drain makes more sense when:
The building is under new construction
The foundation wall itself is deteriorating and needs exterior repair regardless
Some properties need both. A failed original weeping tile combined with hydrostatic pressure from below is not an either-or situation. A proper site assessment identifies where water is entering before any installation decisions are made.
Do Not Overlook Sewage Backup
A french drain handles groundwater infiltration. It will not stop sewage backup, which is a separate problem. When the city sewer surcharges during a heavy storm, wastewater reverses through your floor drain and a french drain does nothing to prevent it.
A backwater valve closes automatically when flow reverses. Many Toronto properties on combined sewer connections are at risk. Installing one alongside a drainage upgrade costs less than scheduling it as a separate job.
Getting the Installation Right
A french drain with incorrect pipe slope, undersized gravel, or a sump pit that cannot handle peak water volume will underperform regardless of which system you choose. The details that matter:
Pipe diameter and slope toward the sump pit
Gravel gradation and bed depth
Filter fabric quality
Sump pit size relative to expected water volume
These rarely appear in a basic quote but determine whether the system still works a decade later. Pomp Plumbing works with residential and commercial properties across Toronto and the GTA. Contact the team for an assessment before committing to any installation.
FAQ
Should I install a french drain inside or outside my foundation?
It depends on where water is entering. Interior systems handle hydrostatic pressure and wall seepage in existing homes. Exterior systems stop water before it reaches the wall — best for new construction or when the foundation wall needs repair. A site assessment gives a definitive answer before any money is spent.
Is an interior french drain worth it for an older home?
For most existing Toronto homes where exterior excavation is not feasible, yes. It resolves basement moisture year-round, does not disturb landscaping, and handles hydrostatic pressure from below — something an exterior system cannot do.
Are exterior french drains effective long-term?
Yes, when installed in the right situation. An exterior system provides the most complete protection by stopping water before it contacts the foundation wall. It does not address water rising from below, and retrofitting one on an existing home is a major, costly undertaking.
Which weeping tile system is better for a Toronto home?
For most existing Toronto and GTA homes, an interior weeping tile system is the more practical choice. Clay-heavy soil and flat lot grading create hydrostatic pressure conditions that interior drainage handles directly. Exterior systems make more sense for new construction.
What happens if I choose the wrong drainage system?
You spend money on work that does not solve the problem. The wrong system leaves the actual source of water entry unaddressed. Getting the diagnosis right before installation is what determines whether the fix holds.
To increase a home’s living space, you don’t necessarily need to build additions. The best and most proven option is to completely renovate an old basement. An ordinary dark crawl space or low foundation can be transformed into a full-fledged warm room. Such space expansion instantly raises the home’s market value and adds comfort for the whole family.
However, before starting such large-scale construction work, you need to study the upcoming expenses in detail. The final cost of underpinning is always individual. It directly depends on the soil type on the site, groundwater depth, and complexity of structural engineers’ calculations.
POM Plumbing specialists will professionally protect your home’s foundation from any deformations. We’ll prepare the lower floor for new pipe installation, deepen the sewage system, and create reliable drainage.
What Is Basement Underpinning?
Want to make your basement ceiling higher? For this, they strengthen and deepen the foundation. Workers carefully excavate the earth under the building. They create a new solid foundation. The floor level drops down. In Toronto, this is how old houses are often updated. It transforms a cramped cellar into a living room.
Main reasons for foundation strengthening:
increasing ceiling height;
strengthening old or damaged foundation;
preparing the basement as a living space;
creating a legal basement apartment;
increasing property market value.
The cost of underpinning basement may seem high. However, many owners consider this an excellent long-term investment. New living space significantly increases the home’s market value.
What is Included in Basement Underpinning?
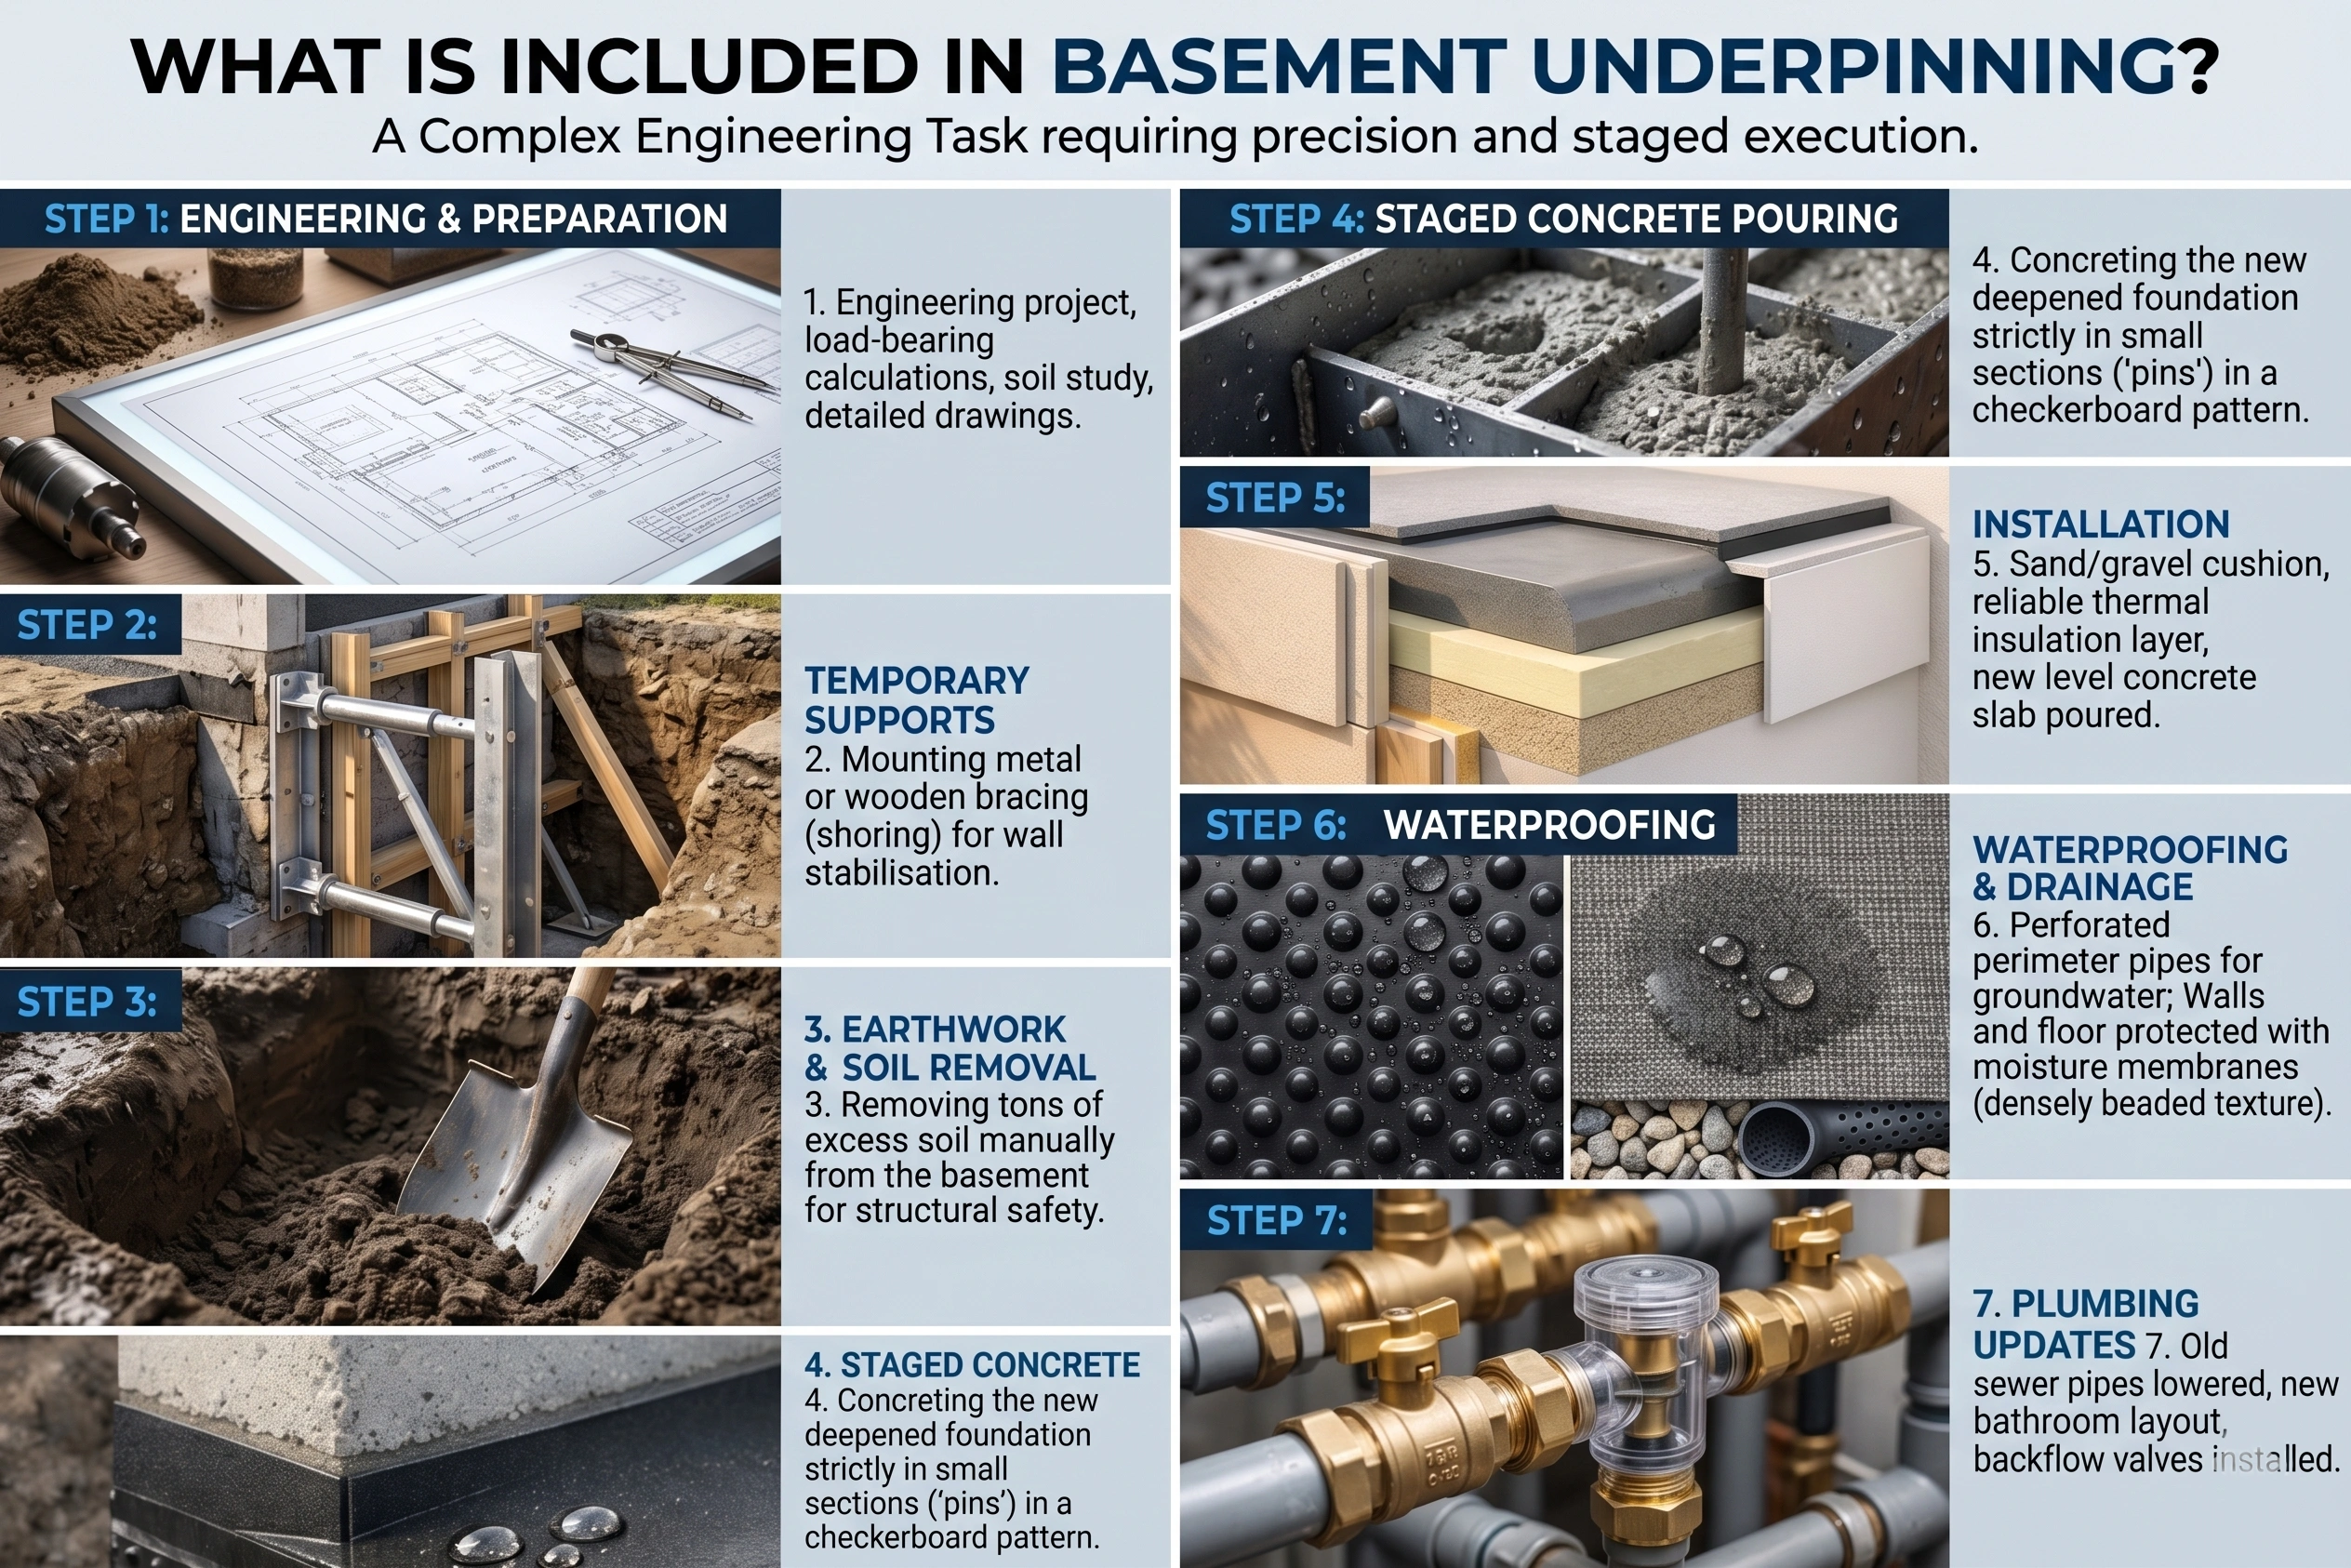
Foundation strengthening isn’t just floor deepening. In reality, it’s a complex engineering task. It requires precise calculations and experience. Professional turnkey renovation always follows a strict plan. It includes several mandatory steps:
Creating an engineering project. Conducting precise calculations of the building’s load-bearing capacity, studying soil, and preparing detailed drawings.
Installing temporary supports. Mounting metal or wooden bracing (shoring) for complete wall stabilisation during excavation.
Earthwork and soil removal. Removing hundreds of tons of excess earth from the basement was performed manually for structural safety.
Staged concrete pouring. Concreting the new, deepened foundation strictly in small sections (so-called pins) in a checkerboard pattern.
Installing a new floor. Builders lay a dense sand and gravel cushion. Then they install a reliable thermal insulation layer. Finally, a level concrete slab is poured.
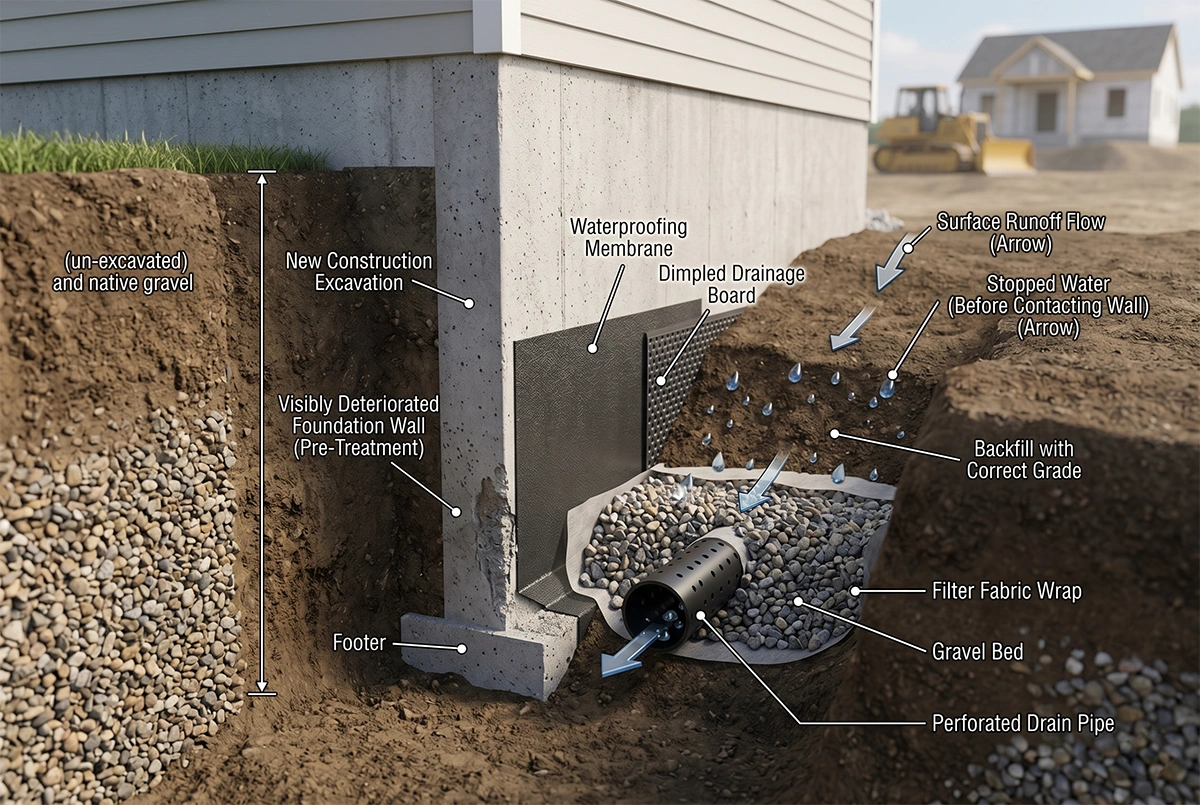
Waterproofing and drainage. Perforated pipes are laid around the basement perimeter. They’re needed to drain groundwater. Walls and floor are protected with special moisture membranes.
Plumbing updates. Old sewer pipes must be lowered. Master’s perform layout for new bathrooms. They also install backflow valves against flooding.
Foundation deepening in old houses requires updating communications. Existing drainage and pipes simply aren’t designed for the new floor depth. Professional commercial plumbing services will help avoid flooding after renovation.
Also, complete building reconstruction requires base building plumbing installation. It allows making the updated basement a full-fledged and comfortable living space.
How Much Does Basement Underpinning Cost Toronto in 2026?
The main question for homeowners is what is the average cost of underpinning?
In 2026, the cost of underpinning basement Toronto will be approximately $70-150 per square foot.
The cost of underpinning a foundation depends on project scale:
Small basement: $35,000 – $50,000.
Medium house: $50,000 – $80,000.
Complex reconstruction: $90,000 – $120,000+.
The final estimate includes not just construction. The cost of foundation underpinning also includes engineering services, city permits, and inspections.
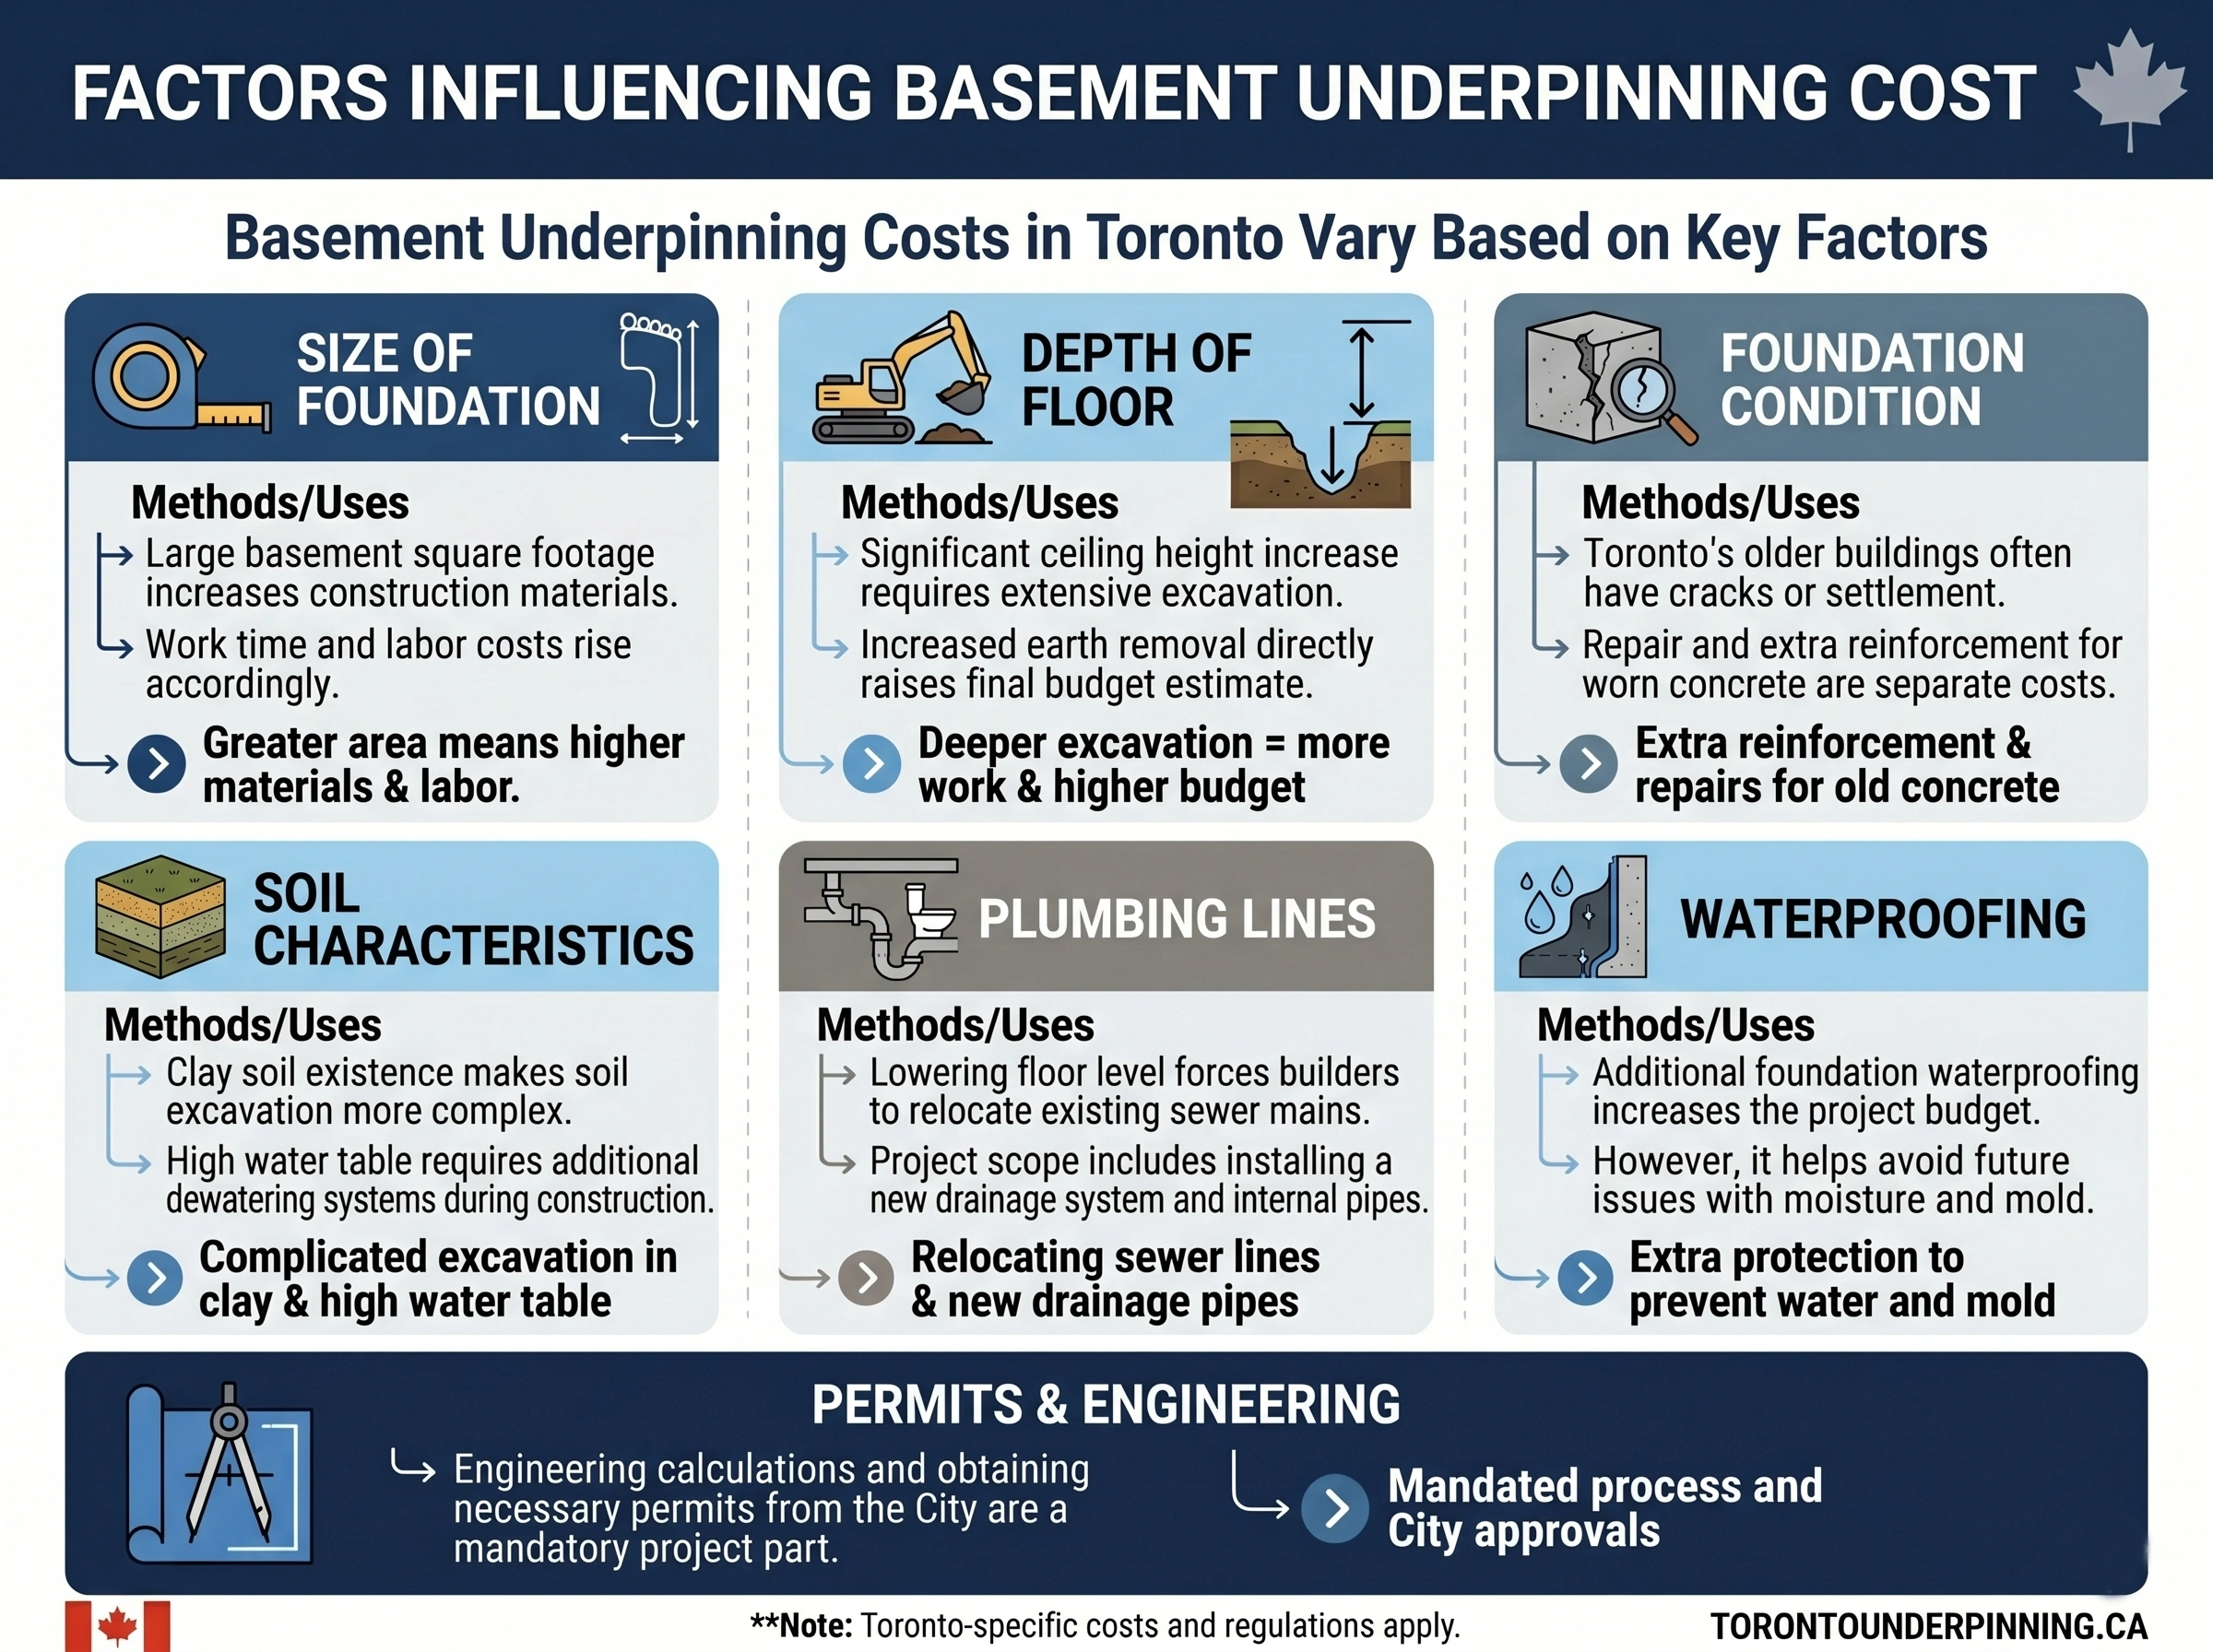
Factors That Affect the Price of Basement Underpinning
The cost of underpinning Toronto depends on several factors.
Foundation size. A large basement area increases construction material volume. Labour time and effort also increase.
Floor depth. Significant ceiling height increase requires large-scale excavation. Earthwork volume directly raises the final estimate.
Foundation condition. Old buildings in Toronto often have cracks or settling. Repair and additional reinforcement of worn concrete require separate expenses.
Soil specifics. The presence of clay soil complicates earth removal. High groundwater level requires installing additional dewatering systems.
Plumbing communications. Lowering the floor level forces masters to relocate sewer mains. The project includes installing new drainage and pipes.
Waterproofing. Additional foundation waterproofing increases the budget but helps avoid moisture and mould problems in the future.
Permits and engineering services. Engineering calculations and city permits are a mandatory part of the project.
Calculating the cost of underpinning foundation for each project is done individually.
Underpinning vs Bench Footing Cost in Toronto
Homeowners often compare underpinning and bench footing to choose a more cost-effective option.
Bench footing is a technology where a concrete ledge is created inside the basement along walls, supporting the foundation without deepening it.
Approximate prices in Toronto:
Foundation strengthening: $70-150 per square foot;
Bench footing: $45-90 per square foot.
Bench footing is usually cheaper but takes up basement space. Underpinning allows preserving usable room area and getting level vertical walls, which is especially important when creating a rental apartment downstairs.
Do I Need a Permit for Basement Underpinning in Toronto?
For basement deepening in Toronto, an official permit is necessary. This work directly changes the home’s load-bearing structures.
Before starting renovation, you must complete important stages:
obtain city building permit;
prepare a detailed engineering project;
strictly follow all local building codes;
pass final municipal inspections.
Unauthorised renovation without documents threatens major fines. There will also be problems with the insurance company. In the future, such property will be extremely difficult to sell.
Better to immediately include expenses for engineers and fees in the overall budget.
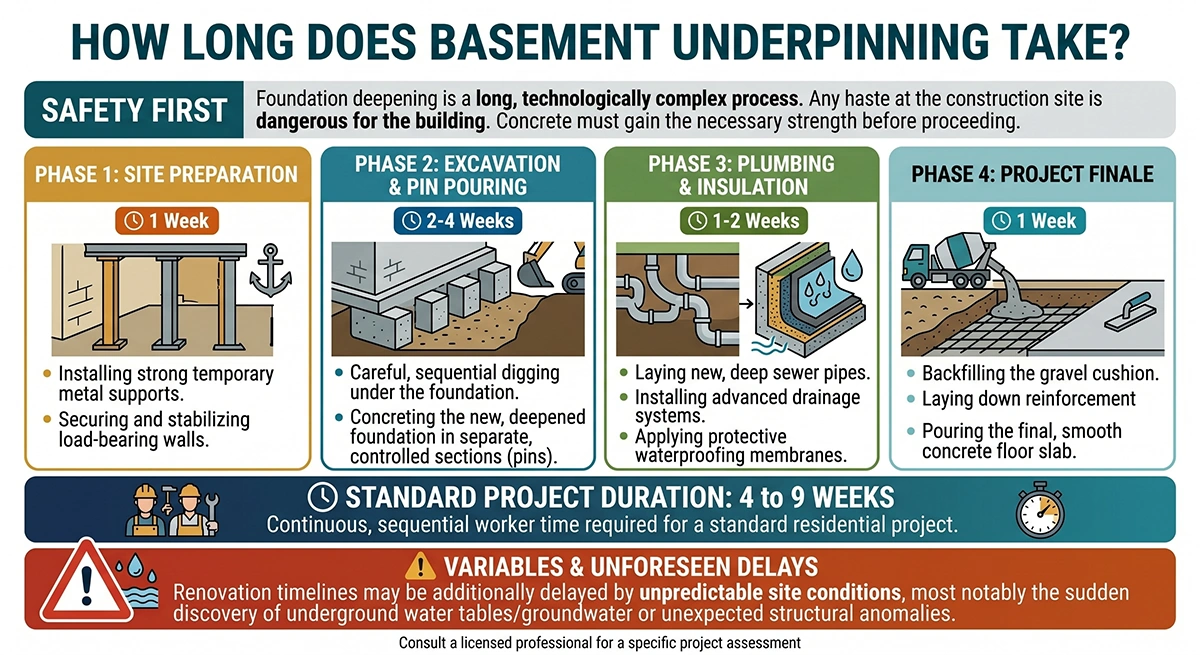
How Long Does Basement Underpinning Take?
Foundation deepening is a long and technologically complex process. Any haste at the construction site is dangerous for the building. Concrete must gain the necessary strength.
Usually, a standard project takes 4 to 9 weeks. This is continuous worker time.
The approximate schedule of all stages looks like this:
Site preparation (1 week). Installing strong temporary metal supports to hold load-bearing walls.
Excavation and pin pouring (2-4 weeks). Careful sequential concreting of the new, deepened foundation in separate sections.
Plumbing and insulation (1-2 weeks). Laying new deep sewer pipes, installing drainage and protective membranes.
Project finale (1 week). Backfilling gravel cushion. Also, reinforcement and pouring the final concrete floor.
Renovation may be additionally delayed. Timing can be affected by unforeseen circumstances like discovered groundwater and such.
Do You Need to Underpinning the Basement?
Foundation deepening isn’t needed for every building. However, in several situations, it’s the most reasonable solution for a homeowner.
Worth considering if:
The basement has ceilings that are too low.
A rental apartment is planned downstairs.
The foundation shows settling signs.
Wall cracks appear.
Property value increase is required.
A large-scale renovation is planned.
Foundation strengthening, in most cases, becomes a justified investment. Properly executed foundation reinforcement improves basement functionality. Additionally, it strengthens the house for decades ahead. Property becomes safe and comfortable. Its market price also grows.
FAQ
How much does basement underpinning cost in Canada?
Basement underpinning typically costs between $20,000 and $50,000 for an average home, but can reach $100,000+ depending on project complexity, size, and depth. Pricing is often calculated per linear foot or square foot.
Is basement underpinning worth the investment?
Yes, underpinning can increase usable living space and significantly boost property value. In many cases, homeowners see a return on investment of up to 70–100%, especially if the basement is finished or rented out.
How is underpinning cost calculated?
Costs are usually calculated per linear foot of foundation or per square foot of basement area. The total price depends on structural requirements, excavation depth, and site-specific conditions.
What is the cheapest underpinning method?
Bench footing (benching) is typically the most affordable option, but it reduces usable space. Traditional mass concrete underpinning costs more but provides full ceiling height and better long-term results.
Are permits and engineering included in the cost?
Not always. Some contractors include permits and engineering in their quotes, while others charge separately. These costs can range from $2,000 to $8,000 depending on the project and location.
How long does basement underpinning take?
Most projects take between 8 and 16 weeks, depending on the size of the basement, complexity, and whether additional work like waterproofing or finishing is included.
If you notice a sewage smell in your home, it’s more than just unpleasant – it could indicate a plumbing issue that needs immediate attention. Sewer gas, which smells like rotten eggs, contains harmful substances like methane and hydrogen sulfide. There are several common causes of sewer gas odors, including dry drain traps, clogged drains, vent pipe blockages, or a failed toilet seal. Ignoring these issues can lead to health risks, costly repairs, or even safety hazards.
Quick Actions to Take:
Ventilate Immediately: Open windows and doors to let fresh air in.
Inspect Drains: Run water in unused sinks or floor drains to refill dry traps.
Check Toilets: Look for wobbling or moisture around the base, indicating a failed wax seal.
Avoid Ignition Sources: Methane is flammable, so avoid sparks or open flames.
If the smell persists or the issue affects multiple areas, it’s time to call a licensed plumber. Sewer gas exposure can cause symptoms like headaches, nausea, or dizziness and should never be ignored. Regular maintenance, such as flushing unused drains and inspecting vent pipes, can help prevent odours from returning.
7 Sources of Sewer Smell in Your Home | Where to Find that Smell!
sbb-itb-1e3c609
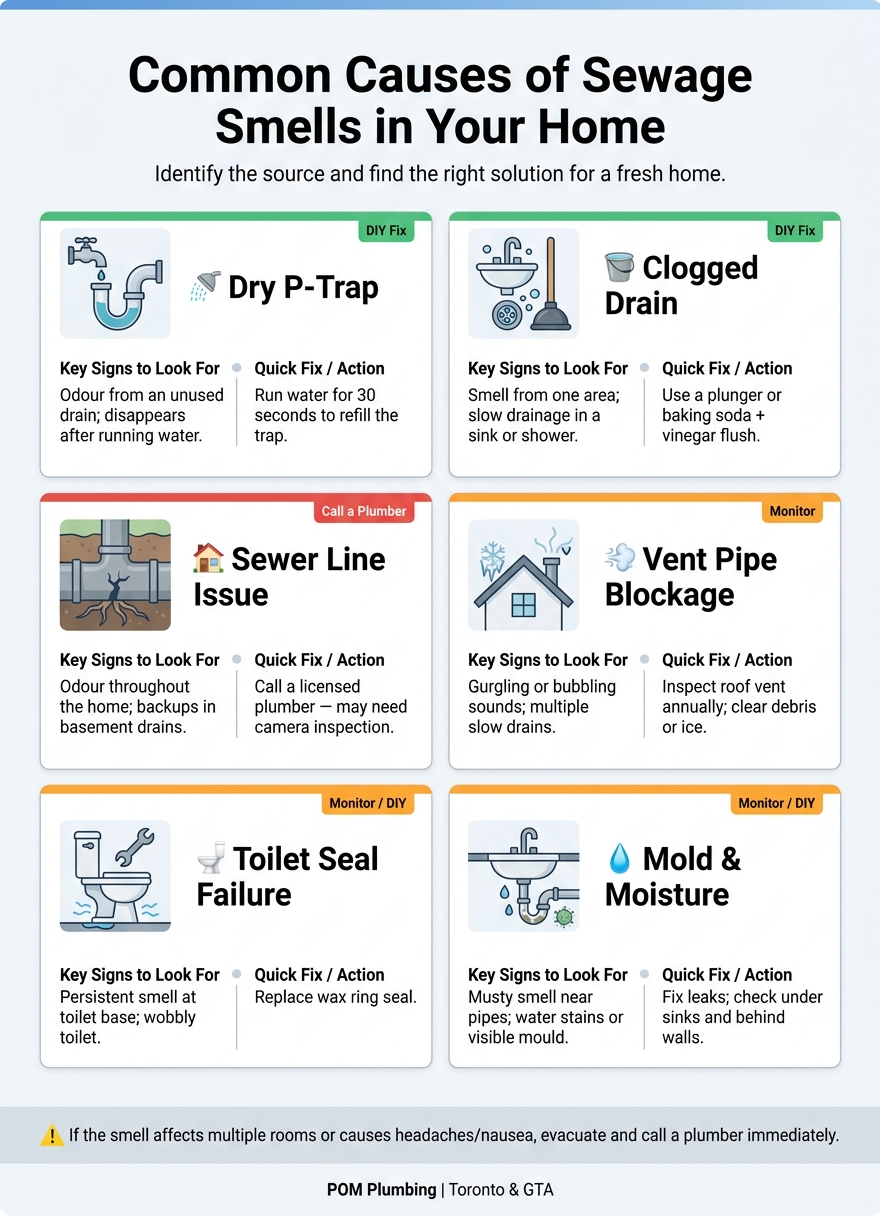
Common Causes of Sewage Smells in the House
Common Causes of Sewage Smells: Signs, Sources & Fixes
Sewage odours often point to plumbing problems. To tackle the issue, start by identifying the source from these common culprits.
Dry or Empty Drain Traps
Every drain – whether it’s in a sink, shower, or floor – has a U-shaped pipe called a P-trap. This pipe holds water, acting as a barrier to keep sewer gases from escaping into your home.
"Drains are equipped with a U-shaped pipe, called a trap, which blocks odors when full of water. Infrequently used drains and sinks will dry out, allowing these odors… to escape." – Office of Environmental Health and Safety, Princeton University
If a drain hasn’t been used for a while, the water in the trap can evaporate, breaking the seal and letting odours seep through. This is especially common in guest bathrooms, basement floor drains, or utility sinks. A quick fix? Let the water run for a minute to refill the trap.
Clogged or Blocked Drains
A slow-draining sink or shower can be more than just annoying. It often signals a buildup of hair, soap scum, or other debris. As bacteria thrive in these blockages, they can release unpleasant smells – even before a full clog occurs.
Sewer Line Problems
When the odour seems to come from multiple spots in your home, the main sewer line could be the problem. Cracks, blockages, or tree roots invading the line can cause sewer gases to back up into your house. This issue often first appears in lower-level fixtures, like basement floor drains.
Vent Pipe Issues
Plumbing systems are designed with vent pipes that extend through the roof, allowing sewer gases to escape outside. If these vents become blocked – by bird nests, leaves, or even ice during harsh Canadian winters – gases may get forced back into your home. A tell-tale sign? Gurgling or bubbling sounds in the toilet or drains when water runs elsewhere in the house.
Toilet Seal Failures
Toilets are sealed to the floor with a wax ring to prevent gases from escaping. Over time, this seal can wear out, especially if the toilet shifts or becomes unstable. If you notice a persistent smell near the toilet or if it wobbles slightly when you sit on it, the wax ring likely needs replacing.
Mold and Moisture Problems
If you’ve ruled out plumbing as the source, the smell might come from mould or mildew. Damp spots under sinks, behind walls, or near leaky pipes can create musty odours. Even a small, slow leak can lead to mould growth, so check for water stains or other signs of moisture.
Each of these issues requires specific attention to resolve the smell and prevent further damage.
Cause
Key Signs to Look For
Dry P-Trap
Odour from an unused drain; disappears after running water
Clogged Drain
Smell from one area; slow drainage in a sink or shower
Sewer Line Issue
Odour throughout the home; backups in basement drains
Vent Pipe Blockage
Gurgling or bubbling sounds; multiple slow drains
Toilet Seal Failure
Persistent smell at toilet base; wobbly toilet
Mold and Moisture
Musty smell near pipes; water stains or visible mould
Is Sewer Gas Dangerous?
Sewer gas poses serious risks and requires immediate attention. This gas is a blend of various substances, including hydrogen sulfide, ammonia, methane, carbon dioxide, sulfur dioxide, and nitrous oxides. Some of these gases are toxic, while others are extremely flammable, creating a dual threat to both health and safety.
Hydrogen sulfide, the gas responsible for the distinct rotten egg smell, is particularly concerning. It is colourless, highly toxic, and can even be explosive. At higher concentrations, it can impair your sense of smell, making it harder to notice the odour as gas levels rise.
"At high concentrations, hydrogen sulfide can interfere with the sense of smell, making it harder to use the gas’s distinct odor as a warning sign." – Wisconsin Department of Health Services
The impact of sewer gas exposure depends on how much gas is present and how long you’re exposed. Low-level exposure might cause eye irritation, a sore throat, or coughing. Moderate exposure can lead to symptoms like headaches, nausea, dizziness, and fatigue. However, severe or prolonged exposure could result in seizures, coma, or even death. Another danger is oxygen displacement by methane or carbon dioxide in confined spaces. If oxygen levels drop below 12%, unconsciousness can occur very quickly.
Beyond health concerns, methane’s flammability adds another layer of danger. If you suspect a gas leak, avoid using electrical switches or creating any sparks.
"Hydrogen sulfide has shown to be toxic to the oxygen systems of the body. In high amounts it can cause adverse symptoms, organ damage, or even death." – Healthline
Understanding these risks highlights why it’s so important to act quickly if sewer gas is detected. Awareness of the dangers can make all the difference in protecting both your health and your home.
What to Do Right Away When You Smell Sewage
If you notice a sewage smell, your first priority should be safety. Start by ventilating your home – open windows and doors to let fresh air in. If the smell is strong or concentrated in a specific area, like a basement, leave that space immediately. Avoid using any open flames or ignition sources, such as gas stoves, matches, or lighters. Methane, a component of sewer gas, is highly flammable, and even a small spark could pose a danger if gas has accumulated indoors.
"If you believe there are high concentrations of sewer gas in an enclosed space, evacuate the building and call the fire department for help." – Wisconsin Department of Health Services
Once your home is ventilated and you’ve ruled out an immediate emergency, take a few minutes to inspect your drains. Run water for about one to two minutes in every sink, shower, and floor drain, especially in areas like bathrooms or utility rooms that aren’t frequently used. Also, check the base of each toilet – if you notice wobbling or moisture around the base, it might mean the wax ring seal is failing and allowing gas to escape.
After addressing these potential sources, keep an eye on the health of everyone in your household. Watch for symptoms such as headaches, nausea, dizziness, or irritation in the eyes. If anyone’s condition worsens or someone loses consciousness, seek emergency medical care right away and contact a professional plumber. While a sewage smell doesn’t always indicate a severe issue, it’s never something to take lightly.
How to Find the Source of the Odour
Once you’ve ventilated the area and confirmed it’s safe, the next step is tracking down the source of the odour. Start by walking slowly through your home, paying attention to where the smell is strongest. If the odour is concentrated in a single bathroom, it’s likely tied to a specific fixture, like a dry P-trap or a failed toilet seal. However, if the smell is noticeable in multiple rooms or throughout the house, the issue might lie with a blocked vent stack or a deeper problem in the main sewer line.
Take a closer look at drains and toilets for clues. Fixtures that don’t get much use – like those in guest bathrooms or basement floor drains – are common culprits. When these drains sit unused for weeks, the water in the P-trap can evaporate, eliminating the barrier that keeps sewer gases out.
Check toilets by gently rocking them. Any movement could mean the wax seal has failed, allowing sewer gas to escape even if there’s no visible water leak. Don’t forget to inspect the sewer cleanout plug, usually located in the basement or near the home’s foundation outside. A loose or cracked cleanout cap is a frequent cause of odours, especially when changes in indoor air pressure occur.
Here’s a quick reference table to help identify the issue based on where and when the odour appears:
Where You Notice It
When It Happens
Most Likely Cause
One rarely used bathroom
Constant or after a long absence
Dry P-trap
One regularly used bathroom
After flushing or always
Failed wax seal
Basement floor drain
Constant
Dry floor drain
Multiple rooms or whole house
Constant or worsening
Blocked vent stack
Laundry area
During or after laundry
Washing machine drain trap or hose
Near cleanout cap
Constant
Loose or missing cleanout plug
Comes and goes randomly
Windy days
Vent stack too short or downdraft
Lastly, pay attention to sounds while running water. If you hear gurgling in a drain when flushing a nearby toilet, it could mean a blocked vent pipe or a clog in the main sewer line. Slow drainage across multiple fixtures at the same time also points to a main line issue. By combining sound cues with odour intensity, you can usually zero in on the problem and decide if it’s something you can fix yourself.
DIY Fixes for Minor Sewage Odours
After identifying the source of the smell, you can tackle some common culprits: dry drain traps, minor drain clogs, and loose toilet seals.
Refilling Dry Drain Traps
A P-trap is designed to hold water, creating a seal that blocks sewer gases from escaping. When a drain isn’t used for a while – like in a guest bathroom or a basement floor drain – the water can evaporate, breaking that seal.
The solution is straightforward: run water for about 30 seconds. This should refill the trap and restore the barrier. To prevent it from drying out again, run water through unused drains weekly.
If the odour returns quickly even after refilling, the issue might not be evaporation but rather a pressure problem in your vent stack. In such cases, it’s best to consult a professional. Meanwhile, you can temporarily cover the drain with a stopper or plastic lid. If the smell subsides while it’s covered, you’ve likely found the source.
"A siphon could pull out just enough water to leave a millimetre of air open in the trap, which is enough to cause your issues." – jay613, Stack Exchange Contributor
Clearing Minor Drain Buildup
Skip chemical drain cleaners. These products can damage pipes over time and often fail to fully clear blockages.
Instead, try these safer methods:
Plunger: Use steady, forceful strokes to dislodge any buildup.
Baking Soda and Vinegar:
Start by pouring a pot of boiling water down the drain.
Add 1 cup of baking soda, followed by a mixture of 1 cup of vinegar and 1 cup of water.
Cover the drain and let it fizz for 5–10 minutes.
Finish with another pot of boiling water to flush everything out.
For blockages that a plunger can’t reach, a plumbing snake (or drain auger) can break up clogs deeper in the pipe without causing damage.
If odours persist after clearing the drain, it’s time to check the toilet seal.
Checking Toilet Seals
A toilet that wobbles, even slightly, is a warning sign. Movement often means the wax ring is compromised or the floor bolts are loose, allowing sewer gas to escape.
To check, gently push on each side of the toilet. If it rocks, the seal is likely damaged. Even if the toilet feels secure but there’s a smell near the base, the wax ring might still need replacing.
Replacing a wax ring is a doable DIY task, but it requires shutting off the water, emptying the tank and bowl, disconnecting the supply line, and lifting the toilet off the floor. After cleaning off the old wax, you’ll place a new ring on the flange, lower the toilet back down, and press firmly to create a tight seal. Tighten the floor bolts snugly, but not too much – overtightening can crack the porcelain. Reconnect the water supply, flush a few times, and check for leaks or odours.
"This form of toilet repair is not an overly complicated process, but it does involve some heavy lifting, and many people are uncomfortable with it." – Vaughan HVAC
If you’re unsure about lifting the toilet or suspect the flange might be damaged, it’s wise to call a plumber. Attempting the repair without confidence could lead to a cracked toilet or an improperly sealed base. Should these fixes fail to resolve the issue, professional help is your best bet.
When to Call a Professional Plumber
If basic fixes fail and the smell comes back within a day or two, it’s a strong sign that the problem goes beyond surface-level issues. When DIY efforts don’t hold up, certain warning signs make it clear that professional help is necessary.
You should call a plumber right away if you notice multiple drains gurgling or draining slowly at the same time, sewage backing up into a basement drain or shower, or a persistent sewer odour that minor repairs haven’t resolved. These symptoms often indicate more serious problems like blockages, venting issues, or even damage to the main sewer line.
"Tree roots can grow around or into underground sewer pipes. Believe it or not, this is one of the most common sewer line problems." – Jason Peavey
If anyone in your home experiences headaches, nausea, or dizziness along with the smell, it’s critical to act fast. Sewer gas contains methane and hydrogen sulfide, which can be dangerous in confined spaces. These symptoms suggest that gas levels may already be dangerously high. In such cases, professional tools and expertise are essential to identify and fix the issue before it worsens.
Licensed plumbers have the equipment to tackle these problems effectively. They use tools like sewer cameras to pinpoint underground cracks or blockages, smoke tests to detect hidden leaks in walls, and hydrojetting to remove stubborn clogs caused by grease or debris – far beyond what a plunger or drain snake can achieve.
POM Plumbing Service Company, with over 20 years of experience, specializes in handling these exact problems. Serving Toronto and the GTA, they offer licensed, insured plumbers and emergency services for urgent situations. Getting a professional evaluation early can save you from turning a manageable issue into an expensive disaster while ensuring your home stays safe and functional.
How to Prevent Sewage Smells in the Future
Stopping sewage odours before they start is much easier than dealing with a major plumbing issue. A few simple habits can keep your home smelling fresh and your plumbing in good shape.
One key step is to flush rarely-used drains regularly. Drains in guest bathrooms, basement floors, or utility sinks often go unused, causing their P-traps to dry out. When this happens, sewer gas can sneak in through the pipes. Running water through these drains for just 30 seconds keeps the water seal intact and prevents odours. At the same time, avoid pouring cooking grease or oil down the kitchen sink. Over time, these substances can coat the pipes, leading to blockages and unpleasant smells.
Another helpful habit is to use a baking soda and vinegar solution as part of your routine maintenance. Simply pour 125 mL (½ cup) of baking soda into the drain, followed by 250 mL (1 cup) of vinegar. Cover the drain and let the mixture sit for 30–60 minutes, then flush it with hot water. For PVC pipes, stick to hot tap water to avoid damage. This simple process helps keep your drains clean and odour-free.
It’s also important to inspect your toilet base periodically. If the toilet wobbles, it could mean the wax ring seal is failing, which might allow sewer gas to escape. Additionally, check your roof vent pipes once a year. Leaves, ice, or even animal nests can block these vents, trapping gases and causing gurgling sounds in your drains. Clearing any obstructions ensures proper airflow and prevents odour problems.
By sticking to these straightforward practices, you can prevent small plumbing issues from turning into larger, more expensive repairs.
"Professional plumbing service helps detect minor issues early, preventing them from becoming costly repairs." – Noonan Energy
Conclusion
A sewage smell in your home isn’t something to ignore – it can signal underlying issues that may worsen over time.
Sewer gas isn’t just unpleasant; it’s a health hazard. It contains methane and hydrogen sulfide, which can cause symptoms like nausea, dizziness, and headaches. Prolonged exposure can lead to more serious health concerns. If the odour is strong or widespread, avoid using open flames until you’ve identified the source.
Sometimes, simple fixes can address the problem. Running water through unused drains or checking for a loose toilet seal can often resolve minor issues. But if the smell lingers or affects multiple drains, it’s time to call in a licensed plumber. More complex problems, like symptoms of a broken sewer line or blocked vents, require professional tools such as camera inspections or smoke testing.
For over 20 years, POM Plumbing Service Company has been helping homeowners and property managers in Toronto and the GTA solve plumbing issues at their root. Our licensed plumbers use advanced diagnostic tools to tackle problems efficiently. Don’t wait – address persistent sewage odours promptly to avoid unnecessary stress, costs, and potential health risks.
FAQs
How can I tell if the smell is sewer gas or something else?
Sewer gas smells tend to stick to a specific drain or room, often near a dry P-trap. The odour can get worse when water is running or the plumbing system is active. Sewer gas contains hydrogen sulfide and methane, both of which can be harmful at high levels. If you’re unsure about the source, check nearby drains and watch for these signs to pinpoint the problem.
Why does the sewage smell get worse at night or on windy days?
Sewage odours often seem stronger at night or during windy conditions. This happens because changes in air pressure and atmospheric conditions can make it easier for gases from your plumbing system to escape. Blocked or damaged vents, as well as cracks in pipes, can worsen the problem. Checking your plumbing system and fixing any issues quickly can help keep these unpleasant smells under control.
Is it safe to stay in the house while waiting for a plumber?
If you suspect a sewer gas leak or notice signs of a sewer backup, staying in the house can be dangerous. Sewer gas exposure poses serious health risks. It’s safer to leave the premises and wait for professional help to address the problem. Your safety should always come first.
Water damage is costly and preventable. Proper drainage systems protect your home by directing water away from vulnerable areas, reducing risks like foundation cracks, basement flooding, and mould growth.
Here’s what you need to know:
Damage Costs: Ignoring drainage issues in Ontario can lead to repair bills averaging over $8,000.
Key Risks: Water intrusion causes 90% of foundation damage, worsened by the region’s clay-heavy soils and freeze-thaw cycles.
Types of Systems: Surface drains, French drains, and stormwater systems manage rainwater, wastewater, and groundwater effectively.
Maintenance Tips: Regularly clean gutters, inspect catch basins, and ensure water flows at least 1.8–3 metres away from your home.
Signs of Trouble: Watch for pooling water, soggy lawns, musty basement smells, or foundation cracks.
Act early to avoid expensive repairs. If you’re in Toronto or the GTA, professional services like POM Plumbing can assess, repair, or upgrade your system to keep your property safe year-round.
Keep Water OUT of Your House: Installing a Landscape Drain – The Great Outdoors 6701
sbb-itb-1e3c609
What Is a Drainage System?
A drainage system is essentially a network of pipes, drains, and other infrastructure that manages and redirects excess water – whether it’s from rainfall, groundwater, or wastewater. Its main purpose is to protect your property from issues like flooding, erosion, and structural damage. By directing water away from vulnerable areas, it ensures your home or business stays safe and dry.
Most systems use gravity to move water downhill and away from buildings. However, in Ontario’s flatter or low-lying regions, pumps are often used to give gravity a helping hand.
Types of Water Managed by Drainage Systems
Drainage systems are designed to handle three main types of water:
Rainwater: Collected by gutters, catch basins, and roof surfaces, it’s channelled through underground pipes to natural outlets like rivers or municipal storm drains.
Wastewater: This includes water from sinks, toilets, and appliances. In urban areas, it flows through sanitary sewers to treatment plants, while rural properties rely on septic systems to process it before returning it to the environment.
Groundwater: Managed through subsurface drainage systems, such as perforated pipes buried 1 to 1.5 metres deep. These pipes lower the water table and keep excess moisture away from soil and foundations.
How the System Works
A drainage system’s components work together to manage water efficiently. Surface features like gutters, trench drains, and catch basins handle the initial collection of water. Subsurface elements, including French drains, lateral pipes, and sump pumps, take over from there, managing water beneath the ground. Finally, outfalls serve as the system’s exit points, releasing the collected water into ditches, watercourses, or municipal systems.
"A well-functioning drainage system is essential for keeping homes, businesses, and communities safe, dry, and healthy." – Shawn Ashworth, Owner and Operator, BEST Plumbing and Drainage Contractors
Pro Tip: Keep a Drainage Plan Handy
It’s a smart idea to keep a detailed drainage plan with your property documents. This plan should show the location of lateral drains, outfalls, and surface inlets. If you ever experience a problem or plan renovations, this document can save you a lot of time and money.
Types of Drainage Systems
Different drainage systems are designed to target specific water sources, and most properties rely on a combination of them to ensure thorough water management.
Surface Drainage Systems
Surface drainage is the most noticeable type. It involves shallow ditches, swales, and proper lot grading to direct rainwater and snowmelt toward a main drain. On paved areas, channel drains collect runoff before it can pool or seep into structures.
To keep swales functioning properly, avoid obstructing them with dirt, rocks, shrubs, or trees. These can block water flow and increase the risk of flooding.
Subsurface Drainage Systems
While surface drainage handles visible water, subsurface systems tackle water underground. A French drain is a common example. This system consists of a perforated pipe placed in a gravel-filled trench and wrapped in geotextile fabric to prevent soil from clogging it. As the water table rises, groundwater enters the pipe from below and is safely carried away from the foundation.
When installing a French drain, ensure that the perforated holes in the pipe face downward. This orientation allows groundwater to flow naturally into the pipe as it rises.
Slope and Gutter Drainage
Slope and gutter drainage focus on managing water from roofs and sloped surfaces. Gutters collect rainwater along the roofline and channel it down through downspouts. From there, splash blocks or underground extensions guide the water away from the foundation. On sloped terrain, slope drain pipes are installed at an incline to direct water downhill, keeping it from pooling near walls or foundations.
Regular maintenance is key for these systems. Clean gutters and downspouts twice a year – once in the spring and again in the fall – to prevent blockages that can lead to water overflowing directly against your home’s foundation.
Stormwater Drainage Systems
Stormwater systems are designed to handle intense rainfall. Catch basins, which are box-like structures with grates, are placed in low areas to capture large amounts of runoff quickly. These basins filter out debris and redirect water into municipal storm lines.
"A proper drainage system prevents water from pooling around the foundation, preventing cracks, shifting, and costly structural damage." – Vodaland
To keep stormwater systems functioning during Ontario’s spring thaw and summer storms, clear catch basin grates and inspect inlets regularly, especially in the spring and fall.
Why Proper Drainage Systems Are Important
Proper drainage isn’t just about keeping water off your property – it plays a crucial role in protecting your home’s structure and maintaining indoor safety. Without an effective system, water can seep into foundations, walls, and living spaces, causing damage that can be costly to repair.
Protecting Building Foundations
A well-designed drainage system helps reduce hydrostatic pressure and prevents water from seeping into porous materials, which can weaken foundations and lead to damp interiors. In Canada, the freeze-thaw cycle adds extra challenges. When water pools and freezes, it expands, potentially cracking or lifting driveways, patios, and foundation walls. Addressing drainage issues early can save up to 70% on repair costs.
By protecting the foundation, you also help guard against internal water damage.
Preventing Water Damage
When drainage systems fail, water doesn’t stay outside – it finds its way into basements and crawl spaces, causing rot, staining, and even structural issues like sagging floors. Features like perimeter drains and properly extended downspouts can redirect water before it reaches your home. Experts recommend extending sump pump discharge pipes and downspouts 1.8 to 3 metres (6 to 10 feet) from the foundation to avoid water pooling near the house.
Proper drainage also plays a big role in controlling indoor moisture levels, which is key for preventing mould.
Reducing Mold and Mildew Growth
Mould thrives in damp environments, and it can start growing within 24 to 48 hours of water exposure in areas like basements or crawl spaces. Since around 50% of indoor air comes from crawl spaces, mould growth under your floors can directly impact your home’s air quality. High humidity – anything above 60% – creates the perfect conditions for mould and mildew. Prolonged exposure to these can lead to health issues, including respiratory problems and chronic fatigue.
"Water-damaged areas and materials should be cleaned and dried within 24–48 hours to help prevent mold growth after crawl space water intrusion." – U.S. Environmental Protection Agency (EPA)
Preventing Soil Erosion
Runoff doesn’t just carry water – it often takes soil along with it. Over time, this erosion can destabilize patios, retaining walls, and sidewalks. Proper drainage systems slow water flow and help preserve topsoil. In areas with clay-heavy soils, like parts of Ontario and the Fraser Valley, water drains more slowly, increasing the risk of erosion. Solutions in these regions often need to account for the soil’s low permeability to effectively manage runoff.
Improving Property Safety
Standing water isn’t just inconvenient – it can be dangerous. Wet surfaces like walkways and driveways can become slippery, especially when overnight temperatures cause water to freeze – a common issue in Canada from late autumn through early spring. Pooled water can also attract mosquitoes, which only need shallow water to breed. By keeping surfaces dry and ensuring water flows away from problem areas, proper drainage helps reduce these risks, enhancing safety for everyone using your property.
Signs of Poor Drainage Around Your Property
Drainage issues often sneak up on homeowners, developing over time and causing damage that may go unnoticed until it becomes costly to fix. Spotting the warning signs – both outside and inside your home – can help you address problems before they escalate.
Outdoors, keep an eye out for standing water near your foundation after a rainfall. If puddles linger for more than one or two hours, it could point to poor grading or slow-draining soil. Other red flags include soft, soggy patches in your lawn, erosion grooves in your soil or mulch, and gravel washing away from your driveway. Water should naturally flow away from your home, so if you see soil pulling away from the foundation, it could indicate settling and a drainage slope directing water inward.
Indoors, watch for musty smells in the basement, water stains, or white, powdery deposits (efflorescence) on your foundation walls – these are signs of ongoing moisture issues. Cracks in the foundation, especially horizontal or stair-step ones, may indicate pressure from saturated soil. Additionally, sagging floors or slow-draining sinks could point to structural or plumbing problems lurking beneath the surface.
A helpful way to assess your property is by conducting a rain audit. Walk around your home during or right after a heavy rainfall to observe how water flows and identify areas where it pools. In provinces like Ontario, the combination of snowmelt and spring rains from April to June often highlights drainage trouble spots. If you notice the same soggy areas appearing every spring, it’s a clear sign of an ongoing drainage issue.
Experts agree that recurring seasonal issues are often tied to the natural behaviour of the site rather than isolated weather events. As Jaspreet Singh, P.Eng., from Soil Engineering Ontario, explains:
"Seasonal recurrence usually means the issue is part of the site behaviour, not just a one-time weather event."
The stakes are high when it comes to water intrusion, which is responsible for 90% of foundation damage. In Ontario, drainage repairs average over $8,000. However, addressing problems early can save you significant money. For instance, a simple re-grading job might cost as little as $500, while delaying repairs could lead to much more expensive waterproofing projects. Early detection through a rain audit can make all the difference in protecting your property.
Common Causes of Drainage Problems
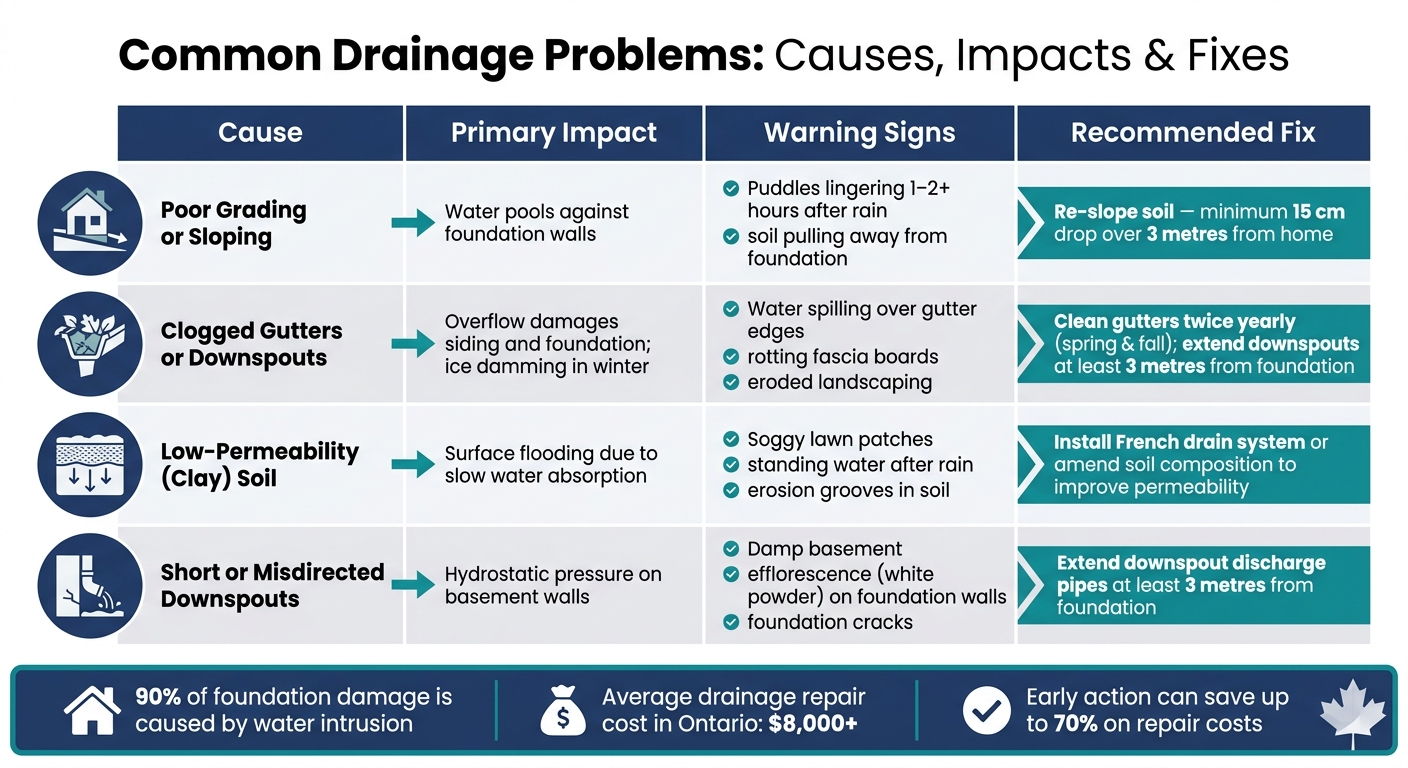
Common Drainage Problems: Causes, Impacts & Fixes
Getting to the root of drainage issues is the first step in resolving them effectively. Most problems stem from a handful of common causes, which makes identifying and addressing them more manageable. These causes often align with the warning signs discussed earlier and play a key role in maintaining proper drainage around your home.
Poor Grading or Sloping
The slope of the ground around your home, known as grading, is crucial for directing water away from the foundation. Ideally, the soil should slope down by at least 15 centimetres over a distance of 3 metres from your home. If the slope is too shallow or uneven, water tends to collect against the foundation walls instead of flowing away.
Grading issues often develop gradually. Over time, soil naturally settles, and in Canada, repeated freeze–thaw cycles can shift the ground enough to undo proper grading. This can create conditions where water flows toward your foundation rather than away. As one drainage contractor explains, "in sloped yards or improperly graded landscapes, water can flow toward the foundation instead of away from it". Re-grading the area promptly can save you from more extensive and costly repairs down the road.
Clogged Gutters or Downspouts
Gutters and downspouts play a vital role in managing rainwater, but they’re prone to blockages from leaves, twigs, and even granules from asphalt shingles. When clogged, water spills over the gutter edges, landing right at the base of your home. This not only saturates the foundation but can also lead to problems like rotting fascia boards, eroded landscaping, and, in winter, ice damming. Michael DiMartino, Senior Vice President of Installations at Power Home Remodeling, highlights the risks:
"Ice damming, the process of water thawing and refreezing on the roof, can be a major culprit behind home leaks."
To avoid these issues, clean your gutters twice a year – once in the spring and again in the fall. Also, make sure your downspouts direct water at least 3 metres away from your foundation.
Low-Permeability Soil
The type of soil surrounding your home can significantly impact drainage. Clay-heavy soils, which are common in areas like Ontario and the Prairies, absorb water very slowly. During heavy rains, this slow absorption can cause water to pool on the surface or run off too quickly. Combined with poor grading or short downspout extensions, this can lead to serious drainage problems.
Cause
Primary Impact
Recommended Fix
Poor Grading
Water pools against foundation walls
Re-slope to create a 15 cm drop per 3 m
Clogged Gutters
Overflow damages siding and foundation
Clean twice a year; consider gutter guards
Clay Soil
Surface flooding due to slow absorption
Add French drains or amend soil composition
Short Downspouts
Hydrostatic pressure on basement walls
Extend downspouts at least 3 metres
In areas with clay-heavy soil, enhancing drainage is crucial. This might involve installing a French drain system or improving soil composition to boost permeability. By understanding these common causes, you can take proactive steps to maintain effective drainage and protect your home.
How to Maintain a Drainage System
Understanding what causes drainage problems is just the beginning – regular maintenance is what truly protects your home. Thankfully, keeping up with drainage maintenance is simple, requiring only basic tools. This routine care works hand in hand with the design and installation practices mentioned earlier.
Cleaning Gutters and Downspouts
Gutters and downspouts play a key role in preventing water damage, but they can only do their job if they’re kept clean. Aim to clean them twice a year – once in the spring and again in late October after most leaves have fallen.
Make sure your downspouts direct water at least 2 metres away from your home’s foundation. If they discharge closer, it increases the risk of soil saturation right against your basement walls. In the fall, disconnect rain barrels and redirect overflow hoses to prevent ice buildup near your foundation during freeze–thaw cycles. Keeping your gutters in good shape lays the groundwork for inspecting the rest of your drainage system.
Inspecting Drainage Components
Cleaning is just one part of the equation – regular inspections are crucial to ensure every part of your drainage system is working properly. This includes checking catch basins, grates, silt boxes, and outfall pipes. For most systems, inspect catch basins and storm drains every three months, but if your property has heavy tree coverage or high traffic, monthly checks are better.
When inspecting, watch out for these red flags:
Reddish-orange slime inside outfall pipes, which signals iron ochre – a bacterial buildup that can clog openings quickly.
Small holes or depressions in the soil above drain lines, known as "blowouts" or "wash-ins", which could mean a pipe is broken and allowing sediment into the system.
Foul odours near grates or basins, often a sign of organic buildup that needs to be cleared.
Additionally, consider installing metal rodent guards on all outfall pipes to keep animals from getting inside.
Monitoring Water Flow
Another essential maintenance step is monitoring how water flows during rainfall. This simple practice can help identify issues early, saving you money and headaches. Watching your property during a rainstorm is one of the easiest ways to see where water collects, moves too quickly, or flows toward your home instead of away from it.
Take note of areas where water pools for more than 1–2 hours or where erosion grooves appear in the soil or mulch. Catching these issues early can reduce repair costs by as much as 70%.
When to Upgrade or Repair a Drainage System
Sometimes, regular upkeep just isn’t enough to keep a drainage system working properly. While cleaning gutters or checking water flow can handle minor issues, there are moments when more serious intervention is needed. Knowing when to call in a professional can save you from costly repairs later.
Recurring Water Pooling
If water consistently pools near your home’s foundation for more than an hour or two after rain or snowmelt, it’s a sign your system is either overwhelmed or failing. This isn’t just a one-off problem – it’s likely tied to deeper issues like slow-draining clay soil, high groundwater levels, or an inadequate drainage setup. If simple fixes like extending downspouts or regrading the area don’t solve the issue, it’s time to bring in a professional. Persistent water pooling can lead to significant problems for your home’s foundation, including cracks and soil erosion.
Foundation or Erosion Problems
Visible foundation cracks, especially horizontal or stair-step ones, are a red flag. Other warning signs include soil pulling away from the base of your home or a damp basement. Erosion channels cutting through your yard or garden beds suggest that water is bypassing your drainage system altogether. Since water intrusion is the leading cause of foundation damage, addressing these issues early can save you a lot of money. For instance, spending $500 on re-grading in the spring could prevent a $15,000 waterproofing project down the line.
Damaged or Undersized Systems
Older drainage systems, especially those made with clay or cast-iron pipes, are prone to corrosion and eventual collapse. Additionally, systems that weren’t designed with your property’s slope, soil type, or runoff volume in mind might simply be too small to handle the job. Warning signs include small sinkholes (blowouts) above drain lines or sediment appearing in outfall pipes. If the cost to repair your system is more than 70% of the price of a new installation, replacement is usually the smarter option. In Ontario, ignoring drainage problems can cost homeowners upwards of $8,000 on average.
To tackle these challenges, professionals use advanced tools to assess the situation. For example, POM Plumbing Service Company employs equipment like camera inspections and moisture metres to identify failing components and recommend the best solutions.
Professional Drainage Solutions for Homeowners
Sometimes, regular maintenance just isn’t enough to tackle drainage issues. That’s when calling in the experts becomes a must. For over 20 years, POM Plumbing Service Company has been a trusted name for homeowners in Toronto and the Greater Toronto Area (GTA), offering services that range from routine drain cleaning to advanced flood prevention systems.
POM Plumbing covers a wide variety of drainage solutions. Their services include the installation and repair of backwater valves, sump pumps, French drains, and weeping tiles, all designed to protect basements from flooding. When it comes to diagnostics, they rely on tools like sanitary drain camera inspections, leak detection, and pressure testing to identify hidden problems such as corroded pipes or damaged sewer lines. To ensure smooth operation, they also offer professional drain cleaning using methods like snaking, power flushing, and catch basin cleaning.
One major advantage of hiring a licensed plumber is the potential to save money through rebates. For instance, Toronto homeowners who install backwater valves or sump pumps under the city’s Basement Flood Protection Program can qualify for subsidies – but only if the work is done by a certified professional. This not only helps offset installation costs but also ensures the work meets safety and quality standards, adding an extra layer of confidence.
"POM was prompt, courteous and thorough. We would recommend to anyone. After calling on a Sunday and receiving a quote on Monday, the backwater valve installation was completed the following Monday, with the necessary building permit issued." – Trisha Grant
POM Plumbing stands out with its upfront pricing, no overtime charges, and a 1-year warranty on labour. They also offer free inspections and no-obligation quotes for repair and restoration work. In emergencies, their team is available 24/7 across the GTA – including Mississauga, Brampton, Vaughan, Markham, and Scarborough – to handle flooding and water extraction. For those looking to avoid costly repairs down the line, POM provides service contracts for regular pipe diagnostics and maintenance, helping homeowners stay ahead of potential problems.
Conclusion: Keep Your Property Protected with Good Drainage
A reliable drainage system does more than manage water – it protects your home’s foundation, prevents expensive repairs, reduces the risk of mould, and keeps your landscaping intact. Ignoring signs like slow-draining water or soggy patches can quickly lead to serious issues, such as cracked foundations or basement flooding.
The secret to avoiding these problems? Regular maintenance. Catching drainage concerns early makes them much easier (and cheaper) to address. Simple steps like inspecting your system in spring and late fall, clearing gutters, and cleaning catch basins annually can make a world of difference. As the Ontario Ministry of Agriculture, Food and Agribusiness wisely notes:
"A subsurface drainage system is a significant financial investment. There is no better way to protect that investment than with regular and proper inspection and maintenance of the system."
Sometimes, though, professional help is unavoidable. Persistent pooling, recurring foundation problems, or ongoing system failures call for expert attention. Acting quickly can save you from even bigger headaches down the road. If you’re in Toronto or the GTA, POM Plumbing Service Company is available 24/7 to assess, repair, or upgrade your drainage system. Taking action now can protect not just your property, but also your peace of mind for years to come.
FAQs
Do I need a French drain or just regrading?
Whether you should opt for regrading or a French drain depends on the specific drainage problems your property faces.
Regrading involves adjusting the slope of the soil to guide surface water away from problem areas. This solution works well if water is pooling on the surface due to improper grading. On the other hand, a French drain is designed to handle water beneath the surface. It uses perforated pipes surrounded by gravel to collect and redirect underground water.
If surface water pooling is your primary concern, regrading might be all you need. However, if subsurface water is causing issues, a French drain could be the better choice. For the best outcome, it’s wise to consult a professional who can assess your property and recommend the right solution.
Who’s responsible for stormwater on my property?
As a property owner, it’s your responsibility to manage stormwater on your property. This means having proper drainage systems in place, like surface drains, sloped landscaping, and gutter systems. These systems help direct surface water runoff properly, reducing the risk of water damage or erosion.
What permits or rebates apply for sump pumps or backwater valves in Toronto?
Currently, there aren’t any specific permits or rebates listed for sump pumps or backwater valves in Toronto based on the information provided. To get the most accurate and current details, it’s best to check local municipal guidelines or reach out to the City of Toronto directly.
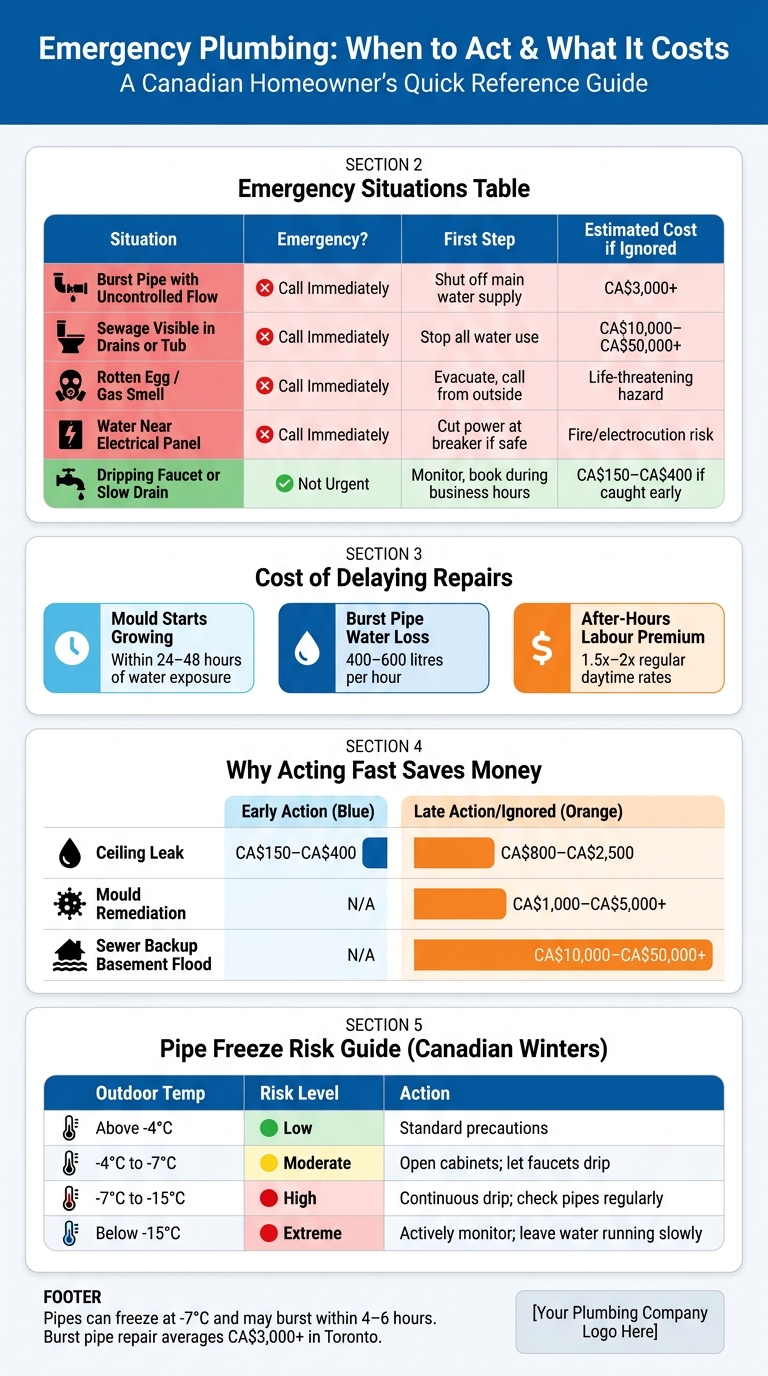
When plumbing emergencies strike, quick action can save you from costly damage and stress. From burst pipes to sewer backups, knowing what to do in a plumbing emergency can make all the difference. Here’s a summary of key takeaways to help you stay prepared:
Burst Pipes: Shut off the main water supply immediately. Frozen pipes are a common issue in Canadian winters.
Overflowing Toilets: Turn off the toilet’s supply valve and avoid flushing again.
Sewer Backups: Stop all water use and call a plumber right away. Check your insurance for sewer backup coverage.
Water Heater Failures: Turn off the water and power supply to the heater if it’s leaking or malfunctioning.
Gas Leaks: If you smell gas, evacuate your home and call 911 or your utility provider from a safe location.
Turn off electricity if water is near outlets or appliances.
Document damage for insurance claims.
Contact a licensed, insured emergency plumber.
Acting fast can minimize damage and reduce repair costs. Don’t wait for problems to worsen – routine maintenance and a trusted plumber’s contact info can save you time and money.
Plumbing emergencies often catch you off guard. Whether it’s a sudden leak or an unpleasant odour, these situations demand immediate attention. Let’s break down some of the most common scenarios you might face.
Burst Pipes
Burst pipes can wreak havoc on your home, especially in Canada, where freezing temperatures are a major culprit. When water freezes, it expands, putting pressure on pipes until they crack. Thawing can worsen the issue, causing sudden splits. Other factors like old piping materials or high water pressure can also lead to bursts.
Signs to watch for include water stains on walls or ceilings, a sudden drop in water pressure, or no water flow at all. If you suspect a frozen pipe, turn off the main water supply right away to minimize damage.
"Stopping a heavy leak should take precedence over not having water for a little while." – David Balkan, CEO, Balkan Sewer And Water Main
Overflowing Toilets
Few things escalate faster than an overflowing toilet. The first step is to locate the supply valve behind the toilet and turn it clockwise to stop the water. If you can’t access the valve, lift the tank lid and press down on the rubber flapper to prevent more water from entering the bowl.
Avoid flushing again when the water level is high – it can make the situation worse. If only one toilet is affected, the issue may be isolated. But if multiple fixtures are backing up, it could signal a larger problem in the plumbing system.
Severe Drain Clogs
When multiple drains back up at the same time, it’s a clear sign of an emergency. In older Toronto areas like East York and Leaside, tree roots often invade aging clay pipes. Grease buildup and heavy rainfall can also overwhelm drainage systems.
Skip the chemical drain cleaners – they rarely address the actual problem and can harm older pipes. Stop using water fixtures immediately and call a plumber. Sewer line camera inspections, which typically costs CAD $200–$400 in Toronto, can pinpoint the blockage.
Sewer Line Backups
A sewer backup is one of the messiest and most expensive plumbing emergencies. Warning signs include sewage odours indoors, gurgling drains, or raw sewage coming up through floor drains or toilets. If this happens, stop all water use immediately.
Damage from sewer backups can be severe, especially in finished basements. Homeowners in Toronto should review their insurance policies, as many don’t automatically cover sewer backups. Adding this coverage usually costs between CAD $50 and CAD $150 annually. Additionally, the City of Toronto offers subsidies of up to CAD $3,400 through its Basement Flooding Protection Subsidy Program for backwater valve installations, which can help prevent future issues.
Water Heater Failures
Water heater problems range from losing hot water to active leaks or even a tank rupture. If you spot water pooling around the unit, hear unusual sounds like popping or rumbling, or notice discoloured water, act quickly.
Turn off the cold water supply valve at the top of the tank. For gas water heaters, switch to the "pilot" or "vacation" setting; for electric ones, shut off the breaker. Avoid trying to move or drain a severely damaged tank on your own.
Gas Line Plumbing Emergencies
A gas leak is a serious safety hazard. If you smell something like rotten eggs or sulphur near appliances or gas lines, leave your home immediately, leaving the door open behind you, and call 911 or your gas utility from outside. Don’t try to investigate, use switches, or even operate your phone until you are safely away from the building.
Major Water Leaks
Major water leaks – those spreading across floors, soaking walls, or coming from supply lines – can cause severe structural damage and lead to mould growth within 24 to 48 hours. If the leak is too large to control with a towel or by shutting off a local valve, turn off the main water supply and contact a licensed plumber as soon as possible.
What to Do Before the Plumber Arrives
Taking prompt action can help keep a plumbing issue from spiralling into a bigger, more expensive problem.
Shut Off the Main Water Supply
In most plumbing emergencies, your first move should be to stop the water flow. Find your main shut-off valve, which is typically located where the water enters your house. For a ball valve, turn it a quarter-turn so the lever is perpendicular to the pipe. For a gate valve, twist it clockwise until it stops. After shutting off the main supply, open a low-level tap to drain any leftover water and relieve pressure. If the problem is isolated to a specific fixture, use the shut-off valve behind it instead. Make sure every adult in your home knows where the main valve is and how to use it.
Turn Off Electricity If Needed
Water and electricity don’t mix – ever. If water is seeping near outlets or electrical panels, head to your breaker box and cut the power to the affected area. This is especially important in spaces with appliances like washing machines, dishwashers, or water heaters. If the water heater is part of the issue, you may also need to turn off the gas supply. To do this, rotate the gas valve 90° so it’s perpendicular to the pipe. And whatever you do, don’t step into standing water until you’re absolutely sure the power is off.
Contain Water and Document Damage
Grab buckets, towels, or anything that can help contain the water, and move valuable items out of harm’s way. Before cleaning up, take detailed photos and videos of the leak, any standing water, and any damaged items. This documentation is essential for insurance claims. Don’t throw away damaged materials until an insurance adjuster has inspected them, and keep all receipts for emergency repairs or temporary accommodations. When the plumber arrives, let them know what steps you’ve already taken – like which valves you shut off or whether the gas or electricity was turned off. This information can help speed up the repair process.
How to Prevent Plumbing Emergencies
Skipping regular maintenance can lead to plumbing disasters. By adopting a few simple habits throughout the year, you can keep your pipes, drains, and water heater functioning smoothly – and avoid the costly emergencies we mentioned earlier.
Insulate Pipes Before Winter
Canadian winters are notoriously harsh on plumbing. Pipes can freeze at -7°C, and if left unprotected, they might burst within 4–6 hours. In Toronto, fixing a burst pipe can cost over CA$3,000, but with proper precautions, you can avoid this expense. Focus on insulating pipes in unheated spaces like basements, crawl spaces, garages, and exterior walls. Foam pipe insulation sleeves are budget-friendly, costing about CA$2–CA$5 per 6-foot section, while electric heat tape for higher-risk areas costs CA$30–CA$100. Seal any gaps around pipes with caulk or spray foam to block drafts, and keep your thermostat set to at least 13°C – even if you’re away. When temperatures dip below -15°C, let faucets connected to exposed pipes drip slightly to keep water moving and reduce pressure.
Outdoor Temperature
Risk Level
Recommended Action
Above -4°C
Low
Ensure heat tape works; follow standard precautions
-4°C to -7°C
Moderate
Open cabinet doors; let faucets drip
-7°C to -15°C
High
Maintain a continuous drip; check pipes regularly
Below -15°C
Extreme
Actively monitor pipes; leave water running slowly
Keep Drains Clean and Clear
Clogs don’t happen overnight – they’re the result of grease, hair, soap scum, and debris building up over time. To prevent severe blockages or even sewer backups, pay attention to what goes down your drains. Avoid pouring cooking grease down the sink, use a hair catcher in the shower, and never flush so-called "flushable" wipes, which can cause serious issues. Sewer backups account for 15% of summer plumbing emergencies, with basement floods causing damages ranging from CA$10,000 to over CA$50,000 when mould remediation and structural repairs are factored in. Keep in mind that standard home insurance doesn’t typically cover sewer backups unless you’ve added a specific endorsement, so it’s worth checking your policy.
Investing in professional drain cleaning can also help. In cities like Toronto, this service usually costs between CA$100 and CA$300 – a small price compared to the expense of fixing a major backup.
Inspect and Maintain Your Water Heater
Water heaters often go unnoticed until they break down, yet they’re responsible for 12% of winter home emergencies. Replacing one can cost anywhere from CA$3,000 to CA$5,000, including installation. To avoid this, check your water heater regularly for leaks, corrosion, or strange noises – these can be early signs of trouble. If your water isn’t heating as well as it used to or your energy bills are creeping up, it could mean the appliance is losing efficiency. Scheduling a professional inspection every fall ensures your water heater is ready for the high-demand winter months and helps you avoid unexpected breakdowns.
Plumbing Tools Every Homeowner Should Keep on Hand
Having the right tools on hand can make all the difference during a plumbing emergency. While you may not be able to fix major issues, these essentials can help you minimize damage until a licensed plumber arrives.
Adjustable Wrench and Plumber’s Tape
An adjustable wrench is a must-have for tightening fittings, shutting off valves, or even turning off the gas supply at the meter. A standard 8- or 10-inch wrench, priced between CA$10 and CA$30, is sufficient for most household plumbing tasks.
Plumber’s tape – also known as PTFE or Teflon tape – provides a temporary watertight seal for threaded pipe connections. This can help slow or stop minor leaks until repairs are made. To apply, wrap the tape clockwise around the pipe threads 3 to 5 times so it tightens as the fitting is screwed on. A roll costs just CA$1 to CA$4, making it a budget-friendly addition to your toolkit.
When leaks occur, everyday household items can also help you manage the situation.
Buckets and Towels
Buckets and towels are invaluable for containing leaks. Place a bucket under an active drip or, if water is pooling behind a ceiling bulge, poke a small hole in the centre to drain the water into a bucket below. This simple step can prevent the ceiling from collapsing under the weight. A 5-gallon bucket, costing CA$5 to CA$10, is easy to store and ready when you need it.
Heavy towels are perfect for soaking up spills or creating makeshift "dams" to redirect water away from sensitive areas like electrical outlets, baseboards, or furniture. Quick action here can protect your home from structural damage and prevent a minor leak from escalating into a major renovation project.
Wet/Dry Vacuum
For larger amounts of standing water, a wet/dry vacuum is far more efficient than towels. It’s a powerful tool for removing water from floors, carpets, and tight spaces, which is crucial since mould can start growing within 24 to 48 hours of water exposure. Home-use models typically hold 5 to 12 gallons and range in price from CA$50 to CA$150.
Before using a wet/dry vacuum for water, always remove the paper filter to avoid damage. If water has reached outlets, appliances, or your electrical panel, shut off power at the breaker box before operating the vacuum. Safety should always come first.
"Do not use electrical appliances near standing water – this includes fans, shop vacs, and space heaters until the area is confirmed safe by a professional." – HYDROPRO
When to Call an Emergency Plumber
Emergency Plumbing Situations: When to Act & What It Costs
Once you’ve taken steps to manage the situation, it’s important to know when it’s time to bring in a professional. While not every plumbing issue needs immediate attention, some problems simply can’t wait.
Burst Pipes or Uncontrolled Leaks
If shutting off the local valve doesn’t stop the water, it’s time to call an emergency plumber. A burst pipe can release a staggering 400 to 600 litres of water every hour, which can quickly damage floors, walls, and even lead to mould. Uncontrolled leaks – like a water meter running even when no taps are open, unexpected warm spots on the floor, or a sudden drop in water pressure – could point to hidden issues such as slab or underground leaks. These need to be addressed immediately to prevent further damage.
Sewage Backups or Gas Odours
If multiple drains are gurgling, backing up, or you see sewage in a bathtub or floor drain, stop all water use and call an emergency plumber right away. Sewage isn’t just unpleasant – it carries harmful bacteria and pathogens that can pose serious health risks.
A rotten egg smell is a clear sign of a natural gas leak. In this case, avoid using light switches, phones, or even starting your car in the garage.
"Gas leaks are a ticking time bomb. If you smell gas, don’t delay! Call a professional plumber who can detect the source of the leak and fix it right then and there." – Transou’s Plumbing & Septic
Evacuate the building immediately, and once you’re at a safe distance, call your gas utility company and an emergency plumber. Similarly, water heater issues or electrical hazards should never be ignored and require professional help as soon as possible.
Water Heater or Electrical Risks
If your water heater is leaking heavily, making strange rumbling or popping noises, or has stopped producing hot water during extremely cold weather, it’s time to call a plumber – especially if your household includes elderly residents or young children. For gas-powered units, shut off the gas valve before making the call if you notice active leaks.
Water near electrical panels is a serious safety hazard, with risks of fire or electrocution. If it’s safe and you’re not standing in water, shut off power at the breaker box first, then call an emergency plumber immediately.
Situation
Emergency?
First Step
Burst pipe with uncontrolled flow
Call immediately
Shut off main water supply
Sewage visible in drains or tub
Call immediately
Stop all water use immediately
Rotten egg / gas smell
Call immediately
Evacuate, call from outside
Water near electrical panel
Call immediately
Cut power at breaker if safe
Dripping faucet or slow drain
No
Monitor, book during business hours
The Cost of Ignoring Plumbing Emergencies
Overlooking a plumbing emergency does more than just allow the problem to linger – it amplifies both the damage and the financial burden. What starts as a minor issue, like a small leak, can spiral into a much bigger and more expensive problem.
Water Damage and Mould Growth
Water has a way of making things worse quickly. Once it escapes, it seeps into structures, causing damage within hours. And if left unchecked, mould can start growing on porous surfaces in just 24–48 hours.
"A ceiling leak that’s ignored becomes a mould problem within 24–48 hours. Act fast." – RenoHouse Team
When mould takes root, the issue becomes more than just fixing a plumbing problem. Professional mould remediation can cost anywhere from CA$1,000 to CA$5,000+, and that’s on top of the structural repairs that will likely be required. Health Canada emphasizes the importance of addressing mould quickly, stating, "Mould can affect indoor air quality and should be addressed by controlling moisture and fixing leaks promptly".
Repairs Get Harder and More Expensive Over Time
Delaying plumbing repairs doesn’t just allow the problem to grow – it makes the repairs more complicated and costly. For instance, a slow leak under a sink can warp cabinet floors and weaken drywall, turning what could have been a simple repair into a full cabinet replacement. Similarly, a ceiling leak left unchecked might escalate into a major overhaul costing CA$800–CA$2,500, compared to a quick patch job that would have been CA$150–CA$400 if addressed early.
Insurance often covers sudden damage but typically excludes issues caused by gradual leaks. Ignoring repairs can even void your insurance claims. On top of that, waiting until the problem becomes an emergency means paying higher after-hours labour rates – 1.5 to 2 times more than regular daytime rates.
Health and Safety Risks
The risks of ignoring plumbing problems extend beyond your wallet. Sewage backups can spread harmful bacteria, while stagnant water near electrical systems poses serious shock and fire hazards. These dangers, combined with escalating repair costs, highlight the importance of acting immediately to prevent further damage and ensure safety.
How to Choose a Reliable Emergency Plumbing Service
When a pipe bursts in the middle of the night or sewage backs up on a long weekend, you don’t have the luxury of time to browse through endless options. Being prepared and knowing what to look for ahead of time can save you from unnecessary stress.
Understanding common emergencies and the steps to take immediately can help you choose a service you can count on.
Check for Licensing and Insurance
In Ontario, plumbers are required to have a provincial licence to legally work on your home. Before agreeing to any repairs, ask to see their credentials. On top of licensing, insurance is essential. This protects you from any liability if something goes wrong during the job. A dependable plumbing service will carry at least CA$2 million in liability insurance and have Workers’ Safety and Insurance Board (WSIB) coverage. If a contractor is unwilling to provide this information, consider it a red flag.
Look for 24/7 Availability and Transparent Pricing
Just because a company advertises 24/7 service doesn’t mean they always have a plumber ready to respond. Some rely on answering services, leading to delays of up to two hours. To avoid this, confirm they have someone on call who can respond immediately.
Clear and upfront pricing is another hallmark of a reliable service. A good company will provide a phone estimate, outlining whether materials, callout fees, and taxes are included. They should also clarify if the callout fee will be deducted from the final bill.
"Any plumbing service should be able to give you a rough estimate over the phone before sending someone to your home, giving you the opportunity to shop around for a suitable price." – blogTO
Choose a Plumber Familiar with Local Plumbing Systems
Toronto’s mix of housing – ranging from century-old homes to modern condos – means plumbing issues can vary greatly by neighbourhood. A plumber with extensive experience in the GTA will know how to tackle these unique challenges effectively. They’ll also be familiar with local municipal procedures, which can be crucial in emergencies.
With over 20 years of experience in Toronto and the GTA, POM Plumbing brings this kind of local knowledge to every job, whether it’s a historic home or a newly built high-rise.
Conclusion
Plumbing emergencies often come out of nowhere. A burst pipe or a clogged drain can quickly spiral into a bigger problem, leading to structural damage, mould growth, and weeks of inconvenience. Acting fast is crucial – shutting off the water immediately can save you from a much larger headache.
Staying on top of routine maintenance is one of the best ways to avoid these issues. Simple steps like insulating your pipes before winter, keeping your drains clear, and regularly testing your sump pump can go a long way. But when an emergency does happen, having the contact information of a licensed, insured plumber already saved can make all the difference. During extreme cold snaps (−20°C or colder), plumbers often see call volumes jump 3–5 times higher than usual. By finding and vetting a reliable service in advance, you’ll be prepared to tackle emergencies without unnecessary stress.
FAQs
Where is my home’s main water shut-off valve?
In most Canadian homes, you’ll find the main water shut-off valve in the basement, usually near the front wall where the water line enters the house. Alternatively, it might be in the utility room close to the water heater or furnace. If your home doesn’t have a basement, check the crawl space instead. The valve is typically one of two types: a gate valve with a round handle or a ball valve with a lever handle. Knowing where this valve is located is essential to quickly stop water flow and prevent damage in case of an emergency.
What should I do if I can’t stop a leak with a local shut-off?
If the local shut-off valve fails to stop the leak, turn off the main water supply immediately to prevent further damage. Then, get in touch with a professional plumber as soon as possible for help. Avoid trying to handle complicated repairs on your own, as this might make the situation worse. Acting quickly is essential to address the problem safely and properly.
Will my home insurance cover a sewer backup?
In Canada, home insurance policies generally don’t cover sewer backup damage unless you’ve specifically added it as an endorsement to your policy. This type of coverage isn’t part of standard insurance plans. To know if you’re protected, review your policy details or reach out to your insurer for clarification.
Copper pipes turn green due to a natural chemical reaction with oxygen, moisture, and carbon dioxide, forming a green layer called verdigris. This is usually harmless and even protective in 85% of cases, but the remaining 15% can signal internal corrosion or leaks, which may lead to costly damage if ignored. Key causes include:
High humidity and condensation: Traps moisture, speeding up oxidation.
Water leaks: Localized green buildup, often with white deposits.
Water chemistry: Acidic or high-chlorine water can corrode pipes internally.
Aging systems: Pipes over 30 years old are more prone to corrosion.
Improper installation: Residue from soldering or contact with damp materials.
Most green discolouration is cosmetic, but signs like damp green spots, green-tinted water, or mineral buildup need immediate attention. Regular inspections, controlling moisture, and testing water quality can help prevent issues. If problems persist, consult a professional plumber, especially for older systems or severe corrosion.
How Copper Pipes Turn Green: The 3-Stage Oxidation Process
Copper pipes develop a green coating due to natural chemical reactions. Initially, copper reacts with oxygen, forming copper(I) oxide, which gives the surface a reddish-brown hue. Over time, this oxide reacts further with oxygen, creating copper(II) oxide, which darkens the surface to black. Eventually, the copper(II) oxide interacts with moisture and carbon dioxide, forming copper carbonate – commonly known as verdigris, the green layer often seen on copper surfaces.
Stage
Reaction Components
Resulting Compound
Appearance
1
Copper + Oxygen
Copper(I) Oxide
Red/Brownish
2
Copper(I) Oxide + Oxygen
Copper(II) Oxide
Black
3
Copper(II) Oxide + CO₂ + H₂O
Copper Carbonate (Verdigris)
Green
Alternative
Copper + Chlorine/Salt Water
Copper Chloride
Blue-Green
This green verdigris layer serves as a passivation layer, creating a stable barrier that helps protect the underlying metal by slowing further corrosion. In fact, about 85% of green discolouration found on the exterior of copper pipes is generally harmless. However, while this external layer is mostly benign, internal corrosion poses a more serious concern, which is addressed in the next section.
Common Causes of Green Copper Pipes
There are several reasons why copper pipes develop a green coating, known as verdigris. Each cause has its own characteristics and solutions, so understanding them can help address the issue effectively.
High Humidity and Condensation
Moisture is the primary reason copper pipes turn green. When humid air or condensation settles on the surface of a pipe, it speeds up the oxidation process that leads to verdigris. This is particularly common in areas like basements, crawl spaces, and utility rooms, where poor ventilation traps moisture.
In fact, external moisture is responsible for about 60% of cases involving green discolouration on copper pipes. Pipes located near exterior walls or water heaters are especially prone to this because of temperature differences that promote condensation. Using a dehumidifier or sealing off crawl spaces can help reduce moisture and slow down this process.
Water Leaks
When leaks occur, they often leave behind a concentrated green buildup, typically around joints, fittings, or elbows. Unlike the uniform green coating caused by humidity, this type of corrosion is more localized and often mixed with white mineral deposits.
Pinhole leaks are particularly tricky because the mineral deposits can temporarily seal the hole, hiding the problem until the buildup eventually breaks apart. These leaks account for roughly 15% of green copper pipe cases. If you notice thick green corrosion in a specific area, especially near a fitting, it’s worth investigating further to rule out an active leak.
Water Chemistry Problems
The composition of your water supply can significantly affect how quickly copper pipes corrode. Acidic water (with a pH below 7) is especially harmful, as it eats away at the pipe from the inside, speeding up internal corrosion. Hard water can also accelerate the formation of green copper salts on the pipe’s exterior.
“Acidic water (low pH below 7), high dissolved oxygen, or high chlorine content can corrode copper from the inside.” – Total Mechanical Care
High levels of dissolved oxygen and chlorine in municipal water supplies are also common culprits. If you notice green-tinted water or green stains around sink drains, it could mean copper is leaching into your water – a more serious issue than surface discolouration. The age of your plumbing system can further influence how water chemistry impacts corrosion.
Aging Plumbing Systems
Copper pipes are known for their durability, often lasting 50 years or more, but they don’t last forever. Over time, the protective lining inside the pipes wears down, leaving the metal more vulnerable to corrosion. Older systems are also more likely to have mineral buildup, micro-cracks, and thinning areas that make it easier for corrosion to take hold.
If your home has plumbing that’s several decades old, green discolouration may indicate that the system is nearing the end of its lifespan, rather than being just a cosmetic issue.
Improper Installation
Installation mistakes can worsen corrosion. For example, acidic flux residue left behind at soldered joints is a common issue. If this residue isn’t cleaned off properly after soldering, it reacts with the copper, causing green discolouration around the joint. While this type of corrosion is often just cosmetic, it can hide deeper problems if ignored.
Additionally, pipes installed without proper support or placed in direct contact with concrete or masonry are more susceptible. Materials like concrete and brick retain moisture, which can keep the pipe’s surface damp and accelerate the formation of verdigris over time.
Environmental Factors
External conditions can also speed up green discoloration on copper pipes. High humidity, poor ventilation, air pollution, exposure to cleaning chemicals, and contact with damp building materials can accelerate oxidation. This is why pipes in basements, crawl spaces, laundry rooms, utility areas, or older homes may develop green patina faster than pipes in dry, well-ventilated spaces.
Is Green on Copper Pipes Dangerous?
When it comes to green discolouration on copper pipes, understanding the difference between harmless and hazardous signs is essential. While most exterior green marks are harmless, the situation changes when green appears internally. In fact, 85% of exterior green discolouration is just verdigris, a natural oxidation layer that actually protects the copper. But if you notice green-tinted water or stains around sink drains, this could mean copper is leaching into your water – a potential health risk. Health Canada has set the maximum safe level of copper in drinking water at 1.3 mg/L. If your water exceeds this limit, it’s time to act immediately.
If copper levels in drinking water become too high, some people may experience nausea, vomiting, stomach pain, or gastrointestinal discomfort. The risk depends on the copper concentration, water usage, and individual sensitivity. This is why green-tinted water or blue-green stains around fixtures should not be ignored.
Another warning sign is damp, green buildup on pipes. This often points to a pinhole leak, which can cause serious problems like wood rot, mould growth, and structural damage to walls and floors. Mould, in particular, can lead to respiratory issues for those living in the home.
Here’s a quick guide to help you distinguish between cosmetic issues and more serious concerns:
Sign
What It Likely Means
Action Needed
Light, dry green coating along a long section of pipe
Harmless verdigris (oxidation)
Improve ventilation or reduce humidity
Damp or concentrated green spot
Possible pinhole leak
Professional inspection recommended
Green staining in sinks or green-tinted water
Copper leaching into water supply
Discontinue use; test water chemistry immediately
Dry green rings around soldered joints
Leftover flux residue
Cosmetic issue; monitor for moisture
If you notice dampness near green spots or an unexpected spike in your water bill, these could be signs of a more serious issue. In such cases, a professional inspection is essential. The next section will guide you through the necessary steps to address these problems.
How to Inspect Copper Pipes for Damage
Once you’ve spotted a potential issue – like a damp green patch on a pipe or an unusual spike in your water bill – the next step is a thorough inspection. Fortunately, you don’t need fancy tools to get started. A simple flashlight and a dry paper towel can help you figure out if you’re dealing with a minor concern or something more serious.
Start by visually checking all accessible pipes, especially in areas like basements, crawl spaces, or utility rooms. Pay close attention to green patches on the pipes. If the green is evenly spread, it’s often harmless oxidation caused by external moisture. However, as Total Mechanical Care explains:
“Green on the OUTSIDE of pipes: Usually harmless oxidation from external moisture. Cosmetic in most cases. Green INSIDE pipes or green-tinted water: This is an entirely different, and more serious problem.”
To check for active leaks, press a dry paper towel against any green or crusty spots. If the towel comes away wet, stained blue-green, or if you hear a faint hissing sound near the pipe, you might have a pinhole leak that needs immediate attention.
Take a closer look at soldered joints and fittings. Green rings or halos around these areas are often just leftover flux from the soldering process. But if you see tiny pits or indentations in the metal, it could mean the pipe is starting to weaken. Don’t forget to inspect nearby materials like drywall, nails, or joists for signs of rust, water stains, or mould, which could hint at hidden leaks.
Finally, examine your fixtures and water quality. Stains with a blue-green tint in sinks, tubs, or toilet tanks, or water that tastes metallic when you first turn on the tap, are strong signs of internal pipe corrosion. If these issues show up alongside visible damage to your pipes, it’s time to call a licensed plumber for a detailed evaluation.
How to Clean Green Copper Pipes
If your inspection reveals that the green discolouration is just cosmetic, you’re in luck – about 85% of green stains on the outside of copper pipes are harmless, caused by oxidation or leftover flux from soldering. However, if the pipe feels damp or shows signs of pitting, it’s time to call a professional plumber.
For surface oxidation, mix a paste using vinegar and baking soda. Apply it to the affected area, let it sit for about 10 minutes, then wipe it off and dry the pipe thoroughly.
For light surface stains, homeowners can also use a lemon juice and salt paste. Apply it gently with a soft cloth, then rinse and dry the pipe completely. Avoid abrasive cleaners, harsh chemicals, or aggressive scrubbing, as these can damage the copper surface or make corrosion worse.
If the green is from flux residue, you’ll need something abrasive, like emery cloth or steel wool, to scrub it away.
After cleaning, make sure the pipe is completely dry to avoid new oxidation. For regular maintenance, use a microfiber cloth, mild detergent, and a soft brush. The goal is to remove surface buildup without scratching the copper or leaving moisture behind. If you plan to paint the pipe, prep is key: clean and dry it first, then apply a metal primer designed for copper. Skipping this step can trap moisture under the paint, which accelerates corrosion, as noted by Total Mechanical Care.
Keep an eye on the pipe after cleaning. If the green patina comes back quickly or the area stays damp, it could signal a pinhole leak or a humidity problem that needs expert attention.
How to Prevent Copper Pipes From Turning Green
Preventing green discolouration on copper pipes mainly involves controlling moisture levels and keeping an eye on water quality. Since about 60% of green pipe cases are linked to external moisture like humidity and condensation, keeping the environment around your pipes dry is one of the most effective steps you can take.
In areas like basements or crawl spaces, improving airflow and using a dehumidifier can help reduce moisture levels. You might also consider encapsulating crawl spaces and insulating pipes with foam or fibreglass to prevent condensation. As VERTEX explains:
“The best way to prevent pipes from condensing is to prevent the ambient air from reaching them in the first place. The simplest way to accomplish this is to wrap the pipes in insulation.”
In some visible or exposed areas, a protective coating may help reduce direct contact with moisture and air. However, coatings should only be applied to clean, dry pipes. If there is dampness, pitting, or active corrosion, the pipe should be inspected before any coating is used, because covering the problem can trap moisture and make the damage worse.
Water quality is another critical factor. If you notice blue-green stains around drains or fixtures, it could mean your water is too acidic. Testing your water’s pH can confirm this – anything below 7 indicates acidity. Installing a neutralising filter can help prevent internal corrosion. The EPA recommends a copper level of no more than 1.3 mg/L in drinking water; higher levels suggest a need for treatment. Combining water quality improvements with regular maintenance will help keep your pipes in good shape.
In addition to water quality, there are other simple ways to prevent corrosion. For instance, keep an eye on your monthly water bill. An unexpected spike could signal hidden plumbing leaks, which might lead to moisture build-up and pipe damage.
A consistent maintenance routine also plays a big role in prevention. Here’s a quick guide to help you stay on top of things:
Maintenance Action
Frequency
Purpose
Visual inspection
Every 6–12 months
Look for damp spots, green crust, or mineral deposits
Humidity check
Seasonally
Ensure basements and crawl spaces stay dry to avoid verdigris
Water bill review
Monthly
Spot hidden leaks early
Professional assessment
Every 2–3 years
Ideal for systems over 30 years old to catch ageing-related issues
When to Call a Plumber for Green Copper Pipes
A plumber should inspect green copper pipes if the buildup is damp, concentrated around joints, returns quickly after cleaning, or appears together with low water pressure, metallic-tasting water, green stains in fixtures, or rising water bills. Professional inspection can confirm whether the issue is only surface oxidation, leftover soldering flux, water chemistry, or an active leak. In some cases, plumbers may recommend pipe cleaning, protective treatment, leak repair, water testing, or partial pipe replacement.
Do Green Copper Pipes Need Replacement?
Not always – but in some cases, yes. While green discolouration on copper pipes is often just a cosmetic issue, green-tinted tap water or internal green deposits are signs of more serious corrosion that might require immediate attention. Regular inspections, as mentioned earlier, can help detect these issues before they become major problems.
The most obvious warning sign is green-tinted tap water or green deposits inside fixtures, which indicate severe internal corrosion. If you notice either of these, it’s time to call a professional for an assessment.
The lifespan of your plumbing is another factor to consider. Copper pipes are known to last over 50 years, but after 30–40 years, they may start to corrode more quickly. If leaks become frequent, it could mean it’s time to replace the entire system.
Here’s a quick reference for when replacement might be necessary:
What You See
Likely Cause
Recommended Action
Concentrated green crust with dampness
Active pinhole leak
Repair the section or consider a full repipe
Green-tinted tap water
Internal corrosion/leaching
Seek immediate professional assessment
When these signs are present, evaluating replacement options becomes critical.
If repairs are no longer practical, a full system replacement is the safest route. In Canada, the cost of a full repipe typically ranges from $4,500 to $15,000, so acting promptly can help you avoid additional damage and expense. Many homeowners choose to replace corroded copper with PEX tubing (cross-linked polyethylene), a flexible material that resists corrosion and pitting, extending the lifespan of your plumbing system.
For homeowners in Toronto and the GTA, POM Plumbing Service Company offers over 20 years of experience. They handle everything from assessing your pipes to managing permits and even wall patching, ensuring the repiping process is as smooth as possible.
Conclusion: Keeping Copper Pipes in Good Condition
Understanding and addressing green oxidation is essential for maintaining the health of your plumbing system.
Green oxidation on copper pipes is a common issue and is often manageable. In most cases, it results from factors like moisture, leftover soldering flux, or active leaks. Only a small number of instances lead to serious structural or health concerns.
Watch for warning signs such as green-tinted water or visible dampness, as these indicate it’s time to take action. Regular inspections and monitoring can help you avoid expensive repairs down the road.
Taking simple steps like improving ventilation and testing your water’s chemistry can extend the lifespan of your copper pipes to over 50 years. These precautions align with earlier advice to protect your plumbing system.
For more serious problems, especially those beyond surface oxidation, it’s best to call in the experts. POM Plumbing Service Company has been assisting homeowners in Toronto and the GTA for over 20 years. They offer a range of services, including leak detection, pipe inspections, and complete repiping solutions, all delivered by licensed and insured professionals with transparent pricing.
FAQs
How can I tell verdigris from a leak?
Verdigris is the even green or blue-green patina that naturally develops on copper pipes over time due to oxidation. However, when leaks occur, they can lead to uneven green corrosion, along with dampness or visible water stains in the area. To spot a potential leak, watch for signs like irregular corrosion, active moisture, or pooling water. Unlike the stable nature of verdigris, corrosion caused by leaks often signals damage that requires further inspection.
When should I test my water for copper?
If you spot green discolouration on your pipes – particularly alongside leaks or signs of corrosion – it’s a good idea to test your water for copper. This can reveal whether the water’s chemistry is playing a role in oxidation and possibly damaging your pipes.
Can I paint over green copper pipes?
Yes, you can paint over green copper pipes, but preparation is key. The surface needs to be cleaned thoroughly to remove any oxidation, dirt, or grime. Proper preparation ensures that the paint sticks well and doesn’t peel or flake later on.
Can I use DIY solutions to clean green copper pipes?
Yes, using natural cleaning agents and regular maintenance practices can be effective DIY solutions.
What are the cost implications of addressing green copper pipes?
Costs vary depending on the extent of the issue. Repair costs may be lower than complete replacement, but long-term investment in quality materials is advisable.
Fixing a toilet isn’t as hard as it seems. Most issues – like running water, weak flushes, or leaks – can be resolved with simple tools and affordable parts. Here’s what you need to know:
Running toilets: Often caused by a worn-out flapper. A quick $10–$15 replacement can save you hundreds of dollars in water bills annually.
Weak flushes: Mineral deposits in rim jets or low water levels are common culprits. Cleaning with vinegar or adjusting the float usually solves the problem.
Leaks at the base: Typically due to a failed wax ring. Replacing it costs $5–$15 but prevents costly floor damage.
Clogs: Use a plunger or toilet auger to clear blockages. Avoid multiple flushes to prevent overflows.
Key tools: Toilet plunger, adjustable wrench, flathead screwdriver, and toilet auger. Most repairs take 15–30 minutes and cost under $75.
If DIY fixes don’t work, or if you notice recurring issues like sewer odours or water backing up into other fixtures, it’s time to call a plumber. Acting quickly can save water, prevent damage, and avoid bigger repairs later.
Keep reading for step-by-step guides and maintenance tips to keep your toilet in top shape.
Common Toilet Problems: Causes, Costs, and Repair Times
How to Repair Toilet Tank Components | Ask This Old House
sbb-itb-1e3c609
Common Toilet Problems and Their Causes
Running toilets are a frequent issue, often caused by worn-out flappers, high floats, or malfunctioning fill valves. These problems can lead to phantom flushes, where water slowly leaks from the tank into the bowl. Flappers, which typically last 4 to 7 years, can deteriorate faster when exposed to chloramine-treated municipal water. Interestingly, about 90% of running toilet cases are linked to faulty flappers.
Weak flushes are usually the result of clogged rim jets. These small holes, responsible for creating the necessary swirl action during a flush, can become blocked by mineral deposits. This is especially common in areas like Toronto, where hard water contains an average of 124 mg/L of calcium carbonate. Another common cause is insufficient water in the tank, often due to an incorrectly adjusted float. If your tank takes more than 3 minutes to refill – when it should take 1–2 minutes – mineral buildup in the fill valve is likely the culprit.
Base leaks are a more serious problem and can point to issues such as a failed wax ring seal, loose closet bolts, or even a cracked porcelain base. Wax seals can naturally wear out over time, but they may fail prematurely if the toilet rocks or was improperly installed. As Mike Thompson, a Master Plumber, explains:
"Wax rings last 20-30 years but can fail earlier if the toilet rocks (breaks the seal) or from improper original installation".
Recurrent clogs might indicate deeper plumbing issues, such as tree root intrusion in older drain lines or partial blockages further down the system. On the other hand, a loose or unresponsive handle is often caused by a broken lift chain, a cracked lift arm, or a corroded handle assembly. These handle-related issues are generally easy to address with basic repairs.
Now that you know the common problems and their causes, it’s time to gather the tools and materials you’ll need to handle these fixes.
Tools and Materials You’ll Need
Before diving into any toilet repair, it’s a good idea to gather all the tools and materials you’ll need. Most fixes are straightforward and require only basic hand tools and affordable parts. With the right equipment, many repairs can be completed in just 15–30 minutes.
Required Tools
Start with the basics:
A toilet plunger is essential for tackling clogs. It’s a must-have in any home.
An adjustable wrench is handy for loosening or tightening nuts on water supply lines and closet bolts.
Use a flathead screwdriver for prying off bolt caps and fine-tuning fill valve screws.
For deeper clogs, a toilet auger (or snake) can reach where the plunger can’t.
If you’re removing the toilet, a putty knife will help scrape off old wax from the floor flange.
A wet-dry vacuum is useful for clearing out any leftover water from the tank and bowl before starting repairs.
Tool Name
Purpose
Estimated Cost (CAD)
Toilet Plunger
Clears bowl clogs using rhythmic pressure
$10 – $25
Adjustable Wrench
Loosens/tightens nuts on water supply lines and closet bolts
$15 – $40
Flathead Screwdriver
Pries off bolt caps and adjusts fill valve screws
$5 – $15
Toilet Auger (Snake)
Clears deep obstructions or retrieves items from the trap
$20 – $60
Putty Knife
Scrapes away old wax from the floor flange
$5 – $12
Wet-Dry Vacuum
Removes residual water from the tank and bowl
$60 – $150
Required Materials
When it comes to materials, the most common replacement part is the toilet flapper, which prevents water from leaking from the tank into the bowl. Flappers typically last only a few years, so having a spare on hand is a smart move. Other essentials include:
A wax ring to create a watertight seal between the toilet base and the drain.
A fill valve to control the tank’s water refill after flushing.
Closet bolts to secure the toilet to the floor flange.
Silicone caulk to seal the gap between the toilet base and the floor.
All these items are easy to find at Canadian hardware stores like Home Depot Canada, Rona, Canadian Tire, and Home Hardware. To ensure you purchase the correct parts, take a photo of your tank’s interior or bring the old part with you to the store. This is especially important for flappers, which come in different sizes (usually 2-inch or 3-inch).
Material
Purpose
Estimated Cost (CAD)
Local Sourcing (Canada)
Wax Ring
Creates a watertight seal between the toilet base and drain
$5 – $10
Home Depot, Rona, Canadian Tire
Toilet Flapper
Seals the tank to prevent water from leaking into the bowl
$7 – $35
Home Depot, Home Hardware
Fill Valve
Controls water level and refills the tank after a flush
$15 – $40
Rona, Lowe’s, Canadian Tire
Closet Bolts
Secures the toilet base to the floor flange
$5 – $12
Local hardware stores
Silicone Caulk
Seals the gap where the toilet base meets the floor
$8 – $15
Home Depot, Rona
How to Fix Common Toilet Problems
With the right tools in hand, many toilet repairs can be tackled quickly – often in less than an hour – saving you the expense of hiring a professional.
How to Fix a Running Toilet
A running toilet is not just annoying; it’s incredibly wasteful. In the Greater Toronto Area, it can waste over 750 litres of water daily, potentially adding around $500 annually to your water bill. The usual culprits are a faulty flapper, an improperly adjusted float, or a defective fill valve.
To confirm the issue, try a dye test: add a few drops of food colouring to the tank and wait 15 minutes without flushing. If the colour seeps into the bowl, the flapper isn’t sealing properly. Replacing the flapper is straightforward. Turn off the water supply, flush to empty the tank, and use a sponge to remove any leftover water. Detach the old flapper from the overflow tube and disconnect the chain from the flush lever. Install the new flapper (which usually costs $10–$15), and reconnect the chain, leaving about ½ inch of slack. This ensures it seals properly without being too loose or tight.
If the flapper isn’t the issue, check the tank’s water level. It should sit about one inch below the top of the overflow tube. If it’s too high, water will constantly drain into the tube. Adjust the float: for a ball float, bend the arm downward; for a float cup, tweak the clip or screw until the water stops at the correct level.
For a faulty fill valve – noticeable by constant hissing or an overfilling tank – replacement is necessary. Turn off the water, disconnect the supply line, and remove the old valve. Install a new universal fill valve (priced between $15–$25), such as Fluidmaster or Korky models, which are widely available. Adjust the valve so its top is about an inch above the overflow tube, reconnect the supply line, and turn the water back on.
"Worn-out flappers are the cause of most toilet leaks." – Mark Carter, Content Writer
Once your toilet is running smoothly, it’s time to tackle clogs.
How to Unclog a Toilet
If your toilet is clogged and the water level is close to the rim, resist the urge to flush again – it could overflow and damage your floor. Instead, place absorbent materials around the base to catch any spills. Then, grab a flange plunger, which has an extended rubber flap designed specifically for toilets.
To use the plunger effectively, wet the rubber cup to ensure a tight seal, position it over the drain hole, and apply steady pressure. Pump 15–20 times in a consistent rhythm while maintaining the seal. This often dislodges blockages near the drain opening. If plunging doesn’t work, it’s time for a toilet auger.
Feed the auger’s curved end into the bowl and guide it past the trap. Turn the handle clockwise while applying gentle pressure to break up deeper clogs in the trapway. Once the blockage clears, retract the cable carefully to avoid splashing or scratching the porcelain. Most clogs can be resolved within 15 to 45 minutes using these tools, saving you the $100–$250 cost of a plumber.
"Plunging does not help? Toilet auger (closet auger) reaches deeper into the trapway. Breaks through what a plunger cannot." – Ryan Pietrzak, Licensed Plumber
If clogs happen frequently or you notice slow drainage in multiple fixtures, the issue might be a blocked roof vent – often caused by bird nests or ice buildup – rather than a simple toilet problem.
Now, let’s look at how to restore a weak flush.
Fixing a Weak Flush
A weak flush often stems from clogged rim jets, a low water level in the tank, or a flapper that closes too quickly. Many Canadian households face this issue due to hard water deposits. For instance, Toronto’s water contains 124 mg/L of calcium carbonate, which can block the small holes under the rim that create the swirling action needed for a strong flush.
To clean the rim jets, inspect the holes, soak them overnight in white vinegar, and use a piece of wire, a small Allen wrench, or a paper clip to clear them. This simple fix costs about $5 and takes around two hours. For the siphon jet (the large opening at the bowl’s base), apply the same vinegar treatment and scrub it with an old toothbrush to remove mineral buildup.
Next, check the tank’s water level. If it’s below the marked line (usually one inch below the overflow tube), adjust the float mechanism. Bend the ball float arm or slide the float cup’s adjustment clip upward until the tank fills properly. This adjustment is quick and free.
Finally, observe the flapper during a flush. It should stay open for at least three seconds to allow the tank to empty sufficiently. If it closes too soon, adjust the chain slack to about ½ inch or replace the flapper with an adjustable model, which costs $10–$15. Modern low-flow toilets in Canada use just 4.8 litres per flush, compared to the 13+ litres used by older models, making it crucial for all components to function efficiently.
How to Replace a Wax Ring or Repair the Flange
Fixing leaks at the base of a toilet is just as crucial as tackling other common toilet problems.
A faulty wax ring can lead to sewage leaks, floor damage, and even mould growth. Signs to watch for include pooling water, persistent sewer odours, a wobbly toilet, or softened, discoloured flooring.
"A leak at the toilet base means unsanitary water is escaping. This can damage subflooring, cause mold growth, and compromise structural integrity. Don’t delay this repair." – Mike Thompson, Master Plumber
Before starting, turn off the water supply and flush the toilet to empty the tank. Remove any leftover water using a sponge or wet-dry vacuum to avoid spills when lifting the toilet, which can weigh between 32–57 kg (70–125 lb). Disconnect the supply line with an adjustable wrench, and remove the anchor bolts at the base. If the bolts are rusted, apply some penetrating oil, like WD-40, to loosen them. Wear gloves to protect yourself from contact with sewage-exposed surfaces.
When lifting the toilet, use your legs for support rather than your back, and place it on old towels or cardboard to prevent damage. Scrape off the old wax from the floor flange and toilet outlet using a putty knife. Inspect the flange – if it’s cracked, rusted, or corroded, install a repair ring or plate. If the flange is more than 6 mm (1/4 inch) below the finished floor, opt for an extra-thick wax ring instead of the standard type.
Insert new anchor bolts into the flange slots, then position the new wax ring (which usually costs $5–$15) on either the flange or the toilet outlet, following the manufacturer’s instructions. Carefully lower the toilet straight down over the bolts without tilting, as tilting could compromise the wax seal. Sit on the toilet to compress the wax ring, then alternately tighten the nuts until the toilet is stable. Avoid overtightening, as this might crack the porcelain base. Finally, reconnect the water supply, turn it on, and check for leaks.
If the flange is severely damaged or the subfloor is rotting, you may need a professional plumber. In the Greater Toronto Area, these repairs typically range from $150–$250. Persistent issues with the toilet base are a clear sign it’s time to call in an expert.
When to Call a Professional Plumber
Sometimes, even the most determined DIY efforts aren’t enough to fix toilet troubles. If you’ve already tried basic fixes – like adjusting the flapper or float – and the issue persists, it’s probably time to call in a licensed plumber.
Certain problems are beyond what a plunger or standard toilet auger can handle. For example, if your plunger doesn’t clear the clog after 10 to 15 attempts, or if water starts backing up into other fixtures like your sink or shower when you flush, you’re likely dealing with a main sewer line issue. These situations demand professional-grade tools and expertise.
"If the plunger doesn’t work after 10–15 attempts, or if multiple fixtures are backing up simultaneously – that’s a main line issue, not a toilet problem." – RenoHouse Team
Other warning signs include leaks around the base of the toilet, especially if the floor feels soft or spongy. This could indicate serious water damage to the subfloor, which needs immediate attention. Recurring clogs may be a symptom of bigger issues like tree root intrusion – common in older Toronto neighbourhoods like The Beaches and High Park – or deteriorating pipes. A drain camera inspection can help pinpoint these hidden problems. Additionally, cracked porcelain in the toilet bowl or tank isn’t something you can fix effectively, and it poses a flooding risk. In such cases, replacement is the safest option.
POM Plumbing Service Company offers a wide range of toilet repair services across Toronto and the GTA. Their services include drain camera inspections, flange repairs, wax ring replacements, and clearing main line blockages. With over 20 years of experience, their licensed and insured professionals ensure all work meets the Ontario Building Code.
If your toilet wobbles even after tightening the bolts or you notice a persistent sewer odour, it’s a sign of deeper structural or component issues that need professional attention. When basic troubleshooting doesn’t solve the problem, plumbers use specialized tools to uncover hidden issues, saving you time and preventing expensive water damage.
Check out the next section for tips on keeping your toilet running smoothly.
Ensuring Your Toilet Stays Problem-Free
Once you’ve completed repairs, keeping up with regular maintenance is key to ensuring your toilet runs smoothly. Preventive care not only helps avoid unexpected repairs but also keeps your toilet functioning efficiently. These simple steps can address common issues and extend the life of your toilet.
Start by cleaning the rim jets monthly using white vinegar. Mineral deposits, especially in areas like Toronto with hard water, can clog the small holes under the rim and weaken your toilet’s flushing power. To clean, pour vinegar around the rim, let it sit for about 30 minutes, and gently scrub with an old toothbrush. Next, inspect the flapper valve for any signs of wear, such as cracks, discolouration, or hardening. Rubber flappers generally need to be replaced every 5 to 7 years. A worn flapper can waste over 750 litres of water daily, potentially adding $20 to $50 – or more – to your monthly water bill.
Once the rim jets are clear and the flapper is in good shape, check the water level in the tank. The water should sit about 2.5 cm (1 inch) below the overflow tube. If it’s too low, the toilet may not flush completely; if it’s too high, water can continuously flow into the overflow. Adjust the float arm or fill valve as necessary. Additionally, make sure the closet bolts are tight to prevent the toilet from wobbling. Finally, avoid flushing non-flushable items, as these are a major contributor to clogs.
For added peace of mind, consider scheduling regular maintenance with POM Plumbing Service Company. With over 20 years of experience serving Toronto and the GTA, their licensed and insured professionals can catch potential problems early, ensure your plumbing complies with local standards, and help you avoid costly water damage.
Conclusion
Toilet repairs don’t have to be overwhelming. Many common problems – like a running toilet, a weak flush, or a minor clog – can often be resolved with basic tools and a bit of patience. Acting swiftly is essential, though. For instance, a running toilet can waste over 750 litres of water daily, potentially increasing your monthly water bill by $20 to $50. Similarly, leaks at the base of the toilet can lead to unsanitary water seepage, which may damage subflooring, encourage mould growth, and result in costly structural repairs.
"A leak at the toilet base means unsanitary water is escaping. This can damage subflooring, cause mold growth, and compromise structural integrity. Don’t delay this repair." – Mike Thompson, Master Plumber
When a repair goes beyond a simple DIY fix, it’s time to bring in the professionals. POM Plumbing Service Company provides expert toilet repair services across Toronto and the GTA, including Mississauga, Brampton, Vaughan, Markham, Richmond Hill, and Oakville. With over 20 years of experience, they offer same-day and 24/7 emergency services to ensure minor issues don’t spiral into major expenses.
Whether it’s replacing a flapper or tackling more complex repairs like wax ring or flange issues, addressing problems early can save water, protect your home, and avoid bigger headaches down the line. Regular maintenance, as outlined earlier, also plays a key role in preventing future issues. By staying proactive, you can keep your plumbing in excellent shape for years to come.
FAQs
How do I know which toilet parts fit my model?
To identify parts that match your toilet model, start by checking the manufacturer’s label. You’ll usually find it inside the tank or at the base of the toilet. This label includes the make and model, which are essential for finding compatible replacements.
For routine repairs, certain parts may work across multiple models, but it’s important to double-check the size and connection type. If you’re uncertain, bringing the old part to a hardware store or referring to your user manual can help prevent buying the wrong replacement.
What causes a toilet to keep clogging?
A toilet can clog for various reasons, often tied to blockages in the drain or trap. Some of the most common culprits include flushing items that shouldn’t go down the toilet, like wipes or hygiene products, or the buildup of mineral deposits in the trap or rim jets. Debris can also play a role. If you have an older toilet with a less efficient flushing system, it might struggle to clear waste properly, causing clogs to happen more often. Performing regular maintenance can go a long way in keeping these problems at bay.
Can I replace a wax ring myself safely?
Replacing a wax ring is manageable if you have some basic plumbing know-how and follow the right steps. Start by turning off the water supply and draining the toilet tank completely. Then, carefully remove the toilet to access the old wax ring. It’s important not to reuse an old ring – always install a new one. For toilets with low flanges, an extra-thick wax ring might be a better choice to ensure a proper seal. If you run into complications, like a cracked flange, or feel unsure at any step, it’s wise to bring in a professional plumber to handle the job.
When buying a house, plumbing problems can lead to costly repairs if overlooked. Even if everything seems functional, hidden issues like leaks, outdated pipes, or poor drainage can cause major headaches later. Here’s what to watch for:
Water Damage: Look for stains, bubbling paint, or warped surfaces on walls, ceilings, and floors.
Pipe Materials: Older homes may have high-risk pipes like Polybutylene or galvanized steel, which could lead to insurance issues or expensive replacements.
Water Pressure & Drainage: Test taps and drains for weak water flow or slow drainage, which could signal hidden blockages or leaks.
Sewer Line Issues: Foul smells, slow multiple drains, or gurgling sounds may point to sewer problems. Consider sewer line camera inspections for older homes.
Water Heater: Check for rust, moisture, or signs of wear near the unit.
Hidden Leaks: Inspect under sinks, inside cabinets, and near shutoff valves for stains, corrosion, or musty smells.
Key Tip: Always request maintenance records, check for proper permits on renovations, and consider hiring a professional plumber for a detailed inspection before finalizing your purchase.
Common Signs of Bad Plumbing in a House
Visible Issues
Start by checking for water stains on ceilings, walls, and floors. Bubbling paint or warped surfaces can also hint at a past or present leak. Look under sinks and inside cabinets for moisture, stains, or musty smells, especially around supply lines, shutoff valves, and drain assemblies. Don’t forget to inspect the water heater – rust, moisture at its base, or issues with the pressure relief pipe are all red flags that highlight why regular water heater maintenance is essential.
For exposed pipes, look for rust, scaling, or green/white oxidation, particularly at joints or on older copper systems. Even the main shutoff valve deserves attention; leaks or corrosion there might signal more extensive problems. Outdated fixtures can also suggest inefficient water use or hidden decay within the plumbing.
"Visible damage may only represent a portion of the underlying issue." – Erich Kamprath, CPI, At Ease Inspections
Water Quality Concerns
Water quality can reveal problems that aren’t immediately visible. Turn on the taps and observe the water. If it’s discoloured – orange or brown – it could mean internal corrosion in older pipes, which might lead to pinhole leaks. Left unaddressed, these issues can escalate into a plumbing emergency. Sewer odours near drains often point to venting issues or dried-out P-traps. Blue-green or rust-coloured stains in sinks and tubs are another warning sign, indicating pipe material breakdown, even if the water appears clear.
These water quality problems can have broader implications, like affecting your ability to get home insurance or increasing premiums, especially if galvanized steel pipes are involved.
sbb-itb-1e3c609
Plumbing Problems to Look For During a Walkthrough
Water Pressure and Drainage
When walking through a property, start by turning on taps in the kitchen, bathroom, and laundry room simultaneously. If the water pressure drops significantly, this could point to corroded pipes or hidden leaks diverting water. Afterward, test each fixture individually. Low water flow from faucets or showers might indicate scaling or blockages that could worsen over time.
Pay close attention to how quickly water drains from sinks, tubs, and showers. Slow drainage might hint at issues like unapproved renovations or problems with the venting system. Also, listen for gurgling sounds in toilets or tubs when water drains elsewhere in the house. These noises often suggest venting problems, which can lead to negative pressure in the plumbing and potentially allow sewer gases to seep into the home.
"Plumbing systems may be out of sight, but they should never be out of mind. A thorough home inspection helps reveal conditions that everyday use may not uncover." – Erich Kamprath, CPI, At Ease Inspections
After assessing water pressure and drainage, shift your focus to spotting signs of water damage.
Water Damage Signs
Water damage can be a costly problem, so look for warning signs during your walkthrough. Check basements and lower-level ceilings for water stains, discolouration, or sagging drywall. These could point to occasional leaks from upper-floor kitchens or bathrooms that may not be active during your visit. Inspect the area around the water heater for moisture or puddles, which might indicate the unit is nearing failure.
In areas with freeze–thaw cycles, plumbing connections and seals are especially vulnerable to subtle leaks caused by temperature fluctuations. Be extra vigilant in these regions, as these issues can often go unnoticed until they worsen.
Ultimate Plumbing Inspection Guide for Home Buyers & Realtors
Plumbing Inspection Checklist for Homebuyers
Common High-Risk Pipe Materials: Risks and Replacement Costs for Homebuyers
Hidden Plumbing Areas
Take a closer look at those out-of-sight spots – under sinks, inside cabinets, and behind walls – because that’s where leaks like to hide. Catching these early can save you from surprise repair bills and potential damage to the home’s structure. Home inspector Erich Kamprath, CPI, points out that "one of the most common findings are small, ongoing leaks concealed beneath sinks or inside cabinetry". When checking these areas, look for water stains, mineral deposits, or warped cabinet bottoms – these are telltale signs of moisture issues, past or present. Pay extra attention to supply connections, shutoff valves, and drain assemblies.
Don’t stop there. Inspect ceilings and walls in lower levels for any staining, discolouration, or corrosion patterns. These often hint at leaks coming from bathrooms or kitchens upstairs. Another critical spot to check is the main water entry point. Older ball valves in this area can develop leaks that often go unnoticed, potentially leading to expensive repairs. If the home has been recently renovated, be extra cautious. Unpermitted work, improper pipe slopes, or poor venting in these areas can result in plumbing problems that are both costly and inconvenient.
Finally, take the time to identify the pipe materials and request maintenance records. This will give you a clearer picture of the plumbing system’s condition and any potential risks down the road.
Pipe Materials and Maintenance Records
The type of pipe material in a home can impact both insurance eligibility and repair costs. For example, Polybutylene (Poly-B) and galvanized steel pipes are often flagged as high-risk materials that may require replacement. Kamprath highlights another issue: "in older homes with copper plumbing systems over 50 years old, I also regularly encounter pinhole leaks caused by internal corrosion". Knowing the materials used can help you anticipate future problems and plan accordingly.
Ask for maintenance records for the water heater, including its age and service history. If the property is rural, request documentation for the septic system, such as the last pump-out date and any repairs. Make sure to review receipts, service logs, and permits for any plumbing upgrades. Additionally, past insurance claims related to water damage should be a red flag, as they could indicate ongoing or recurring issues. This information is crucial for understanding potential costs and protecting your investment.
Comparing Pipe Materials
Pipe Material
Primary Risks
Typical Replacement Cost
Polybutylene (Poly-B)
Premature failure and sudden leaks; may require replacement for insurance coverage
CA$7,000–CA$15,000
Galvanized Steel
Internal corrosion, restricted flow, and rust; often flagged due to age
CA$5,000–CA$20,000
Copper (50+ years)
Pinhole leaks and thinning walls from internal corrosion
Varies by extent
Water damage is one of the most frequent and expensive claims for insurers. Issues like a symptoms of a cracked sewer line or deteriorating pipes could cost anywhere from CA$5,000 to CA$30,000 within your first year of ownership. Knowing what’s behind the walls can help you set realistic expectations for your budget and negotiate necessary repairs before you finalize the purchase.
Sewer and Drain Red Flags
Clogs and Backups
When multiple drains in a home are slow to empty, it could point to trouble with the main sewer line. This isn’t something to brush off. Watch for bubbling or gurgling sounds from toilets – these often signal blockages. Similarly, foul odours wafting up from basement floor drains suggest wastewater isn’t moving as it should.
Take a close look at the basement for any signs of past water damage, such as stains or moisture marks. These could be indicators of previous sewer backups. Also, if there are large, mature trees near the sewer line’s path, they might be a hidden culprit. Tree roots can sneak into tiny cracks in older pipes, eventually causing major blockages.
Because sewer lines are tucked away and often made from materials that degrade over time, a sewer camera inspection is the only way to get a clear picture of their condition. Check the basement for a backwater valve – this device is designed to stop municipal sewage from reversing into the home during heavy rains or system surges. It’s also worth asking the seller or neighbours about how the drainage system handles heavy rainfall or rapid snowmelt.
External Indicators
Keep an eye out for damp patches or pooling water near plumbing exits in the yard. If these spots appear without recent rainfall, they could signal underground leaks or drainage problems.
Replacing a sewer line is no small expense, typically ranging from CA$5,000 to CA$15,000. Erich Kamprath, CPI from At Ease Inspections, emphasizes the importance of proper drainage:
"Proper drainage is essential for preventing backups, overflows, and sewer gas intrusion".
Test how well fixtures drain – slow drainage often points to an issue with the main sewer line. For older homes, it’s a smart move to schedule a professional drain inspection. This can uncover blockages or structural problems that might otherwise go unnoticed.
Spotting these sewer and drain concerns early can help you identify potential risks, even in new construction.
Red Flags in New Construction
Potential Quality Concerns
Even with new builds, plumbing issues can arise, often due to rushed timelines or labour shortages. According to BuildForce Canada, the construction industry will need over 85,000 additional workers by 2032 to keep up with demand and replace retiring employees. Spotting early warning signs can help you differentiate between well-executed builds and those with potential problems.
One of the most concerning issues in newer properties is Kitec piping. This type of polymer pipe, used between 1995 and 2007, is easy to identify by its orange (hot water) and blue (cold water) colouring. The problem lies in its brass fittings, which contain high levels of zinc. When exposed to water and oxygen, these fittings undergo a process called dezincification. Slonee Malhotra from Sorbara Law explains:
"The issues stem mainly from the brass fittings, which contain high levels of zinc. When exposed to water and oxygen, these fittings undergo a process called dezincification, a chemical reaction that breaks down the fittings, forming zinc oxide and causing blockages, corrosion, and ultimately pipe failure".
Replacing Kitec piping can be expensive, with costs ranging from CA$5,000 to over CA$15,000.
Another common issue in new construction is improper venting or drainage slopes. Erich Kamprath from At Ease Inspections highlights:
"I often find improper pipe slopes, incorrect fittings, or inadequate venting that may still function in the short term but increase the risk of slow drainage, recurring clogs, or future leaks".
Keep an eye (and ear) out for gurgling drains or sewer odours – these could indicate venting issues. During your walkthrough, check under sinks for any signs of moisture, as leaks can occur when installations are rushed. If available, ask for pressure testing documentation. If not, consider hiring a licensed plumber to conduct a thorough inspection.
Lastly, confirm that all plumbing work is properly permitted. This step can save you from dealing with costly complications down the road.
When You Should Call a Professional Plumber
Advanced Diagnostics
A routine inspection might catch the obvious, but uncovering hidden problems often requires the expertise of a licensed plumber. As Erich Kamprath, CPI, explains:
"Home inspections are designed to identify conditions of concern, not to diagnose or repair plumbing systems."
Hidden leaks, outdated materials, or other concealed issues can lead to expensive repairs if left unchecked. This is where advanced diagnostics come into play. Licensed plumbers use tools and techniques that go beyond what a standard inspection offers. For example, a sewer camera inspection is invaluable for checking the main line that connects your home to the municipal sewer system. It can reveal issues like blockages, tree root invasions, or structural damage.
For older homes, pressure testing is often used to pinpoint weak spots in the plumbing system. Similarly, water quality and pressure tests can help determine whether low water flow in your taps or shower is due to mineral buildup or a hidden leak. Even aging water heaters can be assessed to decide whether they need replacement or relocation. These advanced tools and methods are essential for identifying and addressing problems in vulnerable systems.
Specialized Expertise
Certain homes, especially those with at-risk piping materials like polybutylene, galvanized steel, or copper that’s over 50 years old, require professional evaluations. Insurance providers often demand detailed documentation of the plumbing system’s condition before they approve or renew coverage.
If you notice signs such as moisture spots or hear water hammer noises, it’s time to call a professional. These issues can quickly escalate, potentially causing structural damage or leading to mould growth. A licensed plumber’s expertise ensures these problems are addressed before they become major headaches.
Conclusion: Protecting Your Investment with Plumbing Awareness
Buying a home is a big commitment, and hidden plumbing issues can quickly turn into expensive repairs. For instance, a small leak costing around CA$200–CA$500 to fix might escalate into a burst pipe requiring CA$2,000–CA$5,000 in repairs – or even a full sewer line replacement, which can range from CA$5,000–CA$15,000.
"Spotting these plumbing red flags during home tours helps secure a home that’s both beautiful and reliable." – Vieira Team
But the risks aren’t just financial. Leaks hidden behind walls can warp floors and weaken structural supports over time. Persistent moisture can lead to mould growth, creating potential health risks. Even something as seemingly minor as unregulated high water pressure can shorten the lifespan of your plumbing system and appliances. Catching these issues early allows you to address them before they become major problems.
To protect your investment, take a few smart steps: check maintenance records and the age of fixtures provided by the seller, request detailed plumbing reports for new builds (including materials used and warranty details), and make sure you know where the main shut-off valve is located – it’s your first defence in an emergency . These small actions can save you a lot of money and stress down the road.
"Prevention doesn’t just save money, it protects your investment and your peace of mind." – Construction Links
Investing in a pre-purchase inspection or scheduling regular plumbing maintenance is a small price to pay compared to the cost of major repairs. Being proactive not only helps you avoid unexpected expenses but also ensures your home remains safe, functional, and valuable. A little vigilance now goes a long way in keeping your home – and your wallet – secure.
FAQs
When is a sewer camera inspection worth it?
A sewer camera inspection can be a smart choice when you’re trying to identify hidden pipe issues, prevent costly repairs, or assess the condition of a sewer line – especially before purchasing a home. This is particularly useful if there are warning signs of trouble or if the sewer line is difficult to reach.
How can I tell what pipe material a home has?
To figure out what material your home’s pipes are made of, start by visually inspecting the supply and distribution pipes. Common types include copper (often shiny or reddish-brown) and grey plastic (known as polybutylene). Their appearance is usually a good indicator of the material.
During a home inspection, the inspector will typically point out and describe the pipe materials. If you’re still uncertain after checking, it’s a good idea to consult a professional inspector who can confirm the materials for you.
What plumbing issues can affect home insurance in Canada?
Plumbing problems that can affect home insurance in Canada often involve water damage from burst pipes, leaks, or plumbing system failures. Insurance typically covers this kind of damage if it’s sudden and accidental. However, damage caused by neglect or lack of maintenance is usually excluded. Keeping your plumbing system in good shape through regular maintenance is crucial to prevent any coverage complications with your insurance.
If you have a basement or crawlspace in Canada, a sump pump is essential to protect your home from water damage. Installed in a pit at the lowest point of your home, it removes excess water caused by rain, melting snow, or rising groundwater. This guide explains how sump pumps work, their types, installation basics, and maintenance tips to ensure your home stays dry.
Key points:
How it works: A sump pump collects water in a basin and pumps it away from your foundation.
Types: Submersible (quiet, powerful) and pedestal (affordable, easy to maintain).
Lifespan: Most pumps last 7–10 years with proper care.
Maintenance: Regular cleaning, testing, and inspections are crucial.
Installation costs: Range from $500 to $3,000, depending on complexity.
A well-maintained sump pump prevents flooding, mould, and structural damage, making it a must-have for Canadian homes. Read on for detailed steps on choosing, installing, and maintaining your sump pump.
A sump pump is a device installed in a sump basin, usually located at the lowest point of a basement or crawlspace. Its job is to direct water – whether from rain, melting snow, or rising groundwater – away from your home’s foundation. When the water in the basin reaches a certain level, a float switch activates the pump’s motor. The motor powers an impeller, which pushes the water through a discharge pipe, carrying it safely away from your property.
In places like Toronto and the Greater Toronto Area, sump pumps play a key role in managing water issues caused by rising water tables, outdated infrastructure, and frequent heavy rainfall. Homes built before the 1980s are especially at risk due to older, often failing drainage systems. Basement flooding is a common and expensive problem for homeowners in these areas, making a dependable sump pump system a must-have for many Canadian homes.
In Ontario, building codes require a sump pump and pit in situations where gravity drainage to municipal storm sewers isn’t possible. This is particularly important in older homes with drainage systems that no longer function properly. If you notice that your neighbours have sump pumps, it’s a good indicator that groundwater levels in your area might also necessitate one for your home.
A standard sump pit is typically 24 inches (61 cm) deep and 18 inches (46 cm) wide. Without a sump pump system, you risk more than just water damage to your foundation – you could also face issues like mould and mildew growth, which can impact your home’s safety and livability.
How a Sump Pump Works
A sump pump works by collecting and removing excess water from a basement or crawlspace. The process starts when water enters the sump basin, either through floor drains or from the surrounding soil. This basin, typically made of tough plastic with drainage slits, is installed at the lowest point of the area. It acts as a reservoir, allowing water to flow in while keeping out larger debris.
As the water level rises in the basin, it activates a switch that turns on the pump. Most sump pump models use a float activator – a buoyant device that lifts an arm to the "on" position when the water reaches a certain height. Some newer designs use a pressure sensor instead, which detects water levels based on the weight of the water pressing down.
Once activated, the pump’s electric motor powers an impeller, which uses centrifugal force to efficiently move water out of the basin. As Murray Anderson describes:
The sump pump’s job is to pump the water out of the pit and away from the building so the basement or crawlspace stays dry.
The water is then pushed through a discharge pipe and released at a safe distance from the house, preventing it from pooling near the foundation. A check valve in the system ensures that water doesn’t flow back into the basin once the pump shuts off, avoiding unnecessary strain on the motor. This cycle repeats automatically whenever water accumulates in the basin, providing consistent protection against flooding.
Sump pumps are especially useful during heavy rain or seasonal thaws, common in areas like Ontario. While running, smaller sump pumps typically use 800–1,000 watts, with a surge of up to 1,800 watts at start-up. This automated system works around the clock to keep your home dry and protected from water damage.
Key Components of a Sump Pump System
A sump pump system is made up of several key parts that work together to keep your basement dry. Knowing how these components function can help you maintain the system and address any issues that come up. Here’s a closer look at the main elements.
The sump pit, sometimes called a basin or liner, is a hole dug at the lowest point of your basement or crawlspace. It’s typically about 60 cm deep and 45 cm wide, lined with plastic that has slits to let water in from the surrounding soil or floor drains. At the centre of the system is the pump itself – this centrifugal unit uses a spinning impeller to create the force needed to move water out of the pit and through the discharge pipe.
The float switch serves as the system’s automated control. It turns the pump on and off depending on water levels. A buoyant ball rises with the water until it reaches a set height, triggering the pump by closing an electrical circuit. Once the water level drops, the float lowers and shuts the pump off. This prevents the pump from running unnecessarily or overheating, which could damage the motor. To ensure proper operation, position the float switch a few centimetres above the pump motor and make sure it has enough space to move freely without obstruction.
The check valve is a one-way valve on the discharge pipe that stops water from flowing back into the pit after the pump shuts off. Without it, water would return to the pit, causing the pump to cycle repeatedly, which could wear out the motor. The discharge pipe, usually a PVC pipe with a diameter of 3.8 to 5 cm, carries water away from your home. It should direct water to an exterior location at least 6 metres from your foundation to prevent it from seeping back into your basement.
For safety, always plug the sump pump into a GFCI outlet (Ground Fault Circuit Interrupter). This reduces the risk of electrocution in the damp environment where the pump operates. Most home systems use standard 110-volt household electricity. Additionally, a small vent (or weep) hole near the pump prevents air lock, ensuring that water flows smoothly through the system.
Types of Sump Pumps
Sump Pump Types Comparison: Submersible vs Pedestal vs Backup Systems
Understanding the different types of sump pumps can make it easier to choose the right one for your home. Your decision should factor in your basement’s water conditions, how much you’re willing to spend, and how much maintenance you’re prepared to handle. The two main types – submersible and pedestal pumps – each bring unique benefits. For added peace of mind, you might also want to think about a backup system to guard against power outages or pump failures.
Submersible pumps are designed to sit fully submerged in the sump pit. These sealed units are quiet and capable of moving between 3,000 and 5,000 gallons per hour (GPH). They’re a great choice for finished basements, though they come with a higher upfront cost and are harder to access for maintenance.
Pedestal pumps, on the other hand, have their motor mounted above the sump pit, keeping it dry and making maintenance much simpler. They handle less water – around 2,000 to 3,000 GPH – and are noisier than submersibles, but they’re easier on the wallet. For added reliability, both types can be paired with backup systems.
When choosing a sump pump for Canadian homes, consider the horsepower based on the water volume and the height the water needs to be lifted. For smaller basements, a 1/3 horsepower pump is usually sufficient, moving about 40 gallons per minute (GPM) at a 1.5-metre lift. A 1/2 horsepower pump, the standard choice for most homes, can handle 50 to 60 GPM and is well-suited for lifts of around 3 metres. In flood-prone areas like parts of Ontario, where high groundwater levels and spring thaws are common, a 3/4 to 1 horsepower pump is often recommended. These details can help you find the right pump for your specific needs.
Comparison Table of Sump Pump Types
Pump Type
Location
Capacity (GPH)
Noise Level
Best For
Typical Cost Range
Submersible
Underwater (in pit)
3,000 – 5,000
Quiet
High water flow, finished basements
Higher
Pedestal
Above the pit
2,000 – 3,000
Louder
Light water flow, easy maintenance, budget homes
Lower
Battery Backup
Secondary system
Varies
Quiet
Power outages, storm-prone areas
Moderate to High
Water-Powered Backup
Secondary system
1,000 – 1,500
Silent
Homes with sufficient municipal water pressure
Moderate
Backup systems offer extra protection for your home. Battery-powered backups kick in automatically during power outages but require regular battery maintenance. Water-powered backups, on the other hand, rely on municipal water pressure to operate, which means they don’t need electricity at all. Both options can be lifesavers in stormy or flood-prone conditions.
Choosing a Sump Pump for Your Home
Finding the right sump pump for your home means tailoring its capacity to match your specific water conditions. To start, calculate how much water the pump needs to handle using this formula: GPH = Area (square feet) × Rainfall (in.) × 0.6. This gives you an estimate of the gallons per hour required, especially during heavy rain or spring snowmelt – common in places like Barrie, Muskoka, and York Region.
Another key factor is the pump’s head height, which is the vertical distance from the sump pit’s base to the highest point where water is discharged. As the vertical lift increases, the pump’s flow rate decreases, so it’s important to measure this carefully. Choose a pump with a maximum head rating that exceeds your actual lift. For instance, if your discharge point is 3 metres above the sump pit, you’ll need a pump rated for a head height beyond that to maintain efficient flow. Keep in mind that every 3 metres of horizontal piping and each 90-degree elbow adds about 0.3 metres of equivalent head pressure.
For most Canadian homes, a 1/2 horsepower pump is a dependable choice. It typically moves 50 to 60 gallons per minute and is effective for vertical lifts around 3 metres. Smaller basements under 1,000 square feet with minimal water issues might do fine with a 1/3 horsepower pump, which moves around 40 gallons per minute at a 1.5-metre lift. However, if you live in flood-prone areas near lakes or in low-lying regions with clay soil, you may need a more powerful 3/4 or 1 horsepower pump to handle the extra water volume.
The diameter of your discharge pipe also matters. Using a pipe that’s too narrow can create back pressure, putting unnecessary strain on the pump and shortening its lifespan. Match the pipe size to the pump’s outlet – usually between 3.8 and 5 centimetres – and opt for the largest size that fits your system. Be cautious about over-sizing your pump, as an overly powerful unit can cycle on and off too frequently, wearing out the motor faster and wasting electricity.
Finally, think about power reliability. In rural areas or storm-prone regions, having a backup system is crucial. Battery-powered backups kick in during power outages, while water-powered systems rely on municipal water pressure to function without electricity. Test your backup system annually to ensure it’s ready to handle sudden surges of meltwater. Once you’ve chosen the right pump, you’ll be ready to move on to installation to ensure everything runs smoothly.
Sump Pump Installation Basics
Installing a sump pump takes careful planning and adherence to local regulations. In Ontario, the Ontario Building Code requires that all new or updated sump pits be sealed and vented for radon gas control. Additionally, the pump must connect to a dedicated circuit with a GFCI-protected outlet for safety. If you’re planning a new installation or making structural changes, you’ll need building and plumbing permits. Electrical work must be performed by a Licensed Electrical Contractor with the required ESA permits.
"Where gravity drainage is not practical, a covered sump with an automatic pump shall be installed to discharge the water into a sewer, drainage ditch or dry well." – Roger Frost, CBCO Wett Certified, InterNACHI
One key rule in Ontario affects water discharge. Sump systems are no longer allowed to drain into municipal storm water systems. Instead, you must direct water to a drywell (at least 4.5 metres from your home’s foundation), a drainage ditch, or surface drainage. This ensures better water management and reduces the risk of water damage to your property.
Professional installation costs typically range between $500 and $3,000, with labour fees falling between $300 and $800. While skilled DIYers might handle simpler setups, it’s wise to hire a professional for tasks like excavating your basement floor, running new electrical circuits, or dealing with permits and inspections. A properly installed sump pump can last 7 to 10 years, helping to prevent basement flooding and saving you money over time , much like proper window well design.
Before starting, make sure you have all the necessary tools and materials.
Tools and Materials Needed
Here’s what you’ll need for the job:
Sump pump unit: Prices range from $150 to $1,500, depending on the model.
Sump basin liner: Approximately 46 cm wide × 61 cm deep.
Rigid PVC piping: 32 mm to 38 mm in diameter.
Check valve, plumber’s tape, pipe clamps, and PVC cement.
For tools, gather a pipe wrench (or adjustable wrench), screwdriver set, utility knife, pipe cutters or hacksaw, and a wet/dry vacuum to clear debris from the pit. These materials are readily available at hardware stores across Canada.
Step-by-Step Installation Guide
Follow these steps for a smooth sump pump installation:
Find the right spot: Locate the lowest point in your basement for the pit.
Excavate the pit: If there’s no existing basin, dig a hole using the standard dimensions (61 cm by 46 cm). Install the sump basin liner to prevent soil from entering the system.
Install the pump: Place the pump in the basin and attach the check valve to stop water from flowing back into the pit.
Set up the discharge line: Run rigid PVC piping from the pump to the outside. Ensure the discharge line ends 3 to 5 metres away from your foundation to avoid water recycling back toward your home.
Connect to power: Plug the pump into the dedicated GFCI outlet and test the float switch and check valve by filling the pit with water.
Winterize: In colder climates, insulate exposed discharge pipes to prevent freezing or blockages during the winter months.
With the right preparation and tools, you can ensure a safe and effective sump pump installation. Properly managing water discharge and following local codes will protect your home and extend the system’s lifespan.
How to Use a Sump Pump
Once your sump pump is installed, using it correctly is key to keeping it running smoothly. Regular testing is a must. Start by pouring about five gallons (19 litres) of water into the sump pit at a natural flow rate. Watch to see if the float switch activates, the motor starts pumping water out, and the system shuts off automatically. Repeat this process twice to be thorough. As Tom Scherer, an agricultural engineer with the NDSU Extension Service, puts it:
If something doesn’t work right, fix it as soon as possible.
During these tests, make sure the check valve is doing its job by stopping water from flowing back into the pit. This prevents short-cycling, which can wear out the pump. For pedestal pumps, keep the ball float and switch in view while testing. For submersible pumps, listen carefully to ensure water is being discharged properly.
Discharge Placement Matters
Where you direct the discharged water is just as important as the pump itself. Scherer advises:
Homeowners should discharge sump water at least 20 feet from their home in a way that the water will drain away from the house.
Place the discharge pipe about 20 feet (6 metres) from your foundation, aiming it toward a spot where the ground naturally slopes away. Avoid directing sump water into a septic system or basement floor drain, as this can lead to serious problems. Keep an eye on these elements to catch any issues early, before transitioning to regular maintenance routines.
Monitoring During Heavy Use
After confirming everything is working correctly, observe your pump during periods of heavy use, like after a big rainstorm. It’s normal for the pump to run continuously for two to three days when groundwater levels are high. However, stay alert for warning signs. If water flows back into the pit after a cycle, the check valve might have failed. If the pump keeps running during dry conditions, it could mean the float switch is stuck or the motor isn’t powerful enough. Also, check the exterior discharge pipe during storms to ensure water is flowing freely without any blockages.
To stay ahead of potential problems, test your sump pump every month, especially before spring and summer when heavy rains are more common. Consider installing a battery-powered backup pump to keep things running smoothly during power outages.
How to Clean a Sump Pump
To keep your sump pump running smoothly and avoid breakdowns, it’s a good idea to clean it twice a year – once before the spring thaw and again before the rainy season.
Start by disconnecting the power to eliminate any electrical risks. Unplug the pump or shut off the breaker. Also, turn off appliances like your washing machine that might drain into the sump pit to prevent unexpected water flow. Make sure to wear protective gloves and a face mask to shield yourself from dirt, mould, and debris.
Once the power is off, remove standing water and sludge from the pit using either a wet-dry vacuum or a bucket. Carefully lift the pump out of the pit and clean its exterior with a soft brush and mild dish soap. Pay close attention to the inlet screen, where sediment tends to collect. Use a plastic scraper to gently clear any buildup from the pump body and basin walls. Then, flush the pit with a garden hose to wash away remaining debris. For algae or stubborn grime, a diluted vinegar solution works well, but steer clear of harsh chemicals that could harm the pump’s components.
While cleaning, take the opportunity to inspect the pump and its parts. Check the impeller for debris, ensure the float switch moves freely, verify the check valve is working to prevent backflow, and make sure the discharge pipe is free of blockages. Also, examine the sump pit itself for any cracks or damage.
After reassembling the pump, pour water into the pit to test if it activates and drains as it should. If you’re unsure about handling electrical components or run into persistent clogs, you might want to call in a professional. Professional cleaning services usually cost between $150 and $300.
Taking the time to clean your sump pump not only extends its lifespan but also ensures it’s ready to handle heavy water flow when needed. A clean pump also makes it easier to identify any performance issues during future maintenance checks.
Common Sump Pump Problems and Quick Fixes
Even with proper sump pump installation and maintenance, units can face issues that might leave your basement at risk. The good news? Many of these problems have simple fixes you can handle before calling in a professional.
One of the most frequent issues is power failure, which often happens during heavy storms – precisely when you need the pump the most. A tripped breaker or unplugged cord could be the culprit, so start by checking your electrical panel. To prepare for future outages, consider adding a battery-powered backup system.
Another common problem involves stuck float switches. If debris accumulates in the sump pit, it can jam the float, causing the pump to either stop working or run non-stop. Clearing out the pit and ensuring the float moves freely often solves this.
Clogged components, like the intake screen or discharge pipe, can also reduce the pump’s efficiency. Regular cleaning can prevent this, but if you notice the pump struggling – especially in winter – inspect these areas. In Canadian winters, frozen discharge lines are a frequent issue. Installing an IceGuard fitting can ensure water escapes even if the main pipe freezes.
If your pump seems to be running constantly but not keeping up, it might be undersized for the water inflow. Alternatively, a broken or missing check valve could allow water to flow back into the sump pit, reducing efficiency. Upgrading to a more powerful unit or replacing the check valve can address these issues.
Sump pumps typically last 7 to 10 years under normal use, but frequent operation can shorten this to 5 to 7 years. If your pump is nearing the end of its lifespan or struggling despite repairs, replacing it might be the best option. Professional repairs usually cost between $150 and $500, while a full replacement – including labour and materials – ranges from $500 to $2,000.
Troubleshooting Table
Here’s a quick reference guide for common sump pump problems and their solutions:
Clean the screen; check discharge line for ice/debris.
Pump runs but no water moves
Broken or missing check valve
Install or replace the check valve.
Pump runs continuously
Stuck float switch or undersized pump
Adjust float; upgrade pump if necessary.
Frequent cycling (on/off)
Sump pit too small
Increase pit size or adjust float switch levels.
Excessive noise/vibration
Worn bearings or damaged impeller
Lubricate bearings; replace impeller or pump unit.
Musty odours in basement
Water pooling or dirty pit
Clean the pit; ensure the lid is sealed.
Pay attention to warning signs like grinding noises, vibrations, or musty smells – these often indicate a problem that could lead to pump failure. If troubleshooting doesn’t resolve the issue or you’re uncomfortable handling electrical components, it’s worth consulting a professional. Labour rates typically range from $45 to $75 per hour.
To prevent unexpected breakdowns, many manufacturers suggest replacing the float switch every two years. With regular checks and quick fixes, you can keep your sump pump running smoothly and extend its lifespan.
Maintenance Checklist
Taking care of your sump pump on a regular basis can help it last longer and reduce the chance of it failing when you need it most. Here’s a breakdown of essential maintenance tasks, organized by how often they should be done.
Monthly (during wet seasons): Test your sump pump by pouring water into the pit. This ensures the float switch activates and the pump starts working properly.
Quarterly: Unplug the pump, clean out any debris from the basin, and check that the intake screen is clear. Make sure the float switch moves freely without obstruction.
Twice a year: In early spring (before snow melts) and late fall (before winter storms), inspect the entire system. Look for rust, cracks, or corrosion. Check the discharge pipe outside for blockages like leaves, ice, or bird nests, and confirm it releases water at least 3 metres away from your home’s foundation. If your pump has a battery backup, inspect the terminals for corrosion and ensure the battery holds a proper charge.
Annually: Hire a professional to thoroughly inspect the system. This typically costs between $150 and $300. They’ll clean the system, test electrical connections, inspect all components, and replace the backup battery if it’s over three years old. Keeping a maintenance log can also help you spot patterns that might indicate potential issues and extend the pump’s lifespan, which is usually 7–10 years.
How often you perform these tasks may depend on how much your sump pump is used. For instance, pumps handling frequent water inflow – like from a washing machine – might need monthly inspections, while less active systems may only require annual checks. Also, avoid using harsh chemicals, as they can damage the pump’s seals.
Conclusion
A sump pump is your primary shield against flooding, foundation issues, and costly water damage repairs. In the Greater Toronto Area (GTA), rising water tables and aging infrastructure make basement flooding a frequent and expensive challenge for homeowners.
This guide has covered how sump pumps work, their essential components, how to choose the right model, and the importance of regular maintenance. As RenoHouse wisely points out:
A sump pump that fails during a storm is worse than not having one – because you’re relying on protection that isn’t there.
Regular maintenance is the key to ensuring your sump pump works when you need it most. Tasks like monthly bucket tests, clearing debris seasonally, and scheduling an annual professional inspection are crucial for keeping your system in top shape.
While you can handle some upkeep yourself – like cleaning the sump pit or testing the float switch – professional installation and inspections provide added peace of mind. A properly installed system not only adheres to the Ontario Building Code but also includes GFCI-protected electrical connections and is tailored to your home’s specific needs. With proper care, most sump pumps last seven to ten years.
If you’re looking for expert assistance, POM Plumbing Service Company has over 20 years of experience serving Toronto and the GTA. Their licensed professionals specialize in sump pump installation, maintenance, and code-compliant upgrades, ensuring your system is ready to protect your home during heavy rains or spring thaws.
Don’t wait for water to start pooling in your basement. Regular testing, cleaning, and professional inspections are essential for your sump pump’s performance. Contact POM Plumbing Service Company today to keep your home dry and your foundation secure.
FAQs
Do I need a sump pump in my home?
If your home is at risk of water intrusion or flooding, a sump pump might be a smart investment. Watch for warning signs like dampness, water stains, musty odours, or elevated humidity levels in your basement. These can indicate potential water issues. In areas like Toronto and the GTA, where flooding or a high water table is common, a sump pump can help safeguard your foundation and prevent expensive water damage.
Should I add a battery backup sump pump?
Adding a battery backup sump pump is a smart move to ensure your home stays protected during power outages or when the primary pump fails. This is particularly important in Ontario, where heavy rains and storms can overwhelm sump systems. A backup pump can be a lifesaver, especially if your home is below the water table or located in an area prone to flooding. It provides an added layer of security, helping to prevent basement flooding, costly water damage, and even mould growth.
When should I replace my sump pump?
If your sump pump is showing signs of trouble – like frequent breakdowns, strange noises, or failing to keep flooding at bay – it might be time for a replacement. Generally, sump pumps older than 7 to 10 years are more likely to fail and could benefit from being replaced before problems arise. Regular maintenance and inspections can catch potential issues early, helping to keep your home safe from water damage.