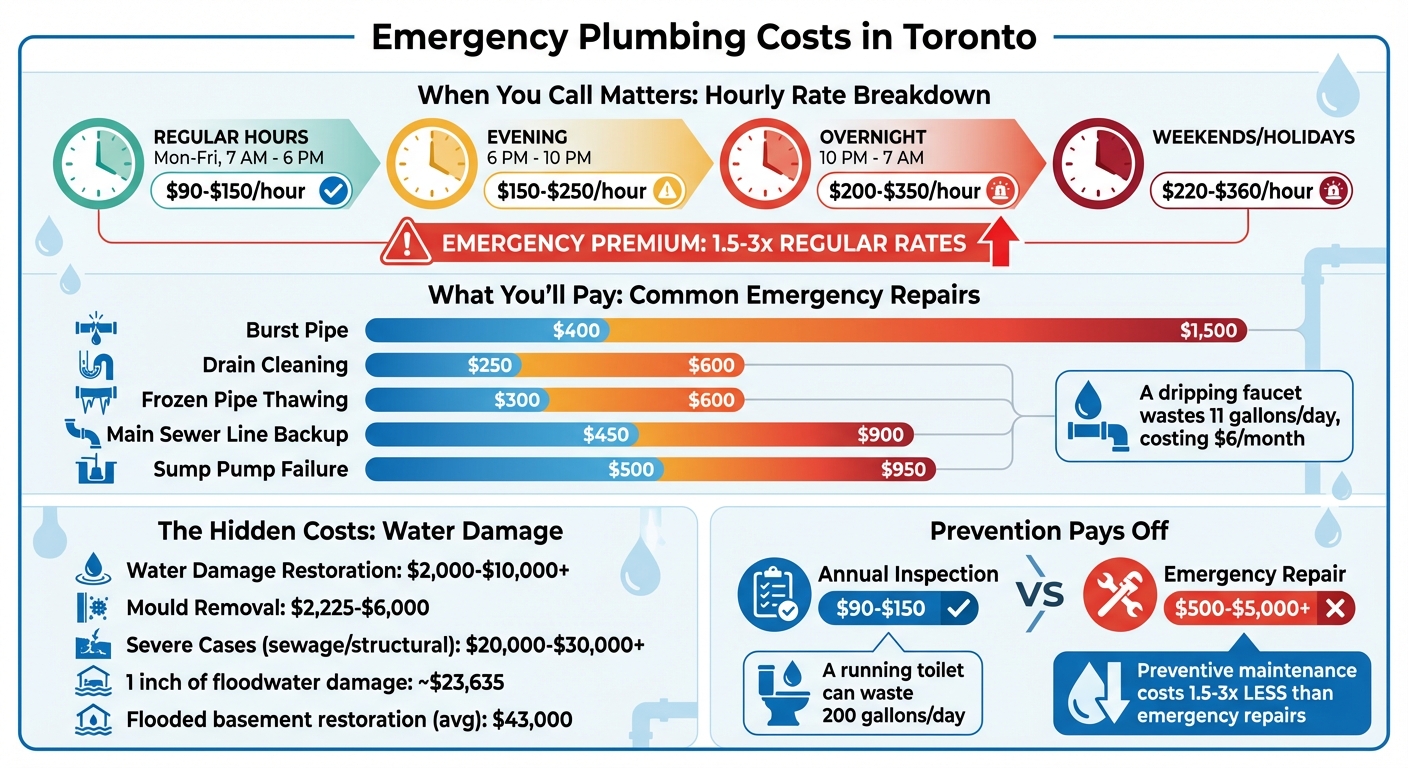
- Emergency plumbing rates: Regular plumber rates in Toronto range from $110–$200/hour, but after-hours calls can exceed $400/hour.
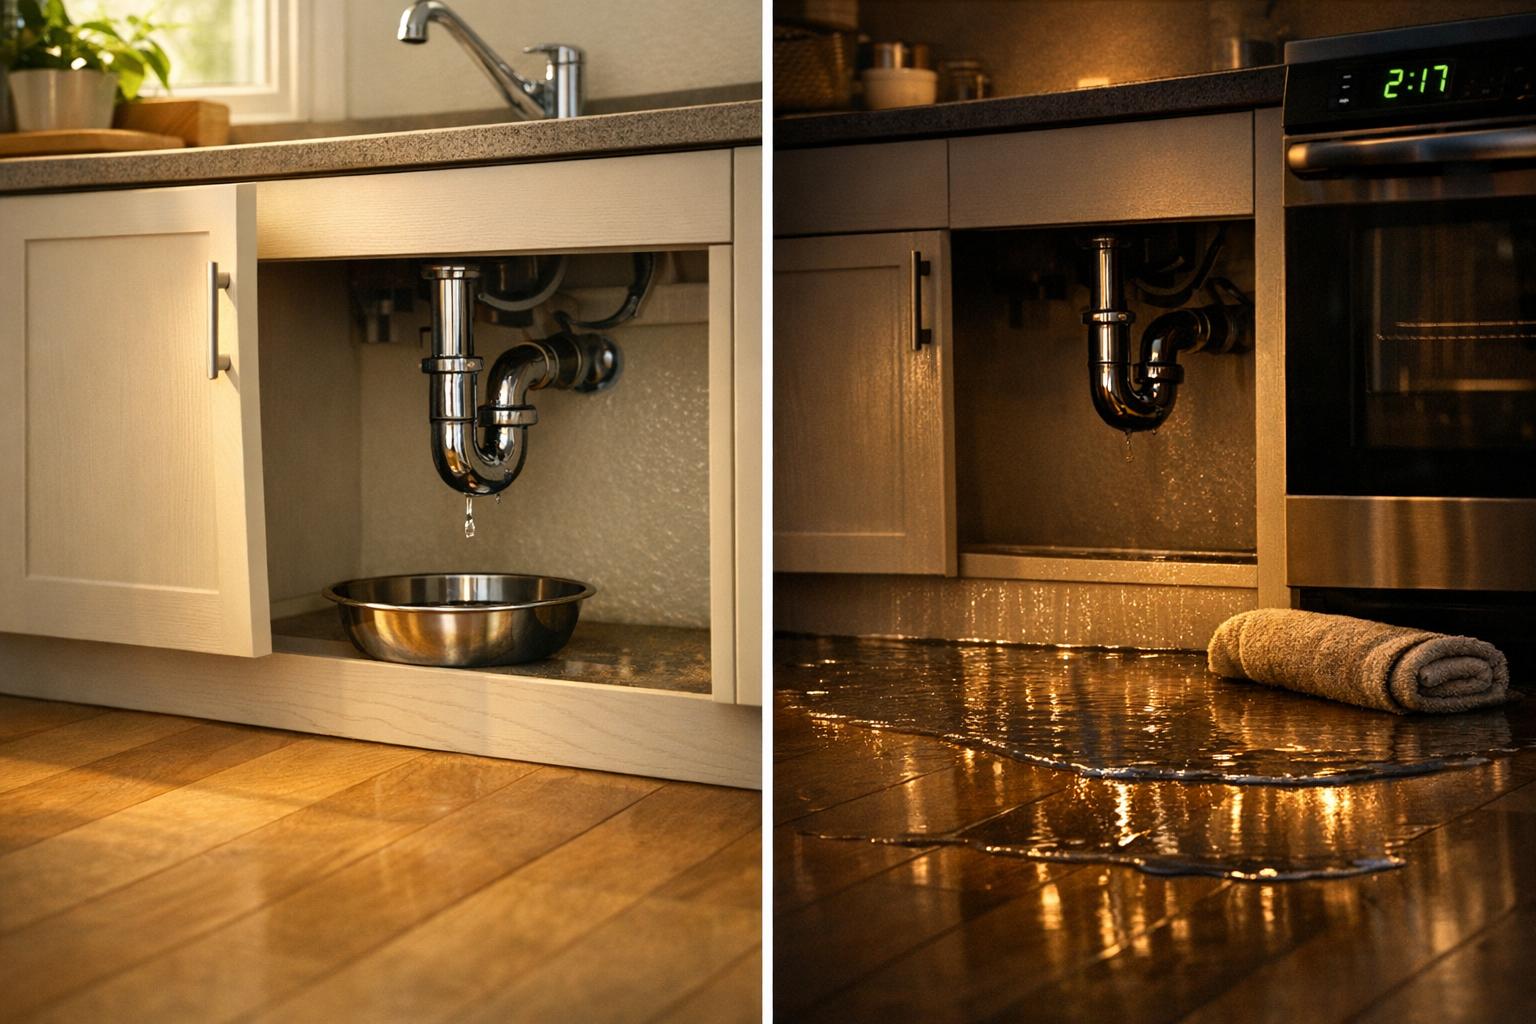
- Common emergencies: Burst pipes, sewage backups, gas leaks, and major water damage require immediate attention. Winter conditions and aging pipes in older Toronto homes increase risks.
- Secondary damage: Water damage restoration can cost $2,000–$10,000+, with mould removal adding another $2,225–$6,000. Delays make repairs more expensive.
- Preventive maintenance: Annual inspections cost around $90–$150, far less than emergency repairs or water damage restoration.
- Insurance coverage: Sudden issues like burst pipes are often covered by insurance, but long-term problems like rust or slow leaks are not.
Acting quickly and scheduling regular maintenance can save you thousands. Don’t ignore small leaks – they can spiral into major expenses.
Emergency Plumbing Costs in Toronto: Regular vs After-Hours Rates and Common Repair Expenses
Plumbing Costs: Regular vs. Emergency Hours Explained!
What Qualifies as a Plumbing Emergency
Not every leak or clog needs an immediate fix, but some situations require urgent attention to avoid serious damage. A plumbing emergency involves any issue that needs immediate action to prevent property damage, health risks, or loss of essential water services. Keep in mind that emergency plumbing services can cost 1.5 to 3 times more than standard rates, turning a $150 repair into a $400+ bill.
Burst pipes are among the most critical emergencies, especially in Canadian winters. When temperatures fall below -6°C, water in uninsulated pipes can freeze, expand, and cause the pipes to crack. The real trouble often begins when the ice thaws, as water rushes through the cracks, potentially releasing hundreds of litres into your walls or basement. For instance, the Cumberland Heritage Village Museum in Ontario experienced a severe flood during the winter of 2003. A furnace failure caused a 3/4-inch roof pipe to freeze and burst, releasing over 2,000 m³ of water. This led to extensive damage, including warped wood and damaged veneers.
Sewage backups and gas leaks are also emergencies that require immediate professional attention. Sewage backups can introduce harmful bacteria and pathogens, posing serious health risks. Meanwhile, gas leaks from water heaters are dangerous due to the risk of explosions. If you suspect a gas leak, evacuate immediately and leave the shut-off to the professionals. Other urgent issues include losing hot water during winter, flooding that can’t be stopped with shut-off valves, and water reaching electrical wiring, which creates a fire hazard.
"Water leaks can also quickly turn into a fire hazard because they can reach electrical wires." – Plumbing and Heating Paramedics
Even minor leaks should be addressed quickly in Canadian climates. Persistent moisture can lead to warped wood, cracked foundations, and mould growth within just 24–48 hours. A small drip might also hint at a pipe freezing elsewhere in your system.
Acting fast is crucial. Emergency plumbers generally arrive within 30 minutes to 2 hours. Knowing where your main water shut-off valve is and using it promptly can save you thousands of dollars in damages – turning a $500 repair into a $5,000 disaster.
Common Small Plumbing Issues That Escalate Quickly
What might seem like minor plumbing problems can often be early signs of larger system failures. Ignoring them could lead to costly repairs and extensive damage. Knowing which issues to address immediately can save you both time and money.
Dripping Faucets and Toilet Leaks
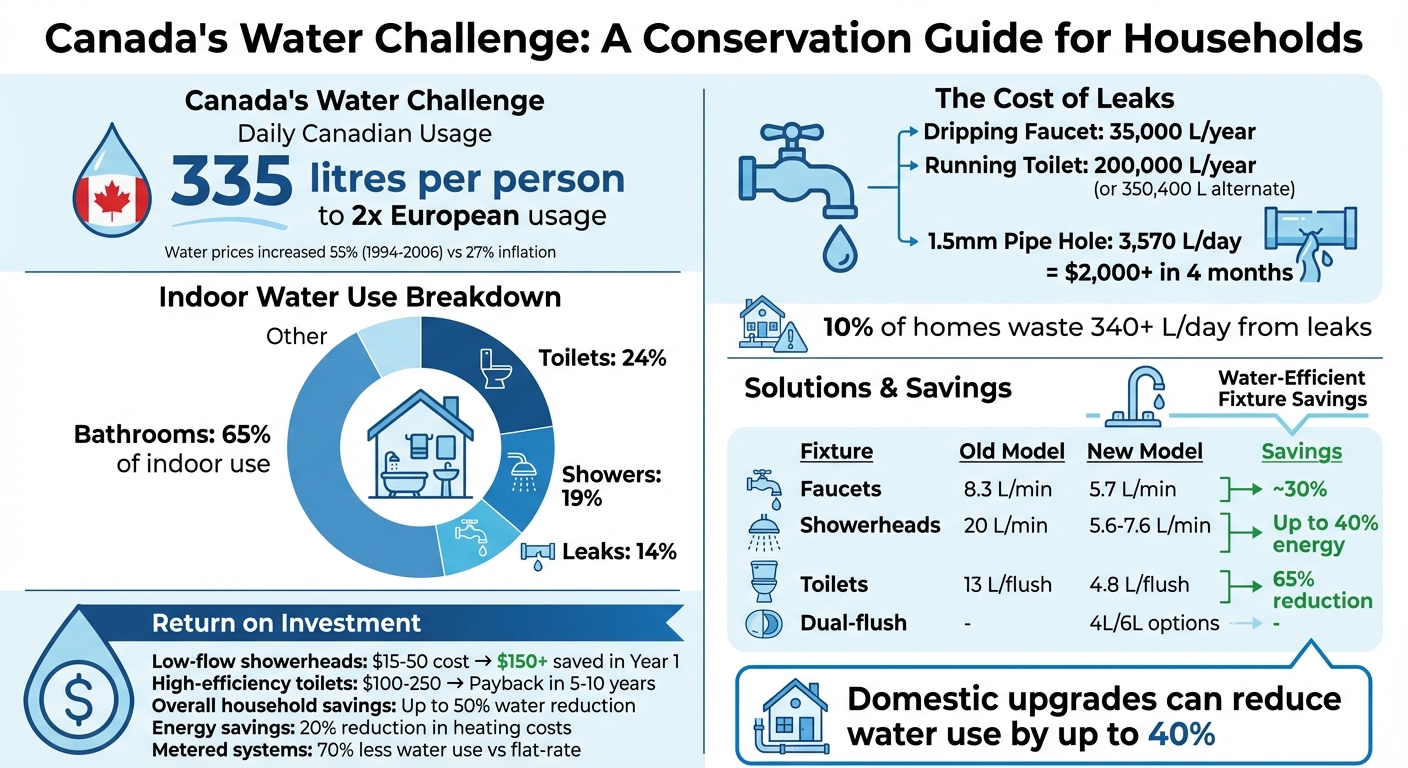
A dripping faucet might not seem like a big deal, but it can waste up to 11 gallons of water daily, adding around $6 to your monthly bill. Beyond the financial cost, this wasted water can seep into subflooring, loosening tiles, rotting wood, and creating the perfect environment for mould to thrive. Mould growth can lead to health problems, including respiratory issues and skin irritations.
Toilet leaks are even more concerning. A single running toilet can waste about 200 gallons of water daily – or over 6,000 gallons in a month. In Toronto, the numbers are even more staggering: up to 20,000 litres of water could be wasted daily, costing a homeowner $97.26 every day. To check for a silent toilet leak, add a few drops of food colouring to the tank. If the colour appears in the bowl within 10–15 minutes without flushing, the flapper valve likely needs replacing.
"The smallest leaks, if left unchecked, can cause major issues in your home. To preserve the integrity of your plumbing system and save you the trouble of costly repairs, deal with any leak immediately." – Plumbing Authority Inc.
Even seemingly minor clogs can be a warning sign of more serious issues.
Minor Drain Clogs
A slow-draining sink or shower might not seem urgent, but it could lead to a sewage backup, which poses serious health risks. Small clogs often hint at larger problems in the sewer line, especially in areas like Toronto, where older homes and high-density housing are common. Left untreated, these blockages can cause pipe ruptures, requiring costly excavation or repairs beneath the house.
The problem is particularly acute in older Toronto neighbourhoods like Old Toronto and East York. These areas often have aging cast iron or galvanized pipes, which are prone to internal scaling and blockages. Avoid using acidic drain cleaners, as they can corrode copper or PVC pipes. Instead, professional mechanical snaking is a safer and more effective solution.
Even a small clog can be a sign of deeper vulnerabilities in your plumbing system.
Kitec Piping Wear

If your Toronto home was built or renovated between 1995 and 2007, it might have Kitec piping – a material notorious for sudden and catastrophic failures. Unlike a slow drip, Kitec pipes often burst without warning, releasing hundreds of litres of water into your walls or ceilings. These failures are typically caused by corrosion, age, and water pressure.
Toronto’s moderately hard water (7–10 grains per gallon) accelerates the deterioration of Kitec pipes by causing mineral buildup, which adds extra pressure to already weakened fittings. When a ¾-inch Kitec pipe ruptures, it can release up to 26 gallons of water per minute. If your home has Kitec piping, replacing it is not just a precaution – it’s a necessity to avoid a plumbing disaster that could cost thousands in repairs and water damage remediation.
How Small Leaks Turn into Major Damage
What starts as a minor drip can escalate into a costly disaster. The journey from a small leak to significant structural damage follows a predictable path, with repair costs climbing at every stage.
Water Damage and Mould Growth
Even in the first few minutes, water begins to wreak havoc. Moisture can alter finishes, and furniture dyes may stain carpets. Within hours, wood furniture starts to swell and lose its shape. If the issue persists for days, the damage becomes far more severe – floors warp, wallpaper peels, paint bubbles, and structural wood begins to crack and split.
Clean water doesn’t stay clean for long. If not addressed quickly, it degrades into grey water, and within 48 hours, it turns into black water – highly contaminated and dangerous. At this point, most affected items become unsalvageable, and the risk to health and safety increases dramatically.
Mould is another major concern. It can start growing as soon as 24 to 48 hours after moisture appears. Once established, removing mould can cost anywhere from $2,225 to $6,000 for larger jobs. Beyond the financial burden, mould poses serious health risks, including respiratory problems, skin irritations, and asthma.
While the immediate effects on finishes and health are concerning, the long-term structural consequences of unchecked leaks are even more alarming.
Structural and Foundation Damage
When moisture seeps into subflooring, it starts to break down materials like plywood, causing them to rot and delaminate. This can lead to tiles and vinyl loosening and detaching. Over time, wooden walls lose their strength, compromising the home’s load-bearing structure.
The financial toll of water damage is eye-opening. Just 1 inch of floodwater can result in approximately $23,635 in repair costs, plus an additional $3,172 in property loss. If the water level reaches one foot, the average damage cost skyrockets to $39,845.
Repair expenses also depend on the type of water involved. Clean water damage averages $3.75 per square foot, grey water repairs increase to $4.50 per square foot, and black water – the most hazardous – costs around $7.00 per square foot. For Canadian homeowners, restoring a flooded basement can cost an average of $43,000. If the leak is hidden behind walls or under concrete slabs, accessing and repairing it alone can range from $800 to over $1,500.
Emergency Plumbing Costs Breakdown
Emergency plumbing services in Toronto fall into three main cost categories: immediate repairs, repair versus replacement, and secondary damage expenses.
Immediate Repair Costs
Toronto plumbers typically use a mixed-billing model. This means you’ll pay a flat call-out fee that covers the first hour, followed by hourly rates for additional time. During regular business hours (Monday to Friday, 7:00 AM to 6:00 PM), licensed plumbers charge between $90 and $150 per hour. But once the clock strikes 6:00 PM, the rates start climbing.
"For after-hours service, emergency plumbing visits range $150 to $400, with nighttime or holiday calls billed at the top of that range." – Premier Plumbing
Evening calls (6:00 PM to 10:00 PM) cost $150 to $250 per hour, while overnight emergencies (10:00 PM to 7:00 AM) can run as high as $200 to $350 per hour. Weekend and holiday rates are even steeper, ranging from $220 to $360 per hour, with call-out fees between $225 and $455.
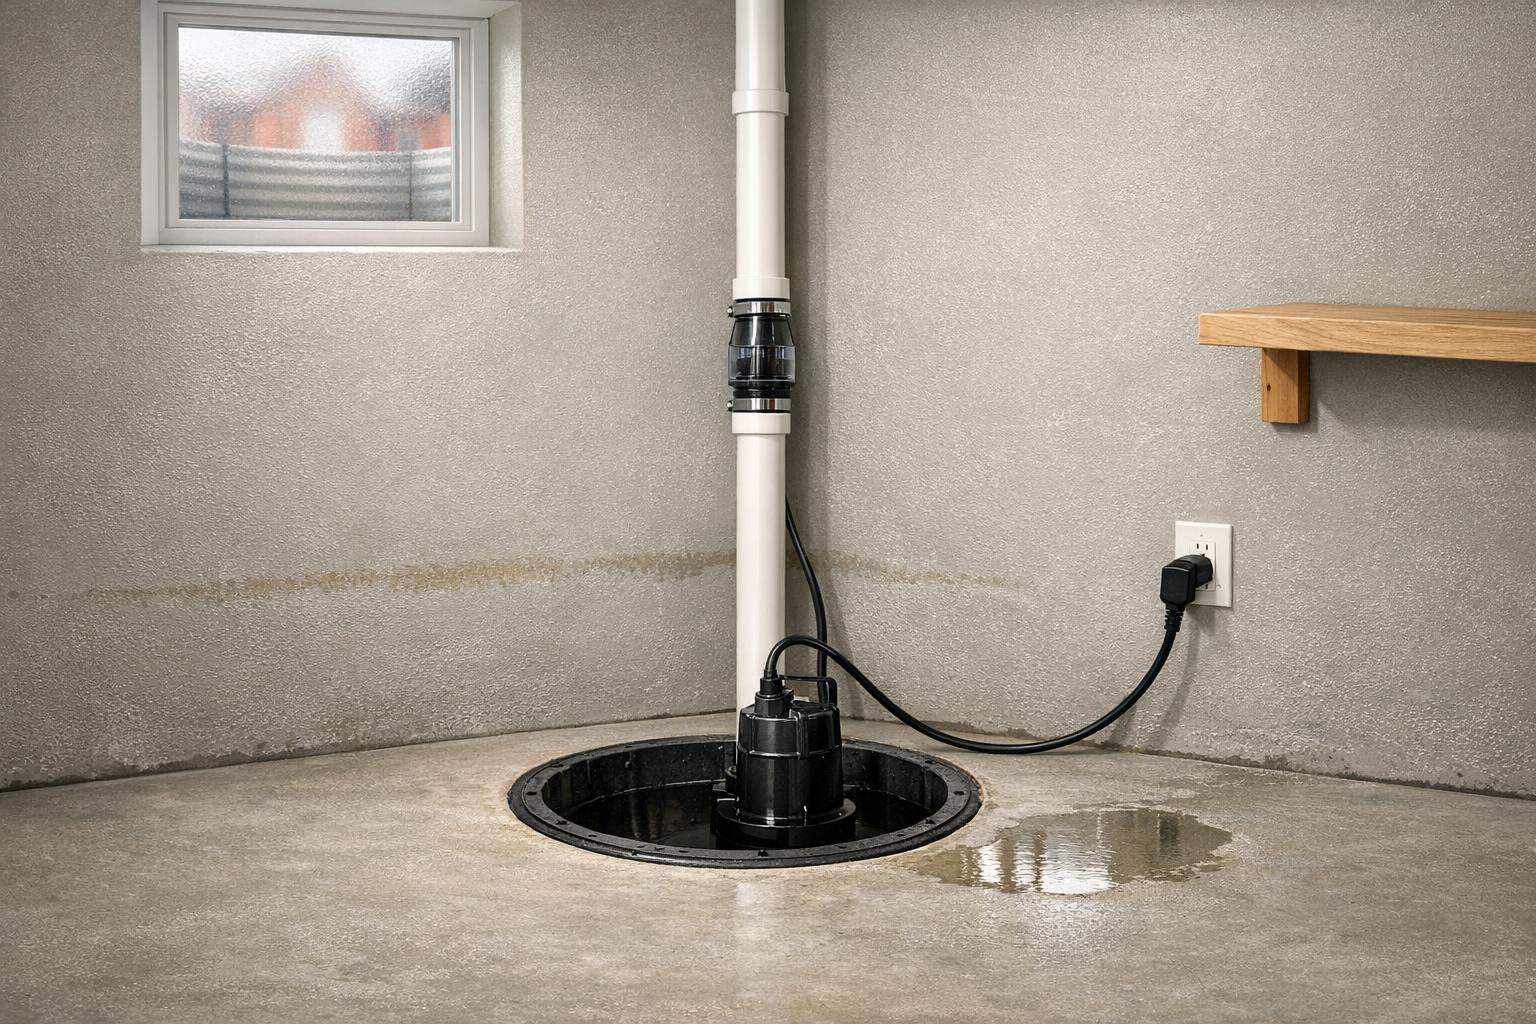
The cost of specific emergency repairs varies widely. Fixing a burst pipe can cost anywhere from $400 to $1,500, depending on how severe and accessible the damage is. Drain cleaning is priced at $250 to $600, and frozen pipe thawing costs $300 to $600. More significant issues like a main sewer line backup range from $450 to $900, and sump pump failures can cost between $500 and $950.
For downtown Toronto homeowners, additional fees may apply. These include extended-zone mileage surcharges ($1.50 to $2.50 per kilometre beyond a 30-kilometre radius), parking fees ($25 to $50 per day), and disposal fees for old fixtures ($25 to $120).
Repair vs. Replacement Costs
When dealing with older systems, patching things up repeatedly can quickly become more expensive than replacing them outright. Here’s a breakdown of costs:
| Item | Patch/Repair | Full Replacement Cost |
|---|---|---|
| Toilet | $150–$400 | $200–$600 |
| Faucet | $100–$350 | $200–$450 |
| Water Heater | $150–$500 | $1,200–$4,500 |
| Piping System | $200–$400 (minor leak) | $3,000–$16,000 (full repipe) |
| Sewer Line | $1,800–$6,000 (repair) | $5,000–$12,000 (excavation) |
Replacement costs include the price of new hardware, labour for installation, and disposal of old fixtures. For example, replacing a toilet costs $200 to $450 in labour alone. Installing a new faucet adds $250 to $350. When it comes to water heaters, tank models range from $1,200 to $1,800, while tankless systems cost $2,500 to $4,000. Sewer line replacements involving excavation can climb up to $12,000.
Secondary Damage Costs
Emergency plumbing issues often lead to secondary damage, which can significantly increase overall costs. Water damage restoration in Toronto typically ranges from $2,000 to $10,000, but extreme cases involving sewage or structural damage can exceed $20,000 to $30,000. Restoration costs per square foot range from $4 to $12, depending on the severity and type of water involved.
For example, sewer backup repairs cost between $1,800 and $6,000. If contaminated water (Category 3/Black Water) is involved, remediation costs can jump to $5,000 to $30,000+. Acting quickly – within the first 24 hours – can keep restoration costs lower ($1,000 to $3,000), while delays may push expenses into the range of $7,000 to $20,000+.
Here’s a look at specific restoration costs:
- Drywall removal and replacement: $300 to $1,200
- Hardwood floor drying or replacement: $2,000 to $8,000
- Cabinet restoration: $1,000 to $5,000
- Mold prevention treatment: $200 to $800
- Structural disinfection and deodorizing: $200 to $1,000
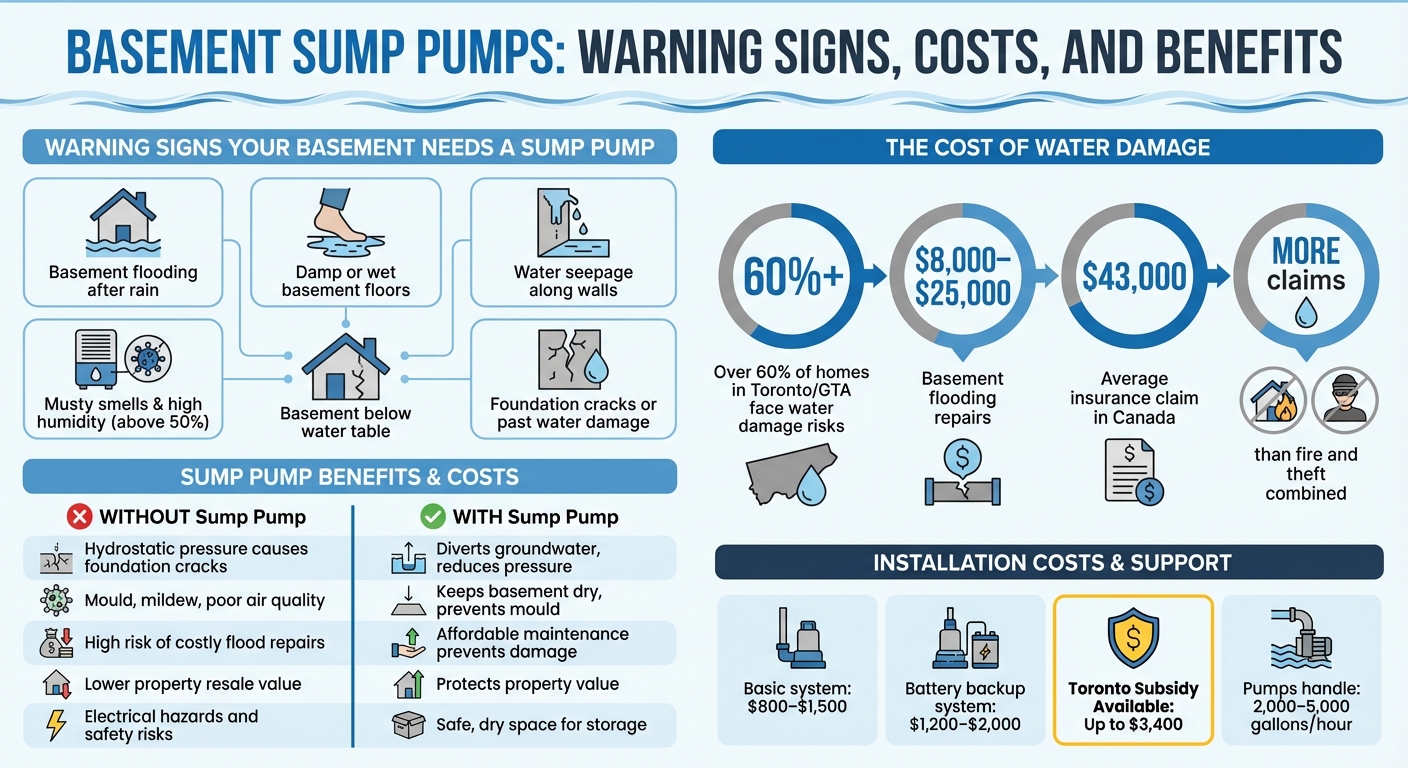
Toronto residents dealing with flood-related repairs should consider the Basement Flooding Protection Subsidy Program, which offers up to $3,400 to help cover the cost of installing backwater valves and sump pumps.
sbb-itb-1e3c609
Factors That Increase Emergency Plumbing Expenses
When it comes to emergency plumbing, several factors can quickly inflate your bill. Timing is often the biggest culprit. Emergency plumbers typically charge 1.5 to 3 times their regular rate. For instance, while a licensed plumber may charge $90–$150 per hour during normal business hours, the same job on a Saturday night or holiday could cost you anywhere from $300–$600 per hour. This steep increase is due to limited staffing and overtime costs. But timing isn’t the only factor driving up expenses.
Accessibility issues can also add significant labour time, especially in the GTA. If pipes are hidden behind finished walls, under concrete slabs, or tucked into tight crawlspaces, the job may require demolition and reconstruction, which extends the work. In downtown Toronto condos, additional challenges like elevator wait times, restricted access to mechanical rooms, and coordination with building management can add one to two hours to the job. When combined with emergency rates, this can lead to a hefty final bill.
Older homes in areas like East York or The Junction bring their own set of challenges, often increasing costs by 15–30%. Houses built between 1900 and 1950 frequently feature cast iron or galvanized pipes, which require specialized fittings and more labour. What may appear to be a straightforward repair can escalate when hidden problems like corroded shut-off valves or cracked flanges are uncovered and demand immediate attention.
"Older Toronto homes often require special-order fittings for legacy plumbing systems, increasing both material cost and lead time." – Premier Plumbing
Urban logistics can also add to your bill. For instance, downtown Toronto plumbers often pass along parking fees of $25–$50 per day. If your home is located more than 30 kilometres from the plumber’s base, you might also face mileage surcharges of $1.50–$2.50 per kilometre, which could tack on as much as $200 to your total cost.
These factors combined make emergency plumbing in the GTA a costly affair, especially when timing, location, and infrastructure challenges align.
When to Call an Emergency Plumber Immediately
Not every small leak justifies a late-night call, but some situations demand immediate attention. For instance, if water is pouring out of your walls or ceilings, it could mean a ruptured pipe. This isn’t just about water damage – it could compromise your home’s structure. In severe cases, delays have even led to collapsed ceilings. If you notice this kind of water intrusion, don’t wait – call a plumber right away.
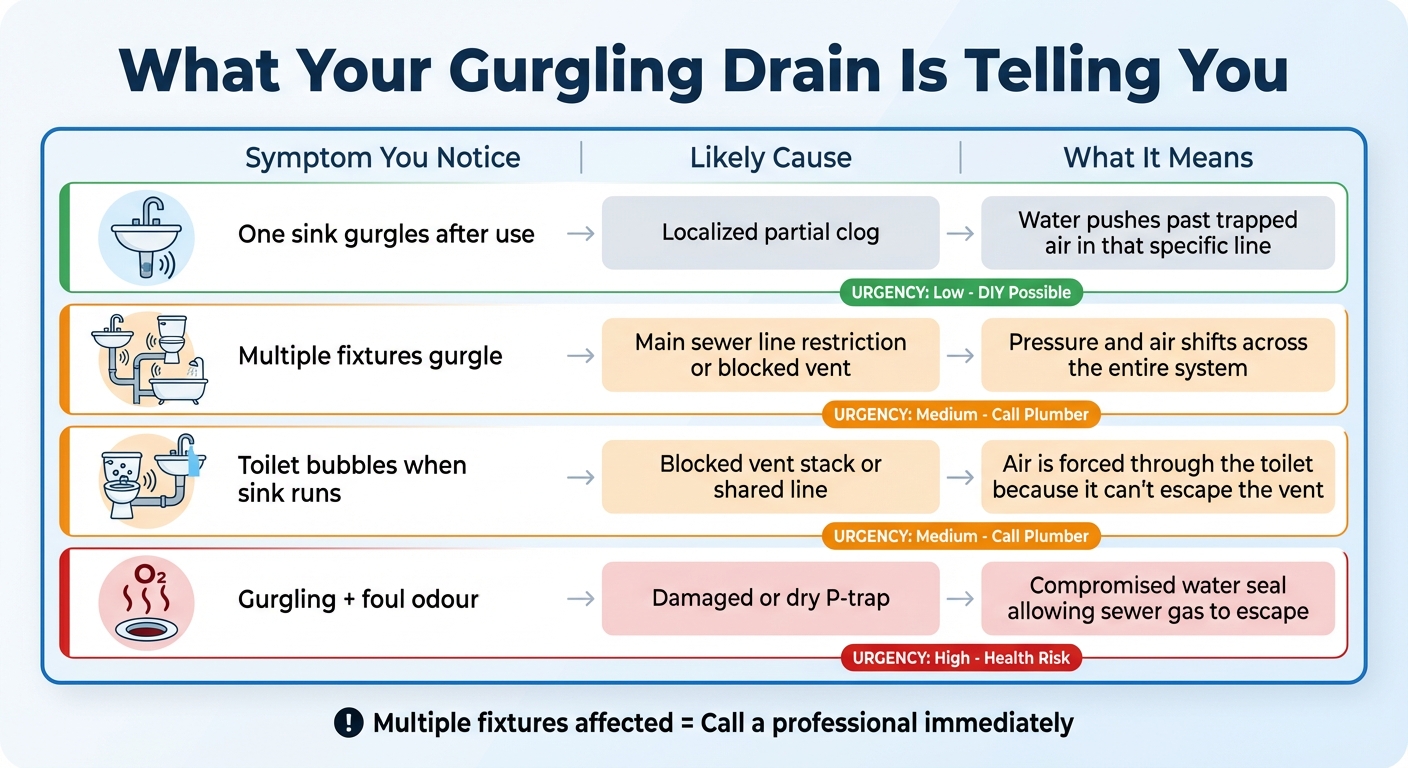
Sewage problems are another critical issue. Sewage backups pose serious health risks and are considered plumbing emergencies. Warning signs include a foul rotten egg smell, gurgling noises from multiple drains, or water backing up into your tub when you flush the toilet. These symptoms often point to a major blockage in the main sewer line. Left unchecked, this can expose your home to hazardous waste, requiring specialized tools and expertise to resolve safely. Similarly, a complete loss of water pressure or sudden water outages throughout your home often signal a break in the main water line. Ignoring this issue will only make it worse.
"If leaving the issue alone until regular business hours means your home will incur more damage or put your family at risk, then it’s typically considered a plumbing emergency." – Scott Dylan Westerlund, Contributing Writer, Angi
Gas-related problems also demand immediate action. If you smell a sulphur-like "rotten egg" odour near your water heater or gas appliances, evacuate your home immediately, contact emergency services, and then call a plumber. Additionally, a water heater that’s leaking heavily, making loud banging noises, or failing during extremely cold weather could lead to a tank rupture or frozen pipes – both of which require urgent attention.
Taking quick action during a plumbing emergency can significantly reduce damage costs and prevent the need for extensive repairs. POM Plumbing Service Company offers 24/7 emergency services across the Greater Toronto Area. With advanced tools like video inspection cameras and power flushing machines, their team can quickly locate and address hidden problems. While waiting for help, shut off the main water valve, clear the area to give technicians access, and watch for warning signs like warm spots on your floors.
How to Reduce the Risk of Costly Plumbing Emergencies
Did you know that preventive maintenance can cost significantly less than dealing with after-hours plumbing repairs? In fact, it’s estimated to be 1.5 to 3 times cheaper. For example, fixing a burst pipe can set you back anywhere from $500 to $5,000, while an annual inspection typically costs just $90 to $150. That’s a small price to pay to avoid a major headache. Regular inspections and modern diagnostic tools are key to staying ahead of potential plumbing disasters.
Regular Inspections and Maintenance
Annual plumbing inspections are like a health check-up for your home – they help identify small issues, like pinhole leaks or worn-out valves, before they turn into costly problems. Think about it: replacing a worn washer during a routine check is far cheaper than repairing water damage caused by a failed supply line.
Many companies, like POM Plumbing Service Company, offer scheduled maintenance plans that include annual tune-ups, priority service, and discounts on repairs. These plans, which usually cost between $150 and $300 per year, can help you avoid emergency calls altogether. Compare that to a single emergency visit during a holiday, which could cost upwards of $600 per hour.
And don’t overlook your water heater! Routine maintenance, such as flushing and inspection, typically costs between $150 and $200. This simple step can add 3 to 5 years to your water heater’s lifespan.
Seasonal maintenance is another smart move. In the winter, insulating exposed pipes and disconnecting outdoor hoses can help prevent the kind of burst pipes that wreak havoc on homes. If you live in Toronto, you might even qualify for up to $3,400 in rebates under the Basement Flooding Protection Program when you install devices like backwater valves.
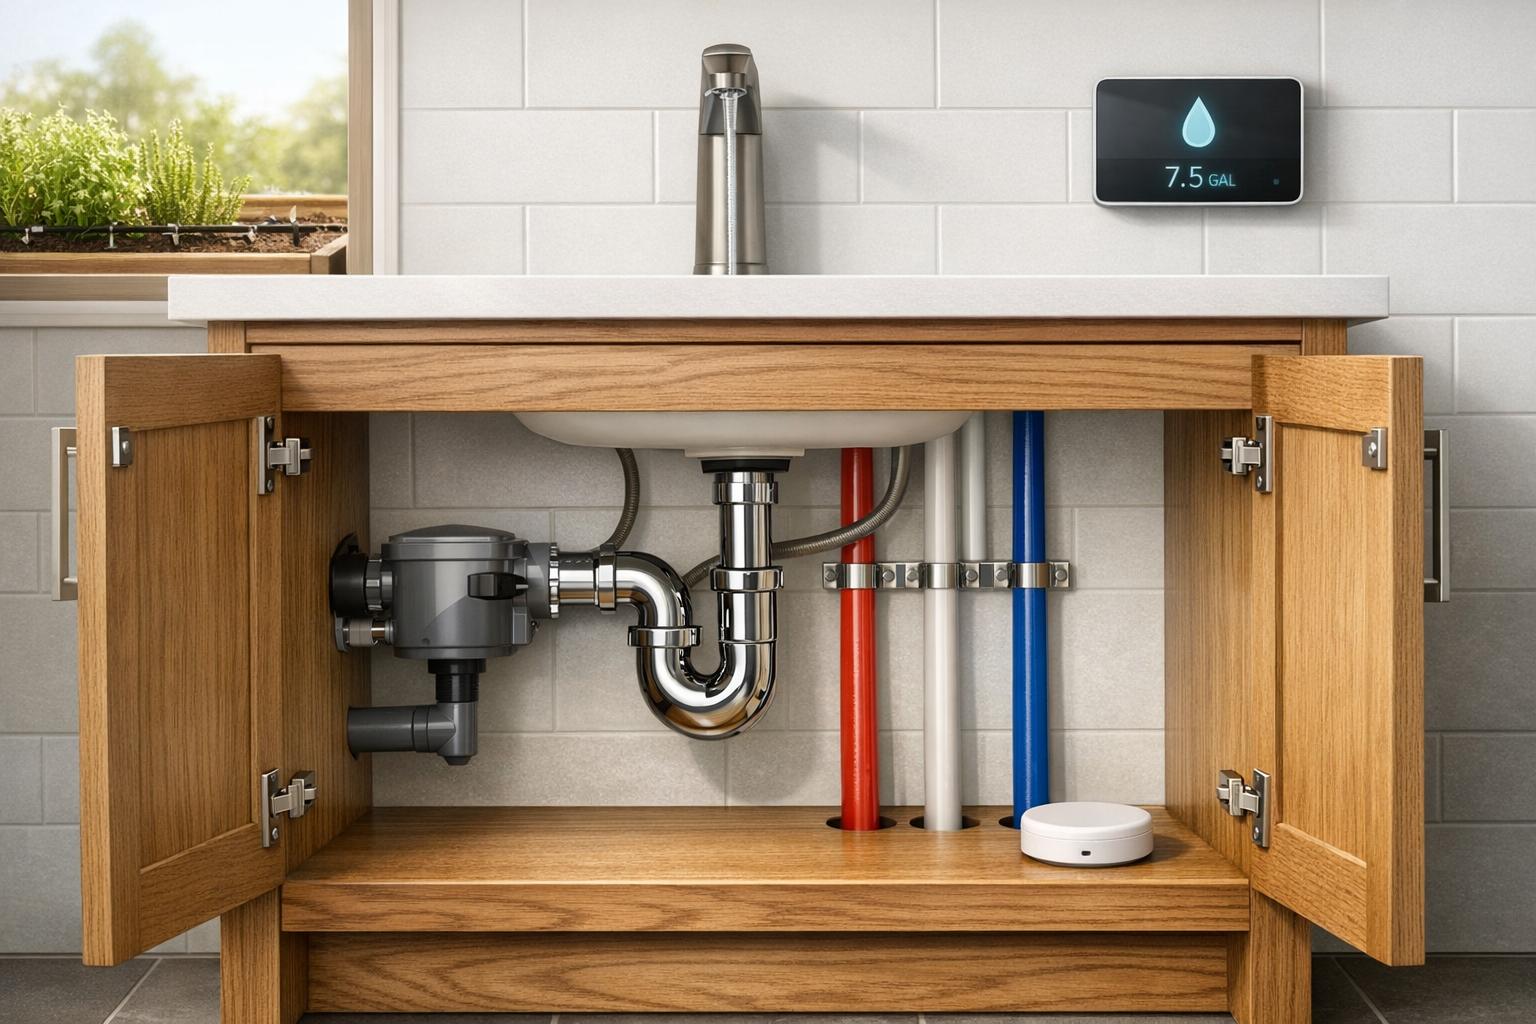
Advanced Leak Detection Tools
Even with regular inspections, some issues can fly under the radar. That’s where advanced leak detection tools come in. These modern technologies, such as video inspection cameras, can identify hard-to-spot problems like tree root intrusions or deep clogs in your mainline before they cause backups. Companies like POM Plumbing Service Company use these tools to provide a detailed analysis of your plumbing system’s health, helping to uncover hidden threats.
Another practical tip is to keep an eye on your water bills. If you notice an unexplained spike, it could be a sign of a hidden leak. In such cases, contacting a plumber right away can save you from more extensive (and expensive) damage.
For deeper cleaning, power flushing machines can clear out your system more thoroughly than standard snaking methods, ensuring long-term reliability. While minor clogs might be manageable on your own, anything involving water heaters, gas lines, or main drainage systems should always be handled by a professional. This ensures the work meets safety codes and prevents further complications.
Is Emergency Plumbing Covered by Insurance?
In Canada, most home insurance policies include coverage for water damage caused by sudden and unexpected plumbing emergencies, like a burst pipe or a sudden water heater failure. However, there’s a catch: while the damage to your floors, walls, or furniture is typically covered, the cost of fixing or replacing the faulty pipe or fixture itself is considered maintenance and isn’t included.
For example, a pipe that bursts due to freezing temperatures is usually covered. On the other hand, leaks caused by long-term issues like rust or corrosion are not. As Rates.ca puts it: "Continuous or repeated seepage or leakage of water is thus considered a maintenance issue and so, not insurable". This distinction is crucial, especially since water damage makes up more than half of home insurance claims in Canada, yet only about 50% of Canadians fully understand their policy coverage.
Most policies also cover secondary damage. For instance, if a burst pipe leads to ruined drywall or flooring, those repairs are generally included. However, the source of the issue – like the burst pipe itself – remains your responsibility. Similarly, if mould develops because of sudden water damage, mould remediation might be covered. But if the mould stems from a slow, ongoing leak, it’s typically excluded. These details highlight why it’s essential to read and understand your policy terms.
Another thing to watch out for is how long your home is vacant. If your house is left unoccupied for 4 to 30 days (depending on your policy) and a pipe freezes, your coverage could be voided. This was a major issue during a severe cold snap in Western Canada in January 2024, which caused $180 million in insurance damages, largely from burst pipes in unheated homes.
It’s also worth checking if your policy includes optional endorsements for things like prevent sewer backups or overland flooding, as these are usually not part of standard coverage. Considering that repairing a flooded basement can cost over $40,000, taking the time to review your policy now could save you from unexpected financial stress later.
Conclusion
Even the smallest leaks can snowball into major problems if left unchecked. What starts as a tiny drip under your sink could quickly lead to thousands of dollars in emergency repairs, water damage restoration, and mould removal. Addressing issues early can save you significant expenses and prevent minor problems from turning into full-blown disasters.
Staying ahead with regular maintenance is the smartest way to avoid costly emergencies. Routine inspections help identify potential issues before they escalate, while scheduled maintenance plans allow you to sidestep the hefty fees that often come with after-hours emergency calls.
At POM Plumbing Service Company, we offer clear pricing, a team of licensed professionals with over 20 years of experience, and tailored maintenance plans to catch problems early. From replacing outdated Kitec piping to inspecting risers and zone valves or performing regular drain checks, our proactive approach ensures your plumbing system stays in top shape and your costs remain manageable.
Don’t wait for a small issue to disrupt your life. Schedule a routine inspection today to safeguard your home and avoid the financial strain of emergency repairs.
FAQs
What should I do first before an emergency plumber arrives?
Before the plumber gets there, make sure to shut off the water supply to stop any further damage. If it’s safe to do so, unplug any nearby electrical devices to reduce potential risks. Taking these precautions can limit water damage and keep you safe while you wait for professional assistance.
How can I tell if a “small” leak is actually urgent?
Even a "small" leak can demand urgent attention if it threatens your home or safety. For example, leaks near electrical outlets, creating puddles, or compromising structural elements need immediate action. Even seemingly minor leaks can escalate rapidly, particularly in older homes where wear and tear are already factors. If you’re unsure, it’s best to shut off the main water supply and call a professional to avoid further damage or potential risks.
What insurance add-ons should I check for sewer backups or basement flooding?
Check whether your homeowner’s insurance includes water backup coverage. This type of protection covers damages caused by sewer backups or basement flooding – situations that can lead to expensive repairs and cleanup. Many insurance providers offer this as an optional add-on, so it’s worth confirming if it’s already part of your policy or if you need to purchase it separately. Having this coverage in place can help ease the financial burden of these unexpected emergencies.