


If you have a basement or crawlspace in Canada, a sump pump is essential to protect your home from water damage. Installed in a pit at the lowest point of your home, it removes excess water caused by rain, melting snow, or rising groundwater. This guide explains how sump pumps work, their types, installation basics, and maintenance tips to ensure your home stays dry.
Key points:
- How it works: A sump pump collects water in a basin and pumps it away from your foundation.
- Types: Submersible (quiet, powerful) and pedestal (affordable, easy to maintain).
- Lifespan: Most pumps last 7–10 years with proper care.
- Maintenance: Regular cleaning, testing, and inspections are crucial.
- Installation costs: Range from $500 to $3,000, depending on complexity.
A well-maintained sump pump prevents flooding, mould, and structural damage, making it a must-have for Canadian homes. Read on for detailed steps on choosing, installing, and maintaining your sump pump.
Contents
- 1 How to Install a Sump Pump | This Old House
- 2 What Is a Sump Pump and What It’s For
- 3 How a Sump Pump Works
- 4 Key Components of a Sump Pump System
- 5 Types of Sump Pumps
- 6 Choosing a Sump Pump for Your Home
- 7 Sump Pump Installation Basics
- 8 How to Use a Sump Pump
- 9 How to Clean a Sump Pump
- 10 Common Sump Pump Problems and Quick Fixes
- 11 Maintenance Checklist
- 12 Conclusion
- 13 FAQs
- 14 Related Blog Posts
How to Install a Sump Pump | This Old House

sbb-itb-1e3c609
What Is a Sump Pump and What It’s For
A sump pump is a device installed in a sump basin, usually located at the lowest point of a basement or crawlspace. Its job is to direct water – whether from rain, melting snow, or rising groundwater – away from your home’s foundation. When the water in the basin reaches a certain level, a float switch activates the pump’s motor. The motor powers an impeller, which pushes the water through a discharge pipe, carrying it safely away from your property.
In places like Toronto and the Greater Toronto Area, sump pumps play a key role in managing water issues caused by rising water tables, outdated infrastructure, and frequent heavy rainfall. Homes built before the 1980s are especially at risk due to older, often failing drainage systems. Basement flooding is a common and expensive problem for homeowners in these areas, making a dependable sump pump system a must-have for many Canadian homes.
In Ontario, building codes require a sump pump and pit in situations where gravity drainage to municipal storm sewers isn’t possible. This is particularly important in older homes with drainage systems that no longer function properly. If you notice that your neighbours have sump pumps, it’s a good indicator that groundwater levels in your area might also necessitate one for your home.
A standard sump pit is typically 24 inches (61 cm) deep and 18 inches (46 cm) wide. Without a sump pump system, you risk more than just water damage to your foundation – you could also face issues like mould and mildew growth, which can impact your home’s safety and livability.
How a Sump Pump Works
A sump pump works by collecting and removing excess water from a basement or crawlspace. The process starts when water enters the sump basin, either through floor drains or from the surrounding soil. This basin, typically made of tough plastic with drainage slits, is installed at the lowest point of the area. It acts as a reservoir, allowing water to flow in while keeping out larger debris.
As the water level rises in the basin, it activates a switch that turns on the pump. Most sump pump models use a float activator – a buoyant device that lifts an arm to the "on" position when the water reaches a certain height. Some newer designs use a pressure sensor instead, which detects water levels based on the weight of the water pressing down.
Once activated, the pump’s electric motor powers an impeller, which uses centrifugal force to efficiently move water out of the basin. As Murray Anderson describes:
The sump pump’s job is to pump the water out of the pit and away from the building so the basement or crawlspace stays dry.
The water is then pushed through a discharge pipe and released at a safe distance from the house, preventing it from pooling near the foundation. A check valve in the system ensures that water doesn’t flow back into the basin once the pump shuts off, avoiding unnecessary strain on the motor. This cycle repeats automatically whenever water accumulates in the basin, providing consistent protection against flooding.
Sump pumps are especially useful during heavy rain or seasonal thaws, common in areas like Ontario. While running, smaller sump pumps typically use 800–1,000 watts, with a surge of up to 1,800 watts at start-up. This automated system works around the clock to keep your home dry and protected from water damage.
Key Components of a Sump Pump System
A sump pump system is made up of several key parts that work together to keep your basement dry. Knowing how these components function can help you maintain the system and address any issues that come up. Here’s a closer look at the main elements.
The sump pit, sometimes called a basin or liner, is a hole dug at the lowest point of your basement or crawlspace. It’s typically about 60 cm deep and 45 cm wide, lined with plastic that has slits to let water in from the surrounding soil or floor drains. At the centre of the system is the pump itself – this centrifugal unit uses a spinning impeller to create the force needed to move water out of the pit and through the discharge pipe.
The float switch serves as the system’s automated control. It turns the pump on and off depending on water levels. A buoyant ball rises with the water until it reaches a set height, triggering the pump by closing an electrical circuit. Once the water level drops, the float lowers and shuts the pump off. This prevents the pump from running unnecessarily or overheating, which could damage the motor. To ensure proper operation, position the float switch a few centimetres above the pump motor and make sure it has enough space to move freely without obstruction.
The check valve is a one-way valve on the discharge pipe that stops water from flowing back into the pit after the pump shuts off. Without it, water would return to the pit, causing the pump to cycle repeatedly, which could wear out the motor. The discharge pipe, usually a PVC pipe with a diameter of 3.8 to 5 cm, carries water away from your home. It should direct water to an exterior location at least 6 metres from your foundation to prevent it from seeping back into your basement.
For safety, always plug the sump pump into a GFCI outlet (Ground Fault Circuit Interrupter). This reduces the risk of electrocution in the damp environment where the pump operates. Most home systems use standard 110-volt household electricity. Additionally, a small vent (or weep) hole near the pump prevents air lock, ensuring that water flows smoothly through the system.
Types of Sump Pumps
Sump Pump Types Comparison: Submersible vs Pedestal vs Backup Systems
Understanding the different types of sump pumps can make it easier to choose the right one for your home. Your decision should factor in your basement’s water conditions, how much you’re willing to spend, and how much maintenance you’re prepared to handle. The two main types – submersible and pedestal pumps – each bring unique benefits. For added peace of mind, you might also want to think about a backup system to guard against power outages or pump failures.
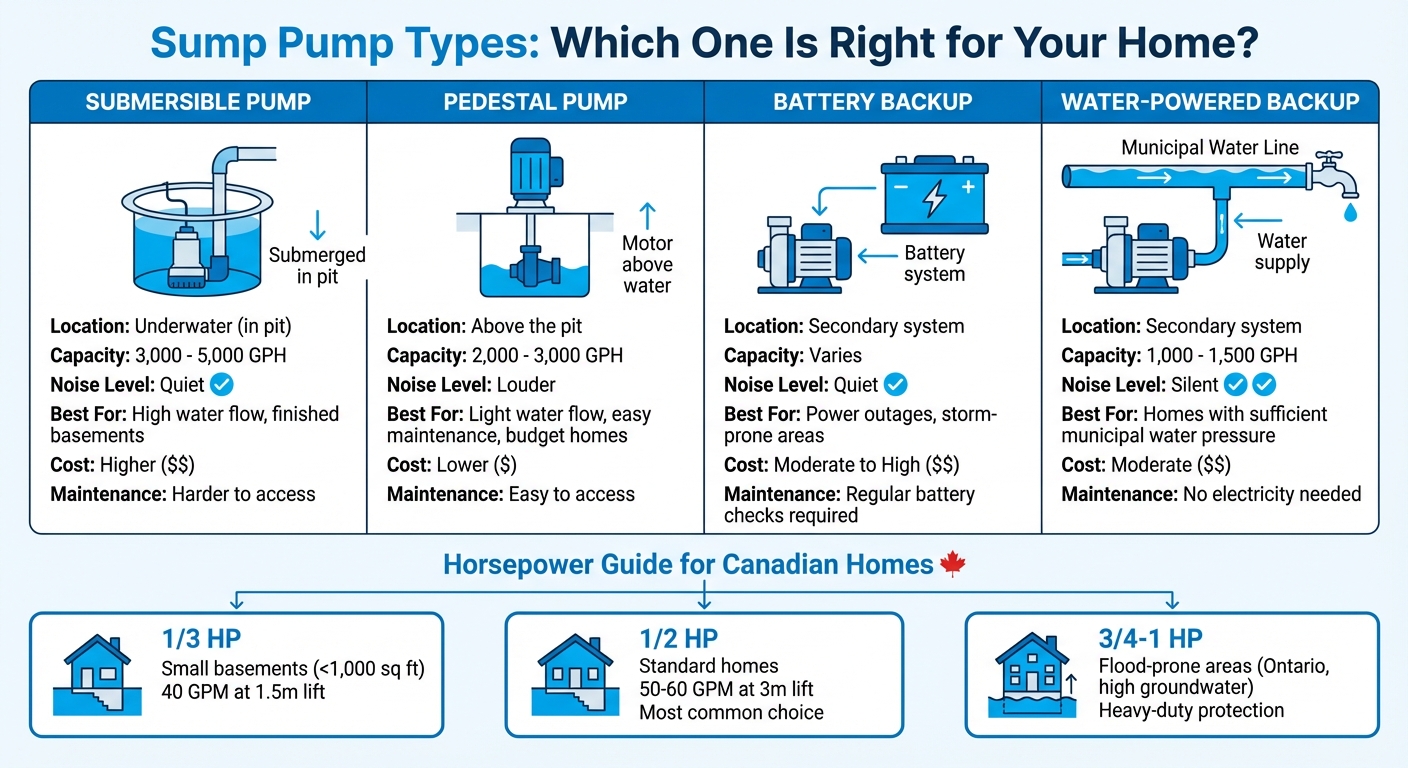
Submersible pumps are designed to sit fully submerged in the sump pit. These sealed units are quiet and capable of moving between 3,000 and 5,000 gallons per hour (GPH). They’re a great choice for finished basements, though they come with a higher upfront cost and are harder to access for maintenance.
Pedestal pumps, on the other hand, have their motor mounted above the sump pit, keeping it dry and making maintenance much simpler. They handle less water – around 2,000 to 3,000 GPH – and are noisier than submersibles, but they’re easier on the wallet. For added reliability, both types can be paired with backup systems.
When choosing a sump pump for Canadian homes, consider the horsepower based on the water volume and the height the water needs to be lifted. For smaller basements, a 1/3 horsepower pump is usually sufficient, moving about 40 gallons per minute (GPM) at a 1.5-metre lift. A 1/2 horsepower pump, the standard choice for most homes, can handle 50 to 60 GPM and is well-suited for lifts of around 3 metres. In flood-prone areas like parts of Ontario, where high groundwater levels and spring thaws are common, a 3/4 to 1 horsepower pump is often recommended. These details can help you find the right pump for your specific needs.
Comparison Table of Sump Pump Types
| Pump Type | Location | Capacity (GPH) | Noise Level | Best For | Typical Cost Range |
|---|---|---|---|---|---|
| Submersible | Underwater (in pit) | 3,000 – 5,000 | Quiet | High water flow, finished basements | Higher |
| Pedestal | Above the pit | 2,000 – 3,000 | Louder | Light water flow, easy maintenance, budget homes | Lower |
| Battery Backup | Secondary system | Varies | Quiet | Power outages, storm-prone areas | Moderate to High |
| Water-Powered Backup | Secondary system | 1,000 – 1,500 | Silent | Homes with sufficient municipal water pressure | Moderate |
Backup systems offer extra protection for your home. Battery-powered backups kick in automatically during power outages but require regular battery maintenance. Water-powered backups, on the other hand, rely on municipal water pressure to operate, which means they don’t need electricity at all. Both options can be lifesavers in stormy or flood-prone conditions.
Choosing a Sump Pump for Your Home
Finding the right sump pump for your home means tailoring its capacity to match your specific water conditions. To start, calculate how much water the pump needs to handle using this formula: GPH = Area (square feet) × Rainfall (in.) × 0.6. This gives you an estimate of the gallons per hour required, especially during heavy rain or spring snowmelt – common in places like Barrie, Muskoka, and York Region.
Another key factor is the pump’s head height, which is the vertical distance from the sump pit’s base to the highest point where water is discharged. As the vertical lift increases, the pump’s flow rate decreases, so it’s important to measure this carefully. Choose a pump with a maximum head rating that exceeds your actual lift. For instance, if your discharge point is 3 metres above the sump pit, you’ll need a pump rated for a head height beyond that to maintain efficient flow. Keep in mind that every 3 metres of horizontal piping and each 90-degree elbow adds about 0.3 metres of equivalent head pressure.
For most Canadian homes, a 1/2 horsepower pump is a dependable choice. It typically moves 50 to 60 gallons per minute and is effective for vertical lifts around 3 metres. Smaller basements under 1,000 square feet with minimal water issues might do fine with a 1/3 horsepower pump, which moves around 40 gallons per minute at a 1.5-metre lift. However, if you live in flood-prone areas near lakes or in low-lying regions with clay soil, you may need a more powerful 3/4 or 1 horsepower pump to handle the extra water volume.
The diameter of your discharge pipe also matters. Using a pipe that’s too narrow can create back pressure, putting unnecessary strain on the pump and shortening its lifespan. Match the pipe size to the pump’s outlet – usually between 3.8 and 5 centimetres – and opt for the largest size that fits your system. Be cautious about over-sizing your pump, as an overly powerful unit can cycle on and off too frequently, wearing out the motor faster and wasting electricity.
Finally, think about power reliability. In rural areas or storm-prone regions, having a backup system is crucial. Battery-powered backups kick in during power outages, while water-powered systems rely on municipal water pressure to function without electricity. Test your backup system annually to ensure it’s ready to handle sudden surges of meltwater. Once you’ve chosen the right pump, you’ll be ready to move on to installation to ensure everything runs smoothly.
Sump Pump Installation Basics
Installing a sump pump takes careful planning and adherence to local regulations. In Ontario, the Ontario Building Code requires that all new or updated sump pits be sealed and vented for radon gas control. Additionally, the pump must connect to a dedicated circuit with a GFCI-protected outlet for safety. If you’re planning a new installation or making structural changes, you’ll need building and plumbing permits. Electrical work must be performed by a Licensed Electrical Contractor with the required ESA permits.
"Where gravity drainage is not practical, a covered sump with an automatic pump shall be installed to discharge the water into a sewer, drainage ditch or dry well." – Roger Frost, CBCO Wett Certified, InterNACHI
One key rule in Ontario affects water discharge. Sump systems are no longer allowed to drain into municipal storm water systems. Instead, you must direct water to a drywell (at least 4.5 metres from your home’s foundation), a drainage ditch, or surface drainage. This ensures better water management and reduces the risk of water damage to your property.
Professional installation costs typically range between $500 and $3,000, with labour fees falling between $300 and $800. While skilled DIYers might handle simpler setups, it’s wise to hire a professional for tasks like excavating your basement floor, running new electrical circuits, or dealing with permits and inspections. A properly installed sump pump can last 7 to 10 years, helping to prevent basement flooding and saving you money over time , much like proper window well design.
Before starting, make sure you have all the necessary tools and materials.
Tools and Materials Needed
Here’s what you’ll need for the job:
- Sump pump unit: Prices range from $150 to $1,500, depending on the model.
- Sump basin liner: Approximately 46 cm wide × 61 cm deep.
- Rigid PVC piping: 32 mm to 38 mm in diameter.
- Check valve, plumber’s tape, pipe clamps, and PVC cement.
For tools, gather a pipe wrench (or adjustable wrench), screwdriver set, utility knife, pipe cutters or hacksaw, and a wet/dry vacuum to clear debris from the pit. These materials are readily available at hardware stores across Canada.
Step-by-Step Installation Guide
Follow these steps for a smooth sump pump installation:
- Find the right spot: Locate the lowest point in your basement for the pit.
- Excavate the pit: If there’s no existing basin, dig a hole using the standard dimensions (61 cm by 46 cm). Install the sump basin liner to prevent soil from entering the system.
- Install the pump: Place the pump in the basin and attach the check valve to stop water from flowing back into the pit.
- Set up the discharge line: Run rigid PVC piping from the pump to the outside. Ensure the discharge line ends 3 to 5 metres away from your foundation to avoid water recycling back toward your home.
- Connect to power: Plug the pump into the dedicated GFCI outlet and test the float switch and check valve by filling the pit with water.
- Winterize: In colder climates, insulate exposed discharge pipes to prevent freezing or blockages during the winter months.
With the right preparation and tools, you can ensure a safe and effective sump pump installation. Properly managing water discharge and following local codes will protect your home and extend the system’s lifespan.
How to Use a Sump Pump
Once your sump pump is installed, using it correctly is key to keeping it running smoothly. Regular testing is a must. Start by pouring about five gallons (19 litres) of water into the sump pit at a natural flow rate. Watch to see if the float switch activates, the motor starts pumping water out, and the system shuts off automatically. Repeat this process twice to be thorough. As Tom Scherer, an agricultural engineer with the NDSU Extension Service, puts it:
If something doesn’t work right, fix it as soon as possible.
During these tests, make sure the check valve is doing its job by stopping water from flowing back into the pit. This prevents short-cycling, which can wear out the pump. For pedestal pumps, keep the ball float and switch in view while testing. For submersible pumps, listen carefully to ensure water is being discharged properly.
Discharge Placement Matters
Where you direct the discharged water is just as important as the pump itself. Scherer advises:
Homeowners should discharge sump water at least 20 feet from their home in a way that the water will drain away from the house.
Place the discharge pipe about 20 feet (6 metres) from your foundation, aiming it toward a spot where the ground naturally slopes away. Avoid directing sump water into a septic system or basement floor drain, as this can lead to serious problems. Keep an eye on these elements to catch any issues early, before transitioning to regular maintenance routines.
Monitoring During Heavy Use
After confirming everything is working correctly, observe your pump during periods of heavy use, like after a big rainstorm. It’s normal for the pump to run continuously for two to three days when groundwater levels are high. However, stay alert for warning signs. If water flows back into the pit after a cycle, the check valve might have failed. If the pump keeps running during dry conditions, it could mean the float switch is stuck or the motor isn’t powerful enough. Also, check the exterior discharge pipe during storms to ensure water is flowing freely without any blockages.
To stay ahead of potential problems, test your sump pump every month, especially before spring and summer when heavy rains are more common. Consider installing a battery-powered backup pump to keep things running smoothly during power outages.
How to Clean a Sump Pump
To keep your sump pump running smoothly and avoid breakdowns, it’s a good idea to clean it twice a year – once before the spring thaw and again before the rainy season.
Start by disconnecting the power to eliminate any electrical risks. Unplug the pump or shut off the breaker. Also, turn off appliances like your washing machine that might drain into the sump pit to prevent unexpected water flow. Make sure to wear protective gloves and a face mask to shield yourself from dirt, mould, and debris.
Once the power is off, remove standing water and sludge from the pit using either a wet-dry vacuum or a bucket. Carefully lift the pump out of the pit and clean its exterior with a soft brush and mild dish soap. Pay close attention to the inlet screen, where sediment tends to collect. Use a plastic scraper to gently clear any buildup from the pump body and basin walls. Then, flush the pit with a garden hose to wash away remaining debris. For algae or stubborn grime, a diluted vinegar solution works well, but steer clear of harsh chemicals that could harm the pump’s components.
While cleaning, take the opportunity to inspect the pump and its parts. Check the impeller for debris, ensure the float switch moves freely, verify the check valve is working to prevent backflow, and make sure the discharge pipe is free of blockages. Also, examine the sump pit itself for any cracks or damage.
After reassembling the pump, pour water into the pit to test if it activates and drains as it should. If you’re unsure about handling electrical components or run into persistent clogs, you might want to call in a professional. Professional cleaning services usually cost between $150 and $300.
Taking the time to clean your sump pump not only extends its lifespan but also ensures it’s ready to handle heavy water flow when needed. A clean pump also makes it easier to identify any performance issues during future maintenance checks.
Common Sump Pump Problems and Quick Fixes
Even with proper sump pump installation and maintenance, units can face issues that might leave your basement at risk. The good news? Many of these problems have simple fixes you can handle before calling in a professional.
One of the most frequent issues is power failure, which often happens during heavy storms – precisely when you need the pump the most. A tripped breaker or unplugged cord could be the culprit, so start by checking your electrical panel. To prepare for future outages, consider adding a battery-powered backup system.
Another common problem involves stuck float switches. If debris accumulates in the sump pit, it can jam the float, causing the pump to either stop working or run non-stop. Clearing out the pit and ensuring the float moves freely often solves this.
Clogged components, like the intake screen or discharge pipe, can also reduce the pump’s efficiency. Regular cleaning can prevent this, but if you notice the pump struggling – especially in winter – inspect these areas. In Canadian winters, frozen discharge lines are a frequent issue. Installing an IceGuard fitting can ensure water escapes even if the main pipe freezes.
If your pump seems to be running constantly but not keeping up, it might be undersized for the water inflow. Alternatively, a broken or missing check valve could allow water to flow back into the sump pit, reducing efficiency. Upgrading to a more powerful unit or replacing the check valve can address these issues.
Sump pumps typically last 7 to 10 years under normal use, but frequent operation can shorten this to 5 to 7 years. If your pump is nearing the end of its lifespan or struggling despite repairs, replacing it might be the best option. Professional repairs usually cost between $150 and $500, while a full replacement – including labour and materials – ranges from $500 to $2,000.
Troubleshooting Table
Here’s a quick reference guide for common sump pump problems and their solutions:
| Problem | Possible Cause | Quick Fix / Solution |
|---|---|---|
| No Power | Power outage or tripped breaker | Reset circuit breaker; check plug; add battery backup. |
| No Power due to Float Switch | Stuck or faulty float switch | Clear debris; replace switch if needed. |
| Pump runs but no water moves | Clogged intake screen or pipe | Clean the screen; check discharge line for ice/debris. |
| Pump runs but no water moves | Broken or missing check valve | Install or replace the check valve. |
| Pump runs continuously | Stuck float switch or undersized pump | Adjust float; upgrade pump if necessary. |
| Frequent cycling (on/off) | Sump pit too small | Increase pit size or adjust float switch levels. |
| Excessive noise/vibration | Worn bearings or damaged impeller | Lubricate bearings; replace impeller or pump unit. |
| Musty odours in basement | Water pooling or dirty pit | Clean the pit; ensure the lid is sealed. |
Pay attention to warning signs like grinding noises, vibrations, or musty smells – these often indicate a problem that could lead to pump failure. If troubleshooting doesn’t resolve the issue or you’re uncomfortable handling electrical components, it’s worth consulting a professional. Labour rates typically range from $45 to $75 per hour.
To prevent unexpected breakdowns, many manufacturers suggest replacing the float switch every two years. With regular checks and quick fixes, you can keep your sump pump running smoothly and extend its lifespan.
Maintenance Checklist
Taking care of your sump pump on a regular basis can help it last longer and reduce the chance of it failing when you need it most. Here’s a breakdown of essential maintenance tasks, organized by how often they should be done.
- Monthly (during wet seasons): Test your sump pump by pouring water into the pit. This ensures the float switch activates and the pump starts working properly.
- Quarterly: Unplug the pump, clean out any debris from the basin, and check that the intake screen is clear. Make sure the float switch moves freely without obstruction.
- Twice a year: In early spring (before snow melts) and late fall (before winter storms), inspect the entire system. Look for rust, cracks, or corrosion. Check the discharge pipe outside for blockages like leaves, ice, or bird nests, and confirm it releases water at least 3 metres away from your home’s foundation. If your pump has a battery backup, inspect the terminals for corrosion and ensure the battery holds a proper charge.
- Annually: Hire a professional to thoroughly inspect the system. This typically costs between $150 and $300. They’ll clean the system, test electrical connections, inspect all components, and replace the backup battery if it’s over three years old. Keeping a maintenance log can also help you spot patterns that might indicate potential issues and extend the pump’s lifespan, which is usually 7–10 years.
How often you perform these tasks may depend on how much your sump pump is used. For instance, pumps handling frequent water inflow – like from a washing machine – might need monthly inspections, while less active systems may only require annual checks. Also, avoid using harsh chemicals, as they can damage the pump’s seals.
Conclusion
A sump pump is your primary shield against flooding, foundation issues, and costly water damage repairs. In the Greater Toronto Area (GTA), rising water tables and aging infrastructure make basement flooding a frequent and expensive challenge for homeowners.
This guide has covered how sump pumps work, their essential components, how to choose the right model, and the importance of regular maintenance. As RenoHouse wisely points out:
A sump pump that fails during a storm is worse than not having one – because you’re relying on protection that isn’t there.
Regular maintenance is the key to ensuring your sump pump works when you need it most. Tasks like monthly bucket tests, clearing debris seasonally, and scheduling an annual professional inspection are crucial for keeping your system in top shape.
While you can handle some upkeep yourself – like cleaning the sump pit or testing the float switch – professional installation and inspections provide added peace of mind. A properly installed system not only adheres to the Ontario Building Code but also includes GFCI-protected electrical connections and is tailored to your home’s specific needs. With proper care, most sump pumps last seven to ten years.
If you’re looking for expert assistance, POM Plumbing Service Company has over 20 years of experience serving Toronto and the GTA. Their licensed professionals specialize in sump pump installation, maintenance, and code-compliant upgrades, ensuring your system is ready to protect your home during heavy rains or spring thaws.
Don’t wait for water to start pooling in your basement. Regular testing, cleaning, and professional inspections are essential for your sump pump’s performance. Contact POM Plumbing Service Company today to keep your home dry and your foundation secure.
FAQs
Do I need a sump pump in my home?
If your home is at risk of water intrusion or flooding, a sump pump might be a smart investment. Watch for warning signs like dampness, water stains, musty odours, or elevated humidity levels in your basement. These can indicate potential water issues. In areas like Toronto and the GTA, where flooding or a high water table is common, a sump pump can help safeguard your foundation and prevent expensive water damage.
Should I add a battery backup sump pump?
Adding a battery backup sump pump is a smart move to ensure your home stays protected during power outages or when the primary pump fails. This is particularly important in Ontario, where heavy rains and storms can overwhelm sump systems. A backup pump can be a lifesaver, especially if your home is below the water table or located in an area prone to flooding. It provides an added layer of security, helping to prevent basement flooding, costly water damage, and even mould growth.
When should I replace my sump pump?
If your sump pump is showing signs of trouble – like frequent breakdowns, strange noises, or failing to keep flooding at bay – it might be time for a replacement. Generally, sump pumps older than 7 to 10 years are more likely to fail and could benefit from being replaced before problems arise. Regular maintenance and inspections can catch potential issues early, helping to keep your home safe from water damage.