


If your shower head is leaking, rusty, or just outdated, it might be time for a replacement. Not only can a new shower head provide a better showering experience, but it can also make your bathroom look more modern. Moreover, if the shower arm, which is the pipe that connects the shower head to the wall, is damaged or corroded, it’s wise to replace it too. This guide will walk you through the process of replacing both.
Contents
Why Replace Your Shower Head and Arm
There are several good reasons to consider replacing your shower head and arm:
- Improved Water Flow: Over time, shower heads can accumulate mineral deposits that reduce water flow. If you’ve noticed a decrease in water pressure or an uneven spray pattern, a new shower head can help restore optimal water flow.
- Efficiency: Modern shower heads are designed with water efficiency in mind. By switching to a newer model, you can save water, which is not only beneficial for the environment but can also lead to savings on your water bills.
- Aesthetic Upgrade: Bathroom fixtures, like everything else, evolve in terms of design and style. Replacing an old, worn-out shower head and arm can instantly give your bathroom a fresh and updated look.
- Health and Hygiene: An old shower head might harbor bacteria, mold, or other germs. Replacing it can help ensure that the water spraying on you is as clean as possible.
- Functionality and Features: The latest shower heads come with multiple features, such as adjustable spray patterns, massage settings, and even Bluetooth speakers. If your current shower head is a basic one, you might want to upgrade to enjoy some of these functionalities.
- Fixing Leaks or Damage: If your shower arm or head is leaking, rusted, or damaged in any other way, it’s essential to replace it. A faulty arm or head not only wastes water but can also lead to more significant plumbing issues in the future.
- Enhanced Shower Experience: Simply put, a good-quality shower head can make your daily shower a more enjoyable experience. Whether it’s a rain shower head that mimics a natural downpour or a high-pressure head for a more invigorating wash, there’s something for everyone.
In conclusion, while a shower head and arm might seem like simple fixtures, they play a crucial role in our daily routines. Replacing them when needed can improve the functionality, aesthetics, and overall enjoyment of your bathroom.
Essential Tools for Changing a Shower Head Arm
Replacing a shower head arm is a relatively straightforward process, but having the right tools on hand can make the job much easier and more efficient. Here’s a list of essential tools you’ll need:
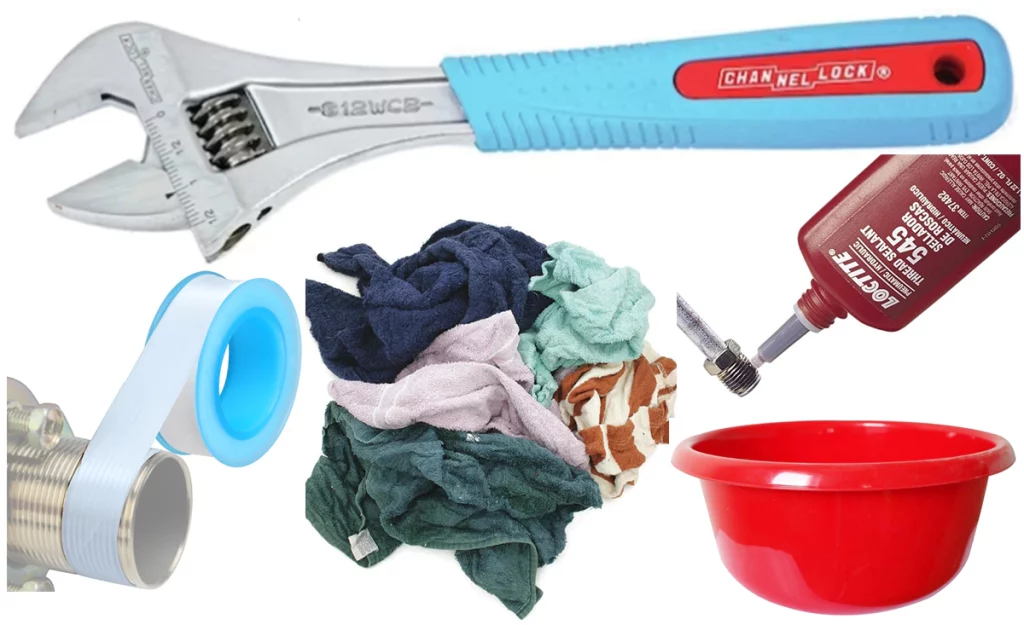
- Adjustable Wrench or Channel Locks: This is the primary tool you’ll need to grip and turn the shower arm, especially if it’s tightly fixed or if there are signs of corrosion.
- Teflon Tape (Plumber’s Tape): This thin white tape is wrapped around the threads of the shower arm to ensure a watertight seal when the shower head is attached. It helps prevent leaks and is an essential for most plumbing tasks.
- Old Rag or Cloth: Useful for gripping the shower arm or head to prevent scratches or damage to their finish when using the wrench. It’s also handy for cleaning any debris or old Teflon tape from the threads.
- Bucket or Bowl: While not strictly necessary, having a bucket or bowl can be useful to catch any residual water that may drain out when you remove the old shower arm.
- Pipe Thread Sealant: This is an alternative to Teflon tape. It’s a liquid sealant that can be applied to the threads for a watertight seal. Some plumbers prefer it, but either this or Teflon tape will work.
In conclusion, while you might not need all of these tools for a simple replacement, it’s good to have them on hand. Being prepared can save time and ensure that the job goes smoothly from start to finish.
Step 1: Turn Off the Water Supply
Before starting, ensure the water supply to the shower is turned off. This can often be done from the shower’s faucet or the main water shut-off valve for the house.
Ensuring the water supply is turned off is the first and most crucial step when making any plumbing adjustments or repairs. It helps prevent potential flooding, water wastage, and makes the process smoother.
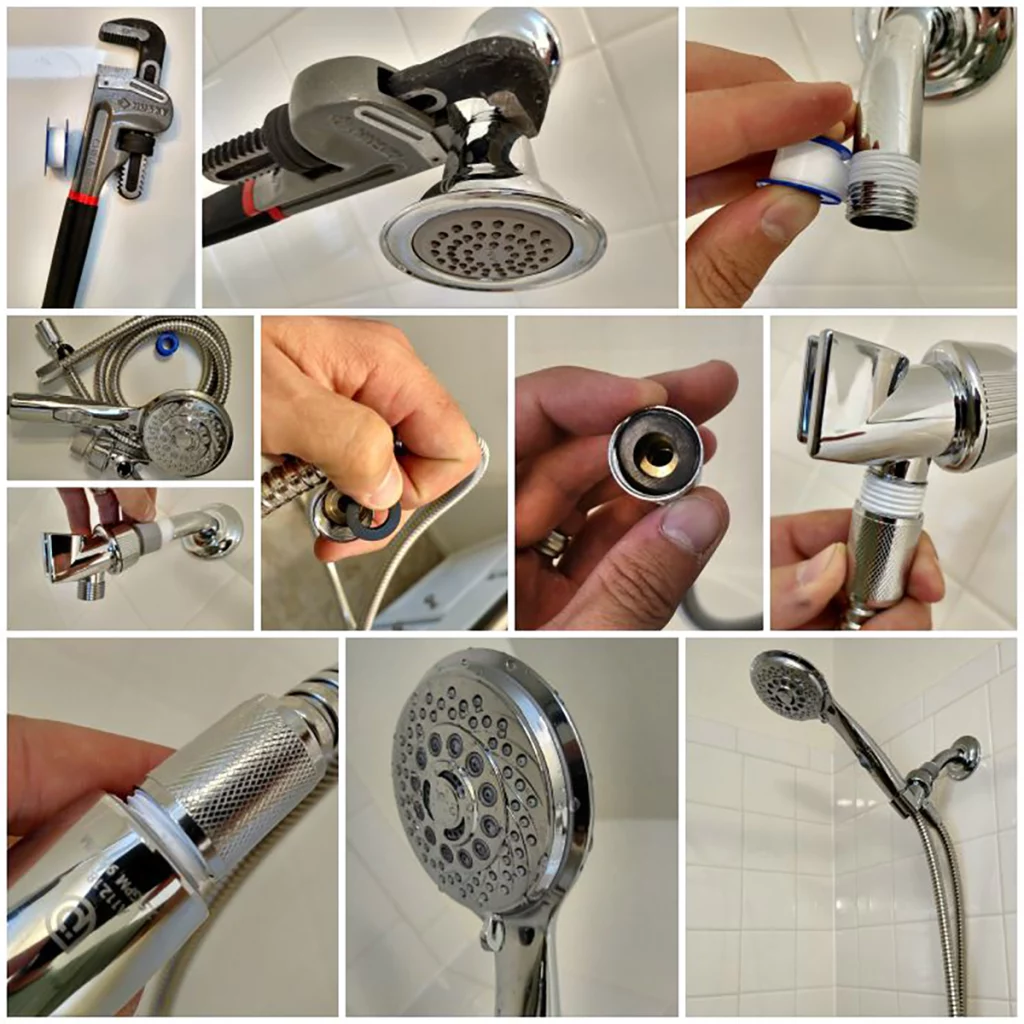
Step 2: Remove the Old Shower Head
Once the water supply is securely turned off, the next step is to remove the old shower head. Here’s a detailed breakdown of the process:
- Use an adjustable wrench to grip the base of the shower head.
- Turn it counterclockwise until it’s completely unscrewed.
- If it’s stuck due to mineral deposits, wrap the rag around the connection and use the wrench to avoid scratching the finish.
Step 3: Dismantle the Shower Arm
After removing the shower head, the next step is to dismantle the shower arm, especially if it’s damaged, corroded, or you’re planning a complete upgrade. Here’s how to safely remove the shower arm:
- Using your adjustable wrench, grip the shower arm.
- Turn it counterclockwise to unscrew it from the wall.
- Clean the threads on the wall end with the rag to remove any old Teflon tape or debris.
Step 4: Choosing the Right Replacement
When buying a new shower head and arm:
- Ensure it’s the right size and thread match for your existing setup.
- Consider features like adjustable sprays, water-saving technology, or a rainfall design to enhance your showering experience.
Step 5: Installing the New Shower Arm
After dismantling the old shower arm and ensuring the area is clean and prepared, it’s time to install the new shower arm. Follow these steps to ensure a smooth installation:
- Prepare the New Shower Arm
- Apply Teflon Tape
- Position the Shower Arm
- Hand Tighten First
- Use a Wrench for the Final Turns
Step 6: Attaching the New Shower Head
Once you have successfully installed the new shower arm, it’s time to attach the new shower head. Follow these steps for a proper and leak-free installation:
- Prepare the Shower Head
- Apply Teflon Tape
- Attach the Shower Head
- Secure with a Wrench (if necessary)
- Check the Alignment
- Test the Installation
- Safety and Aesthetics
Tips for Leak-Free Replacing a Shower Head and Arm
Ensuring a leak-free installation when replacing a shower head and arm is crucial to prevent water wastage, potential water damage, and maintain an optimal shower experience. Here are some tips to help you achieve a secure and watertight setup:
Quality Matters: Invest in high-quality shower heads, arms, and associated components. They are often better designed, have a more precise fit, and last longer.
Inspect Old Parts: Before installation, check the old shower arm and the connection inside the wall for signs of damage or corrosion. Damaged threads or fittings can cause leaks.
Use Teflon Tape: Always wrap the threads of the shower arm and where the shower head attaches with Teflon tape (plumber’s tape). This helps ensure a watertight seal and smoothens the screwing process.
Check the Washer or Gasket: Most shower heads come with a washer or gasket that helps prevent leaks at the connection point. Ensure it’s properly seated and not damaged.
Hand Tighten First: When attaching components, start by hand tightening. This reduces the risk of cross-threading, which can damage the threads and lead to leaks.
Avoid Over-Tightening: Over-tightening can damage the threads, warp washers, or even crack components. Always tighten just until snug, and use a wrench delicately if needed.
Test After Installation: Once everything is set up, turn on the water and check for leaks. Look at the connection points, especially where the shower arm meets the wall and where the shower head attaches to the arm.
Regular Maintenance: Periodically check for leaks, especially after the initial installation. Sometimes, leaks can develop over time due to wear and tear or mineral buildup.
Clean Regularly: Mineral deposits from hard water can cause blockages and force water out of unintended places. Regularly clean your shower head and arm to prevent buildup.
Replace Damaged Parts: If you notice a part is damaged or corroded, replace it promptly. Damaged parts, even if they don’t currently leak, are weak points that can develop leaks in the future.
Seek Professional Help if Unsure: If you’re unsure about the installation or encounter problems, don’t hesitate to consult with or hire a plumber. It’s better to ensure a correct installation than to risk potential water damage.
By following these tips and best practices, you’ll be well on your way to a leak-free shower experience, ensuring efficiency and peace of mind in your bathroom.
Enjoy Your Refreshed Shower Experience
Congratulations! You’ve successfully navigated the process of replacing your shower head and arm. With these new installations in place, you’re in for a rejuvenated and revitalized showering experience. Here’s what you can look forward to:
Enhanced Water Flow: With a new shower head, you can enjoy a consistent water flow, free from blockages or disruptions that old, mineral-clogged heads might have caused.
Customized Settings: If your new shower head comes with multiple spray patterns or pressure settings, take some time to experiment and find your preferred setting. Whether it’s a gentle mist or a vigorous massage, the perfect shower awaits.
Eco-Friendly Showers: Modern shower heads are often designed with water conservation in mind. Enjoy your showers knowing you’re using water more efficiently and reducing your environmental impact.
Aesthetic Appeal: A new shower head and arm can significantly uplift the overall look of your bathroom. Relish the fresh, modern ambiance it brings each time you step in.
Health and Hygiene: With a new setup free from the old residues and possible mold or bacteria, you can have peace of mind about the cleanliness of the water cascading over you.
Maintenance Reminders: To maintain this refreshing experience:
- Regularly clean your shower head to prevent mineral buildup.
- Check for leaks or drips from time to time.
- Ensure that the arm remains firm and doesn’t wobble.
Relaxation: Beyond functionality, a shower is a sanctuary for many. It’s a place to relax, unwind, and wash away the stresses of the day. With your new installation, take a moment to deeply relax, and appreciate the enhanced experience.
In conclusion, every step taken, from the decision to replace to the careful installation, culminates in this moment. So, the next time you step into your shower, take a deep breath, let the water cascade over you, and truly enjoy the refreshed experience you’ve crafted. Happy showering!
FAQ about replacing the shower head and holder
First, turn off the water supply. Use an adjustable wrench to unscrew the shower head counterclockwise from the arm. Then, grip the shower arm and turn it counterclockwise to remove it from the wall.
Yes, most people can replace a shower head and arm with basic tools and instructions. However, if you encounter issues or are unsure, it’s best to consult a professional.
Choose a size that matches your shower’s existing plumbing and suits your personal preferences. Standard shower arms typically have a 1/2-inch threaded connection, and most shower heads are designed to fit this size.


