


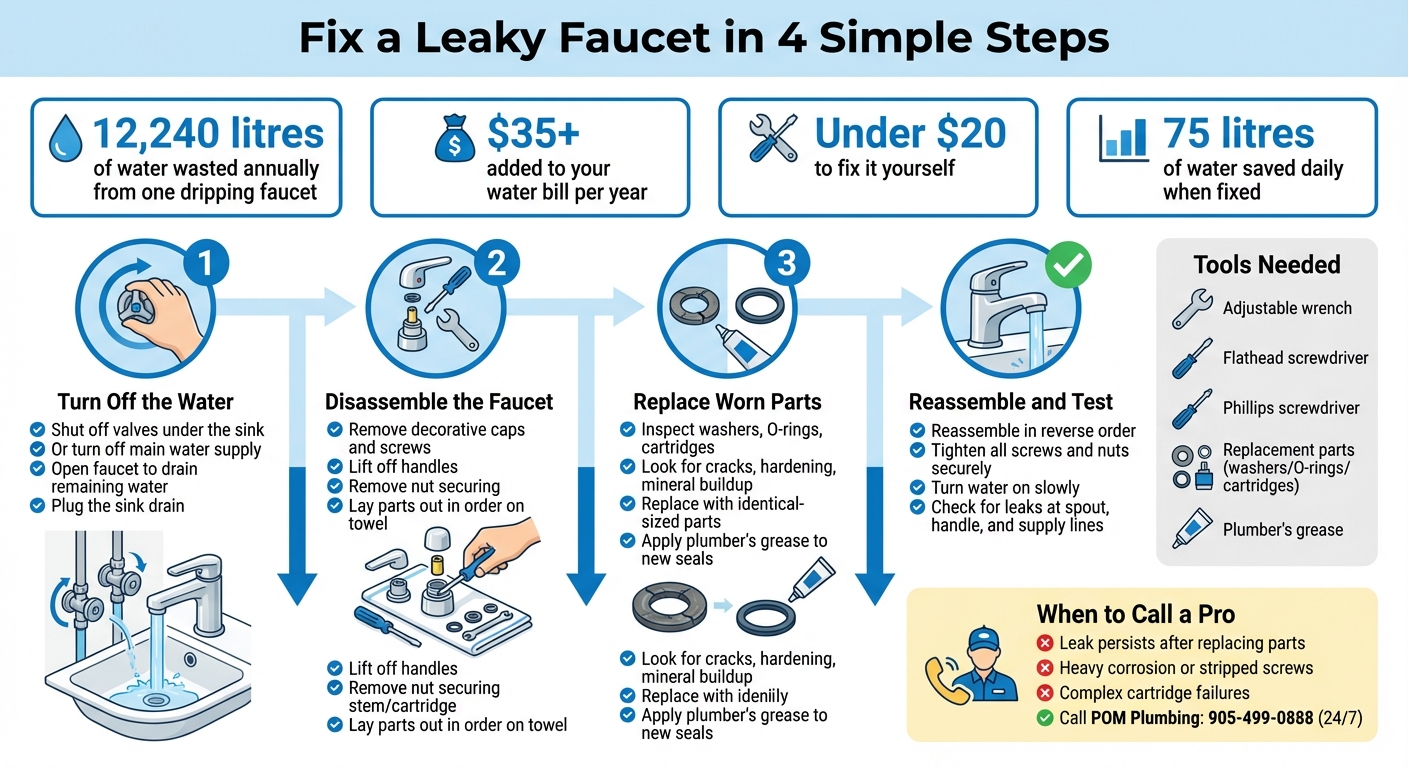
A leaky faucet isn’t just annoying – it can waste up to 12,240 litres of water annually, adding $35 or more to your water bill. Fixing it yourself is simple and affordable. Most leaks are caused by worn washers, O-rings, or cartridges, which you can replace for under $20. Here’s how to stop the drip in four steps:
- Turn off the water: Shut off valves under the sink or the main water supply.
- Disassemble the faucet: Remove handles and internal components to access the damaged parts.
- Replace worn parts: Inspect washers, O-rings, or cartridges for wear and replace them.
- Reassemble and test: Put the faucet back together, turn the water on, and check for leaks.
If the issue persists after replacing parts, or if you notice heavy corrosion or complex damage, it’s best to call a plumber for a plumbing emergency. For residents in Toronto and the GTA, POM Plumbing Service Company offers 24/7 licensed help. Don’t let a small drip lead to costly repairs – act now to save water and money.
4-Step Guide to Fix a Leaky Faucet and Save Water
Contents
6 Steps to FIX a Leaky Faucet GUARANTEED
sbb-itb-1e3c609
Why Is My Faucet Leaking?
Faucet leaks usually happen because internal parts wear out and can no longer seal water effectively. Components like rubber washers, O‑rings, and cartridges endure constant pressure and frequent use, which eventually causes them to harden, crack, or break down.
In areas like Toronto and the GTA, the water’s high calcium and magnesium levels create additional challenges. These minerals lead to build‑up on valve seats, while hard water scaling inside cartridge openings can prevent washers from sealing properly. If you notice white or chalky residue around your faucet, it’s a clear sign of hard water deposits. On top of that, excessive water pressure adds extra strain on seals and internal parts, sometimes causing leaks even after replacing worn components.
The location of the leak often reveals the root of the problem. For example, if water drips from the spout when the faucet is off, it’s likely due to a worn seat washer or a faulty cartridge. On the other hand, if water seeps around the base of the handle, damaged O‑rings or issues with the stem assembly are often to blame. Identifying these patterns can make it easier to pinpoint the issue and fix the problem efficiently.
How Do You Stop a Leaky Faucet? Quick Overview
Fixing a leaky faucet is a simple DIY task that can save up to 75 litres (about 20 gallons) of water every day. The process involves four key steps: identifying the source of the leak and turning off the water, taking apart the faucet, replacing any worn-out parts, and testing the repair. Before getting started, gather the necessary tools: an adjustable wrench, flathead and Phillips screwdrivers, replacement parts, and plumber’s grease.
Step 1: Identify the Leak and Shut Off the Water
First, locate the shut-off valves under your sink and turn them clockwise until they’re fully closed. If your sink doesn’t have individual shut-off valves, turn off the main water supply. Open the faucet to drain out any remaining water and relieve pressure in the pipes. Plug the sink drain to prevent losing any small parts during the repair. Once the water is off and the system is depressurized, you’re ready to move on.
Step 2: Disassemble the Faucet
Carefully take apart the faucet to access its internal components. Start by removing any decorative caps and screws to lift off the handles. Use an adjustable wrench to remove the nut that secures the stem or cartridge. For kitchen faucets with a spout leak, loosen the coupling nut and gently pull the spout out of its socket to access the O-rings inside.
As you disassemble, lay the parts out on a towel in the order you remove them. This will make reassembly much easier and help you avoid any mix-ups.
Step 3: Replace Worn-Out Parts
Check the internal components for signs of wear. If you notice cracks, hardening, or mineral build-up, replace them with identical-sized parts. If you’re unsure about the size, take the old parts to a hardware store to find a match. For ball-type faucets, replacement kits typically include the cam assembly, seats, and springs, and cost around $20.
Before installing new O-rings or washers, apply plumber’s grease or petroleum jelly to ensure a tight seal and increase their lifespan.
Step 4: Reassemble and Test the Faucet
Put the faucet back together in the reverse order of disassembly, making sure all screws and nuts are tightened securely. Slowly turn the water back on and let it run for a few minutes to flush out any debris. Check for leaks at the spout, around the handle, and under the sink near the supply lines. For ceramic-disk faucets, turn the water on gradually to avoid damaging the delicate ceramic disks. If you still notice leaks, double-check that all parts are correctly installed and properly sized.
Common Faucet Types and Parts That Fail
Understanding your faucet type can make diagnosing and repairing issues much easier, especially in Canadian homes where hard water can speed up wear and tear. Below is a table outlining common failures for each faucet type, followed by a breakdown of their weak spots.
| Faucet Type | Most Likely to Fail | Primary Cause of Failure |
|---|---|---|
| Compression | Seat Washers, O-rings, Valve Seats | Mechanical friction from tightening and mineral corrosion of the seat |
| Cartridge | Internal Cartridge, O-rings | Mineral buildup (calcium/magnesium) clogging the unit and weakening internal seals |
| Ball | Seals, Springs, O-rings | Grit accumulation and loss of spring tension over thousands of uses |
| Ceramic Disk | Ceramic Disks, Neoprene Seals | Debris or mineral deposits interfering with the seal |
Compression Faucet
Compression faucets have separate handles for hot and cold water. The seat washers and O-rings are the most common points of failure because they compress against the valve seat every time the handle is tightened. This repeated friction can lead to cracking in the rubber components and corrosion of the valve seat, eventually causing leaks and reduced water flow.
Cartridge Faucet
Cartridge faucets, often featuring a single handle that moves up and down or side to side, rely heavily on the cartridge mechanism. As noted by a Berks Plumbing and HVAC Specialist, "The cartridge is the control centre of the faucet… Over time, this component takes the most abuse and is the #1 cause of faucet failure". The cartridge manages both water flow and temperature mixing, making it prone to wear. Mineral deposits can clog its passages and weaken the seals, leading to dripping spouts, stiff handles, or uneven water temperatures. While replacing the O-rings around the cartridge can sometimes solve the problem, a full cartridge replacement is often necessary.
Ball Faucet
Ball faucets, commonly found in kitchen sinks, use a rotating ball bearing to regulate water flow. The seals and springs inside these faucets are particularly vulnerable. Over time, grit can build up around these components, and the springs can lose their tension. This wear and tear often results in leaks around the handle or reduced water pressure. Replacing the worn seals and springs usually restores the faucet’s functionality.
Ceramic Disk Faucet
Modern ceramic disk faucets operate using two ceramic disks that slide against each other to control water flow. While the ceramic disks themselves are incredibly durable, the neoprene seals surrounding them can degrade over time. Additionally, mineral deposits or debris in the water supply can scratch or damage the ceramic surfaces, disrupting the seal. Hansen’s Plumbing explains:
"Ventura’s hard water accelerates the breakdown of the rubber and plastic seals inside your faucet. The mineral buildup can cause them to become brittle and fail, leading to leaks".
This issue is especially prevalent in regions with hard water. Recognizing these common failures can help you address problems early and prevent leaks from worsening.
How to Prevent Future Leaks
Fixing leaks is just the start; keeping them from happening again is where the real work begins. Even a small drip can snowball into expensive repairs, water damage, or even mould issues if left unchecked. To put it into perspective, repairing leaks typically costs between $125 and $800, but that doesn’t include the extra costs for fixing water damage afterwards.
One way to stay ahead is by keeping an eye on your water pressure and protecting your fixtures. Ideally, water pressure should sit between 30 and 80 psi. Pressure that’s too high can strain pipes, while low pressure might hint at a hidden leak. You can use a manual gauge or invest in a smart valve to monitor this in real time. Some advanced systems are even sensitive enough to detect leaks as small as a single drop per minute. Interestingly, within the first month of installing a smart water shut-off, 60% of homeowners discover leaks they didn’t know existed. These tools can save you from unexpected repairs and help keep your plumbing system in good shape.
For Canadians dealing with harsh winters, seasonal prep is a must. Freezing temperatures can wreak havoc on outdoor fixtures, causing pipes to burst when they thaw. To avoid this, prevent frozen pipes by winterizing outdoor faucets and irrigation systems. Use frost-free sillcocks, shut off indoor valves, drain outdoor taps, and store hoses. If you have a sprinkler system, either drain it yourself in the fall or hire a pro to blow out the lines with compressed air.
Lastly, regular inspections are key. Check exposed pipes for signs of corrosion or buildup, and have a plumber use a camera to inspect sewer lines for cracks or tree roots. In unheated areas, insulate pipes with foam or heat tape to prevent freezing. A little attention now can save you a lot of hassle later.
When to Call a Professional Plumber
Sometimes, even the best DIY efforts aren’t enough to fix plumbing problems, and that’s when professional help becomes essential.
Take a leaky faucet, for example. If you’ve already replaced the O-rings and cartridges but the dripping continues, the issue might be more serious – like a cracked faucet body or hidden internal damage. Persistent leaks after attempted repairs often point to problems that require specialized tools and expertise to diagnose and resolve.
While replacing a rubber washer is relatively simple, dealing with complicated cartridge failures or leaks at the spout’s base can be much trickier. These types of repairs often involve internal seals or other components that aren’t easy to access or fix without the right training. If you encounter heavy corrosion, stripped screws that won’t budge, or a faucet body that’s beyond cleaning, it’s a clear sign to call in a licensed plumber.
Hard water and calcium deposits can also make plumbing repairs more challenging. Significant calcium buildup can clog or damage internal parts, sometimes requiring professional cleaning or even a whole-house water softener. Tub and shower valve repairs are another area where expertise is crucial. Since much of the valve assembly is hidden behind walls, improper handling can lead to hidden water damage and costly repairs down the line.
For those in Toronto and the GTA, POM Plumbing Service Company offers 24/7 licensed plumbing services in Mississauga, Brampton, Vaughan, and Oakville. Their team brings over 20 years of experience to handle advanced repairs like complex cartridge replacements, internal seal restoration, and diagnosing high water pressure issues. They also use modern diagnostic tools to ensure precise and efficient solutions.
If you’re unsure about a repair – or if parts don’t fit properly – it’s best to stop and call a professional. Improper fixes can lead to burst pipes or hidden water damage, turning a small problem into a major headache. Even a slow drip can waste a surprising amount of water over time. A licensed plumber not only resolves the issue but also helps protect your home from further damage and rising costs.
Conclusion
A dripping faucet isn’t just an annoyance – it’s a drain on both water and money. A single faucet leaking at the rate of one drop per second can waste 34 litres of water daily – that’s 12,240 litres a year, enough to supply water for over 180 showers. This kind of waste can easily add $35 or more to your annual water bill.
The good news? Most faucet leaks are caused by worn-out parts like washers, O-rings, or cartridges, which typically cost less than $20 to replace. By following the simple four-step repair process outlined earlier, you can fix most leaks yourself. Don’t forget to clean mineral deposits with white vinegar, use plumber’s grease on new seals, and tighten connections carefully to avoid damage. Routine maintenance and keeping an eye on potential issues can save you from bigger problems down the road.
However, there are times when DIY efforts may not be enough. If the dripping continues after replacing parts, or if you’re dealing with severe corrosion, stripped screws, or complex cartridge failures, it’s time to bring in emergency plumbing services. Ignoring these issues can lead to bigger problems like cracked faucet bodies and hidden water damage – repairs that are far more costly than fixing a simple leak.
For homeowners in Toronto, Mississauga, Brampton, Vaughan, and Oakville, POM Plumbing Service Company offers 24/7 licensed plumbing services. Whether it’s a basic washer replacement or a more complicated repair, their team is ready to help. Call 905-499-0888 if the leak persists. Don’t let a small drip turn into a costly repair – address leaks promptly, use quality parts, and know when to call in the experts. Your water bill – and your home – will be better for it.
FAQs
How do I know what type of faucet I have?
To figure out what kind of faucet you have, look for a model number or take a close look at its parts, like the handle, cartridge, or valve. Determining if it’s a single-handle or double-handle design can also give you a good idea. If there’s a leak, identifying where it’s happening – whether at the spout, base, or handle – can help narrow down the type and the parts you’ll need for repairs.
What if the leak continues after I replace the washer or cartridge?
If the leak continues after swapping out the washer or cartridge, there might be another faulty component or an installation issue. Carefully inspect all connections to make sure everything is securely and correctly installed. Should the problem persist, take a closer look at other parts of the faucet, as they could be the source of the issue. In some cases, replacing the entire faucet assembly might be necessary. For ongoing problems or if you’re unsure, reaching out to a professional can help prevent further damage and ensure the repair is done right.
How can I remove hard-water buildup that’s causing a drip?
To tackle hard-water buildup that’s causing a drip, try using an acidic cleaner such as white vinegar or lemon juice. These natural options work well to break down mineral deposits.
Here’s how to do it:
- Turn off the water supply to prevent any mess.
- Soak a cloth in vinegar or lemon juice and wrap it around the affected area, or apply the cleaner directly to the buildup.
- Allow it to sit for about 30 minutes to loosen the deposits.
- Gently scrub the area using a soft brush, then rinse thoroughly with water. Finish by drying the faucet completely.
This simple method can help restore your faucet and stop the drip.
