


Replacing plumbing fixtures can save you money and improve your home’s plumbing system, but only if done correctly. Mistakes like overtightening parts, skipping safety precautions, or ignoring local codes can lead to leaks, flooding, or damage. Here’s what you need to know:
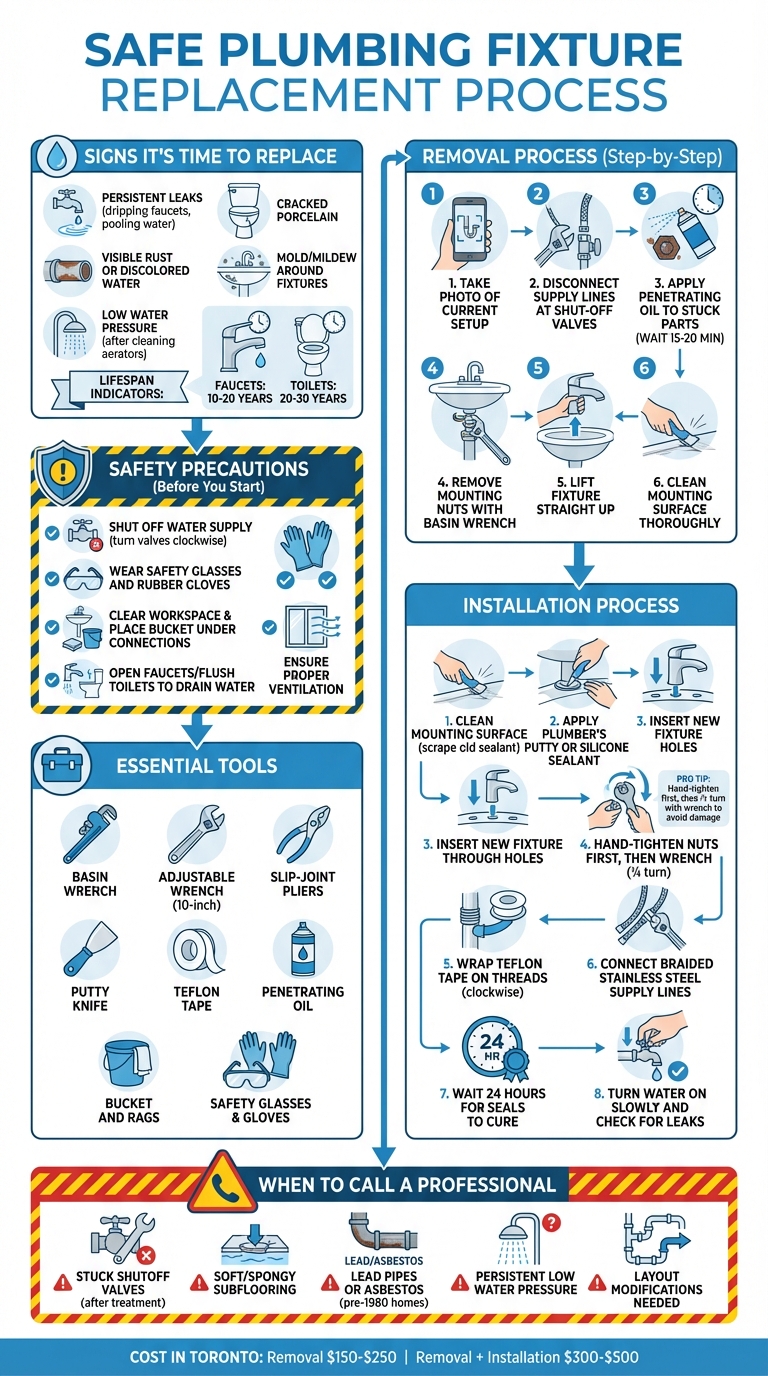
- When to Replace Fixtures: Persistent common household plumbing issues like leaks, rust, or low water pressure, or fixtures past their lifespan (faucets: 10–20 years; toilets: 20–30 years) signal it’s time for a change.
- Safety First: Shut off water, wear gloves and safety glasses, and prepare your workspace to avoid accidents. Older homes may require extra caution due to materials like lead or asbestos.
- Tools You’ll Need: Basin wrench, adjustable wrench, pliers, putty knife, Teflon tape, and cleaning supplies are must-haves.
- DIY Steps: Drain water, take photos of setups, and carefully remove old fixtures. Use proper techniques and avoid forcing corroded parts.
- Installation Tips: Clean surfaces thoroughly, use new seals, and follow Canadian plumbing codes. Avoid overtightening to prevent damage.
- When to Call a Pro: For stuck valves, damaged subfloors, or outdated materials like lead pipes, professional help is recommended.
Regular maintenance like cleaning with mild soap, checking for leaks, and flushing lines can extend the life of your fixtures. If unsure about a project, hiring a licensed plumber can prevent costly mistakes.
Step-by-Step Guide to Safely Removing and Replacing Plumbing Fixtures
Contents
- 1 How to Replace a Bathroom Faucet and Drain
- 2 When Should Plumbing Fixtures Be Replaced?
- 3 Safety Precautions Before You Start
- 4 Tools and Materials You’ll Need
- 5 How to Remove Old Plumbing Fixtures Safely
- 6 How to Install New Plumbing Fixtures Correctly
- 7 Common Mistakes to Avoid
- 8 When to Call a Professional Plumber
- 9 Preventive Tips for Long-Lasting Fixtures
- 10 Conclusion
- 11 FAQs
- 12 Related Blog Posts
How to Replace a Bathroom Faucet and Drain
sbb-itb-1e3c609
When Should Plumbing Fixtures Be Replaced?
Replacing plumbing fixtures early can save you from expensive repairs and skyrocketing bills. For instance, persistent leaks – like a faucet that won’t stop dripping or water pooling around the base of a toilet – often mean the internal components are failing. While a single drip might seem trivial, these issues usually indicate that repairs alone won’t cut it anymore.
Another red flag is visible rust or discoloured water, which points to internal corrosion and deterioration.
David Topelko from Homewise Plumbing explains, “Older plumbing fixtures simply weren’t designed with conservation in mind”.
If your fixtures are nearing the end of their lifespan and showing signs of inefficiency, replacing them is often more economical.
Structural problems also demand immediate attention. For example, cracked porcelain in toilet tanks or bowls can’t be repaired and poses a serious flooding risk. Similarly, if you notice mould or mildew around fixtures despite regular cleaning, it’s likely caused by a hidden leak creating constant moisture. You can also perform a quick “rocking test” on your toilet – if it moves, the wax seal or flange might be damaged.
If you’re dealing with low water pressure that persists even after cleaning aerators or showerheads, it’s often due to mineral deposits clogging the internal passages beyond repair. As a general guideline, faucets usually last 10 to 20 years, while well-made toilets can serve you for 20 to 30 years. If your fixtures are reaching or surpassing these timelines and showing any of these issues, it’s smarter to replace them rather than pour money into constant repairs. Spotting these warning signs early can help you decide whether to tackle a DIY replacement or call in a professional. Plus, replacing fixtures at the right time can extend the life of your plumbing system overall.
Safety Precautions Before You Start
Before diving into any plumbing work, the first step is to shut off the water supply to avoid unexpected flooding. For faucets, look for the hot and cold valves inside the cabinet beneath the sink. For toilets, locate the valve on the supply line that connects the wall or floor to the bottom left of the tank. Turn these valves clockwise until they stop. If they’re stuck, don’t force them – apply penetrating oil and let it sit for 15 to 20 minutes. If the local valves are missing or leaking, you’ll need to turn off the water at the main shut-off valve, often found in the basement, garage, or near the water metre. Once the valves are closed, open faucets or flush toilets to drain any remaining water and reduce the pressure in the pipes.
Wear proper protective gear to ensure your safety. Safety glasses or goggles are a must, as older plumbing systems often release rust and debris during disassembly. Rubber gloves are essential when handling toilet components or old wax rings. If you’ll be working on your knees, such as when removing a toilet, knee pads can prevent discomfort and protect your joints. This gear not only keeps you safe but also helps maintain a cleaner and safer work environment for the installation process.
David Rowe, a Master Plumber, advises: “If you are working with a torch be completely aware of what surrounds the area you are working on, and if you are working alone with no others anywhere near you, have a fire extinguisher at hand”.
Clear and prepare your workspace to avoid accidents and damage. Empty out cabinets under sinks or move items around the fixture to give yourself enough room to work. Place a bucket or tray under P-traps and supply lines before disconnecting them to catch any leftover water. Keep old towels or rags nearby for quick cleanups, and cover open drains with a cloth or plug to prevent small parts, like screws or nuts, from falling in. If you’re working near a kitchen sink with a garbage disposal, turn off the power at the circuit breaker. Toilets, which can weigh anywhere from 70 to 120 pounds, can damage flooring, so place cardboard or old blankets under them for protection.
Ensure proper ventilation by opening windows or using fans, especially when working with adhesives or solvents. Block open drain pipes with a rag to stop harmful sewer gases, such as hydrogen sulphide, from entering your workspace. Use a flashlight or work light to brighten dark areas like cabinets, reducing the risk of tool slips or accidental injuries. In older Toronto homes built before 1960, be extra cautious – shut-off valves may be corroded and could break when operated, and you might encounter lead pipes or asbestos-containing materials, which should not be disturbed. Following these precautions will set you up for a safer and smoother plumbing project.
Tools and Materials You’ll Need
Having the right tools on hand can make your project smoother and help avoid damage to your fixtures. To stay organized, group your supplies into three categories: removal tools, installation materials, and cleaning supplies. Most of these items can be found at your local hardware store.
For removal, you’ll need a basin wrench, a 10-inch (250 mm) adjustable wrench, slip-joint (or tongue-and-groove) pliers, a flathead screwdriver, and a utility knife to cut through caulk. For stubborn, corroded bolts, a mini hacksaw comes in handy. If you’re dealing with rusted nuts, apply some penetrating oil and give it about 15 minutes to work its magic before attempting removal. When removing a toilet, a 5-gallon (19 L) bucket and a large sponge are essential for draining both the bowl and tank completely.
Once the old fixture is out, shift your attention to installation supplies. Use Teflon tape to seal threaded joints and plumber’s putty or silicone caulk to create watertight seals. Opt for braided stainless steel supply lines – they’re more durable than plastic alternatives. For toilet installations, you’ll need a new wax ring and a set of closet bolts. Check that your new fixture aligns with your sink’s mounting holes, which typically range from 1 to 4 holes. Also, confirm that your supply lines are compatible with your shutoff valves.
Finally, gather cleaning and safety supplies to wrap things up. A calcium, lime, and rust remover (like CLR or Rust-Oleum) is great for tackling mineral deposits and corrosion. A putty knife will help scrape away old sealant, while wire brushes are ideal for cleaning rust from threads. Keep plenty of rags on hand, along with rubber gloves, safety glasses, and a flashlight to help you work safely and efficiently.
“Once you’ve removed the faucet, make sure to clean any leftover sealant or other gunk.” – Moen
How to Remove Old Plumbing Fixtures Safely
Before diving into fixture removal, make sure the water supply is off. To relieve any pressure in the lines, open faucets or flush the toilet. Place a bucket under the supply line connections to catch any residual water, and keep rags handy to clean up spills. If you’re working near a garbage disposal, disconnect its power at the breaker to avoid accidental activation.
Taking a quick photo of the current setup with your smartphone can save you a lot of trouble when it’s time to reassemble. Also, block the drain with tape to prevent small parts from falling into the pipes.
“The key is being able to get to the fixture and secure both sides of the joint so that they are able to come apart and not damage any pipes, especially plumbing that is inside the wall.” – Pipe Break
These steps will help create a safe and manageable workspace for removing plumbing fixtures.
Removing Faucets
Once the water supply is off and the area is prepped, start by disconnecting the hot and cold supply lines at the shut-off valves using an adjustable wrench. This is often easier than disconnecting them directly at the faucet. If the lift rod is attached to a pop-up drain assembly, slide off the spring clip to release it. Use a basin wrench to access and unscrew the mounting nuts behind the sink. After the nuts are removed, lift the faucet straight up. If it’s stuck, carefully pry the base with a plastic putty knife to avoid damaging the surface.
For rusted or mineral-encrusted nuts, apply penetrating oil like PB Blaster or Pipe Break. Let it soak for 15–20 minutes (or overnight for tougher cases). Use a wire brush and CLR to clean off loosened rust or deposits. If the nut is still stuck, try tightening it slightly first – this can help break the rust bond, making it easier to loosen. Always use two tools: one to turn the stuck part and another to hold the pipe steady. This prevents putting stress on pipes inside the wall, which could lead to leaks or damage.
Removing Toilets
Start by shutting off the water supply. Flush the toilet to empty the tank and bowl, then use a sponge and bucket to remove any leftover water. Disconnect the supply tube from the shut-off valve with an adjustable wrench. Next, unscrew the tank bolts to separate the tank from the bowl. At the base of the toilet, remove the floor bolt nuts. If they’re rusted, apply penetrating oil and wait 15 minutes. If they remain stuck, carefully cut them with a mini hacksaw to avoid cracking the porcelain.
Rock the toilet bowl gently side to side to break the wax ring seal, then lift it straight up and place it on old towels or cardboard. Use a putty knife to scrape away the old wax ring from the floor flange, and dispose of it in a plastic bag. Clean the flange thoroughly to ensure a proper seal when installing the new toilet.
Removing Showerheads and Valves
Shower components can be removed using similar techniques. For showerheads, apply penetrating oil to the connection and let it soak for 15–20 minutes. Use a strap wrench or wrap a rag around the shower arm to protect the finish, then turn counterclockwise to unscrew. If it’s still stuck, gently tap it with a hammer to help the oil penetrate deeper. For particularly stubborn connections, apply controlled heat with a heat gun or hair dryer to expand the metal and break the corrosion.
“A little patience goes a long way. Still resisting? Heat the fitting slightly, being cautious of the surrounding materials.” – Superior Plumbing
To remove valve trim rings and cartridges, start by taking off any decorative caps or screws. If screws are stuck, apply penetrating oil and use a box-end wrench to avoid rounding the edges. For hardware that’s completely seized, carefully cut it with a hacksaw. Avoid using high heat on plastic (PVC/CPVC) components, as they can melt and release harmful fumes.
How to Install New Plumbing Fixtures Correctly
With the old fixtures safely out of the way, it’s time to focus on installing your new plumbing fixtures the right way. Start by thoroughly cleaning the mounting surface to remove any residue left behind. A clean surface is essential for creating a watertight seal. Once prepped, you can move on to installing your new fixtures, beginning with faucets.
When installing faucets, it’s important to follow Canadian plumbing standards. Start by applying a bead of plumber’s putty or silicone sealant to the base of the faucet, unless a gasket is provided. Insert the faucet through the sink holes, then secure it underneath with washers and mounting nuts. Hand-tighten the nuts first to allow for any needed adjustments, then use a basin wrench to finish tightening – just be careful not to overtighten, as this could cause damage. Wrap Teflon tape around the faucet shank threads, and connect flexible, braided stainless steel supply lines to the hot and cold shanks. Attach the other ends of the supply lines to the shut-off valves, tightening them first by hand and then with a wrench.
“You must wait at least 24 hours to ensure all seals have cured before you turn the water supply on; otherwise, you could create leaks.” – Wayfair.ca
Once the faucet is securely in place, you can move on to installing your toilet. Again, make sure you’re following Canadian plumbing standards. Start by placing a new wax ring on the floor flange – reuse of an old wax ring is a no-go. Carefully lower the toilet bowl straight down onto the flange, ensuring the bolts align with the holes. Press down firmly to seat the wax ring, and alternately hand-tighten the floor bolt nuts until they’re snug. Avoid overtightening, as this can crack the porcelain. In cities like Toronto, local building codes often recommend caulking the base of the toilet where it meets the floor to prevent water seepage.
Once everything is in place, remove the faucet aerator and slowly turn the water supply back on. Let the water run for about 30 seconds to flush out any debris, and check all connections for leaks. Make sure the shut-off valves are easily accessible near each fixture. If you’re upgrading to a high-efficiency toilet, you’ll meet current conservation standards while also saving water.
Common Mistakes to Avoid
When installing or maintaining fixtures, a few common DIY mistakes can lead to leaks, damage, or expensive repairs. One frequent error is overtightening connections. Using too much force can crack porcelain, strip threads, or damage seals. A good rule of thumb: hand-tighten connections first, then give them just a quarter-turn with a wrench.
“Installing a new sink and faucet is an impactful way to update your kitchen or bathroom without breaking the bank”
Another misstep is failing to clean the mounting surface. Residue or grime can prevent a watertight seal. Before installing new fixtures, scrape away any old material with a putty knife and clean the area with rubbing alcohol. Additionally, forgetting to flush the lines after installation can clog your new aerator with debris or sediment. To avoid this, run the water for about 30 seconds without the aerator attached to clear out the system.
Using the wrong sealant is another issue to watch for. For example, plumber’s tape shouldn’t be used on compression fittings. When using tape, always wrap it clockwise to prevent it from unravelling during tightening. Reusing old supply lines is also a bad idea, as it increases the risk of leaks or failure.
Lastly, forcing corroded or stuck parts can lead to broken pipes or sink damage. If mounting nuts are stubborn, apply penetrating oil and wait a bit. Then, use two wrenches – one to hold the pipe steady and the other to turn the nut – to prevent kinking or breaking the copper inlet. If you encounter persistent issues despite your best efforts, it may be time to call in a professional.
When to Call a Professional Plumber
Sometimes, tackling plumbing issues on your own just isn’t enough. When DIY fixes fail or the risks of further damage increase, it’s time to bring in a professional. For example, trying to force corroded parts can lead to serious problems like flooding. If a shutoff valve remains stuck even after treatment, stop immediately. A frozen or corroded valve that won’t stop water flow needs to be professionally replaced with a quarter-turn ball valve. Forcing it could snap the valve stem and result in significant water damage to your home.
Structural issues are another clear sign to call an expert. If you find soft or spongy subflooring after removing a toilet, it’s a sign of serious water damage that must be repaired before installing a new fixture. Older homes, especially those built before 1980 in areas like The Beaches, High Park, and Riverdale in Toronto, often contain outdated materials like cast iron flanges, lead pipes, or even asbestos. These materials can pose safety risks and require professional handling.
“If you are having trouble with even the simplest of plumbing fixtures… don’t hesitate to call a professional plumber for repair or maintenance services instead of attempting a DIY repair that could just further the damage.” – Brothers Plumbing
If you’re modifying your sink, countertop, or plumbing layout, professional expertise is essential. Licensed plumbers ensure proper integration of drain and vent systems, handle permits, and comply with Canadian building codes, including specific local requirements like caulking around toilet bases. In Toronto, professional toilet removal typically costs between $150–$250, while removal and installation combined ranges from $300–$500. Emergency same-day service can add an extra $100–$150 to the bill.
Persistent plumbing issues like low water pressure, discoloured water, or mould are often signs of deeper problems that require professional diagnosis. Surface-level fixes won’t address the root causes. Companies like POM Plumbing Service, with over 20 years of experience, have the tools and expertise that most homeowners simply don’t have. A professional consultation can help you avoid turning small problems into costly disasters. Regular maintenance is key to preventing these emergencies.
Preventive Tips for Long-Lasting Fixtures
Keeping your fixtures in good shape doesn’t have to be complicated. A little regular care goes a long way. Start by cleaning them weekly with a soft cloth and mild soap to avoid scratches and wear over time. Skip abrasive cleaners – they can permanently damage surfaces. For hard water buildup or mineral deposits, soak showerheads or faucet aerators in a mix of equal parts water and white vinegar. This gentle solution clears scale without using harsh chemicals.
Regular inspections are just as important as cleaning. Check connections and moving parts twice a year to catch issues early. Turn shut-off valves under sinks and behind appliances on and off occasionally to prevent them from seizing due to corrosion. Toilet flappers should also be checked every few years since faulty ones can cause those annoying “silent leaks” that waste water without making noise. Watch for signs like discolouration, rust, or moisture on exposed pipes – these can indicate corrosion or poor seals. After any new installation or repair, monitor connections for leaks over the next 48 to 72 hours to address problems before they escalate.
Flush your system regularly to keep water flowing smoothly. Remove the aerator and run hot and cold water for at least a minute to clear out sediment and debris. If you notice low water pressure, cleaning the aerator can often solve the problem by removing mineral buildup. It’s also smart to keep Teflon tape and silicone sealant handy for refreshing seals if you notice minor leaks at joints.
When making adjustments or repairs, protect decorative finishes to avoid unnecessary damage. Use a strap wrench or wrap fixtures in a cloth before using pliers, especially on chrome or nickel surfaces, to prevent scratches. Adding a bead of clear silicone caulk around sink basins and backsplashes can stop water seepage. Just be sure to wipe away any excess sealant immediately to avoid unsightly buildup or mould growth.
Tackle corrosion early to keep it from becoming a bigger issue. A wire brush can remove rust or mineral deposits from hardware and mounting surfaces. For stuck parts, try applying penetrating oil and letting it sit for 30 minutes or even overnight. If you spot mould near sinks or tubs, don’t just clean the surface – find the source of the moisture, which is often a hidden plumbing leak. Following these steps consistently will help your fixtures stay reliable and look great for years to come.
Conclusion
To ensure safety during plumbing work, always start by shutting off the water supply – either at the local shutoff valves or the main line – and release any remaining pressure by opening the faucets. If you’re working near a garbage disposal, disconnect its power at the breaker for added safety. Essential tools like a basin wrench, adjustable wrench, and a bucket will make straightforward replacements much easier.
Safety gear is equally important. Wear rubber gloves and safety glasses to protect against contaminants and flying debris. If you encounter issues such as soft or damaged subflooring, a cracked or broken floor flange, or suspect the presence of lead or asbestos in older pipes (common in homes built before 1980), stop immediately and consult a professional. Similarly, call in experts for challenges like frozen shutoff valves or projects that involve new supply lines, which need to meet local building codes.
When using silicone caulk or plumber’s putty, allow it to cure for 24 hours before turning the water back on. Start by hand-tightening connections, then give them an additional quarter to half turn with a wrench. Monitor for leaks over the next couple of days to ensure everything is secure.
For ongoing maintenance, clean fixtures weekly with a soft cloth and mild soap, and soak aerators and showerheads in a water-and-vinegar solution to remove mineral deposits. Periodically inspect connections and operate shutoff valves to prevent them from seizing. These habits not only extend the life of your fixtures but also help you spot potential issues early.
While many top DIY plumbing fixes are manageable on your own, it’s important to recognize when a job is beyond DIY capabilities. If you’re ever uncertain or face complications that go beyond basic repairs, remember that POM Plumbing Service Company has over 20 years of experience serving Toronto and the GTA with licensed and insured professionals. By prioritizing safety, precision, and regular maintenance, you can ensure a successful and long-lasting plumbing installation.
FAQs
Do I need a permit to replace a fixture in Toronto?
In Toronto, straightforward upgrades like replacing a faucet or showerhead typically don’t require a permit. However, if you’re planning to modify plumbing connections, move fixtures, or add new lines, you might need one.
To stay on the right side of the rules, it’s a good idea to contact the Toronto Building Department or speak with a licensed plumber. This can help you follow local regulations and avoid fines or issues when selling your property down the line.
How can I tell if my shutoff valve will break if I turn it?
Inspect the valve closely for signs of corrosion, rust, or mineral buildup, as these can compromise its strength. If the valve feels stiff, difficult to turn, or emits odd noises, it might have internal damage and could be on the verge of failure. Avoid forcing a valve that’s stuck or rusted – doing so could lead to leaks or further harm. If the valve shows noticeable wear or damage, replacing it is a safer option to prevent future problems.
What should I do if a fitting won’t loosen?
If a fitting refuses to budge, try applying some penetrating oil and give it about 15 minutes to work its magic. After that, grab a basin wrench or water-pump pliers to help loosen and remove the nuts more easily. When dealing with particularly stubborn fittings, remember that patience and using the right tools are essential to prevent causing any damage.