


Fixing a toilet isn’t as hard as it seems. Most issues – like running water, weak flushes, or leaks – can be resolved with simple tools and affordable parts. Here’s what you need to know:
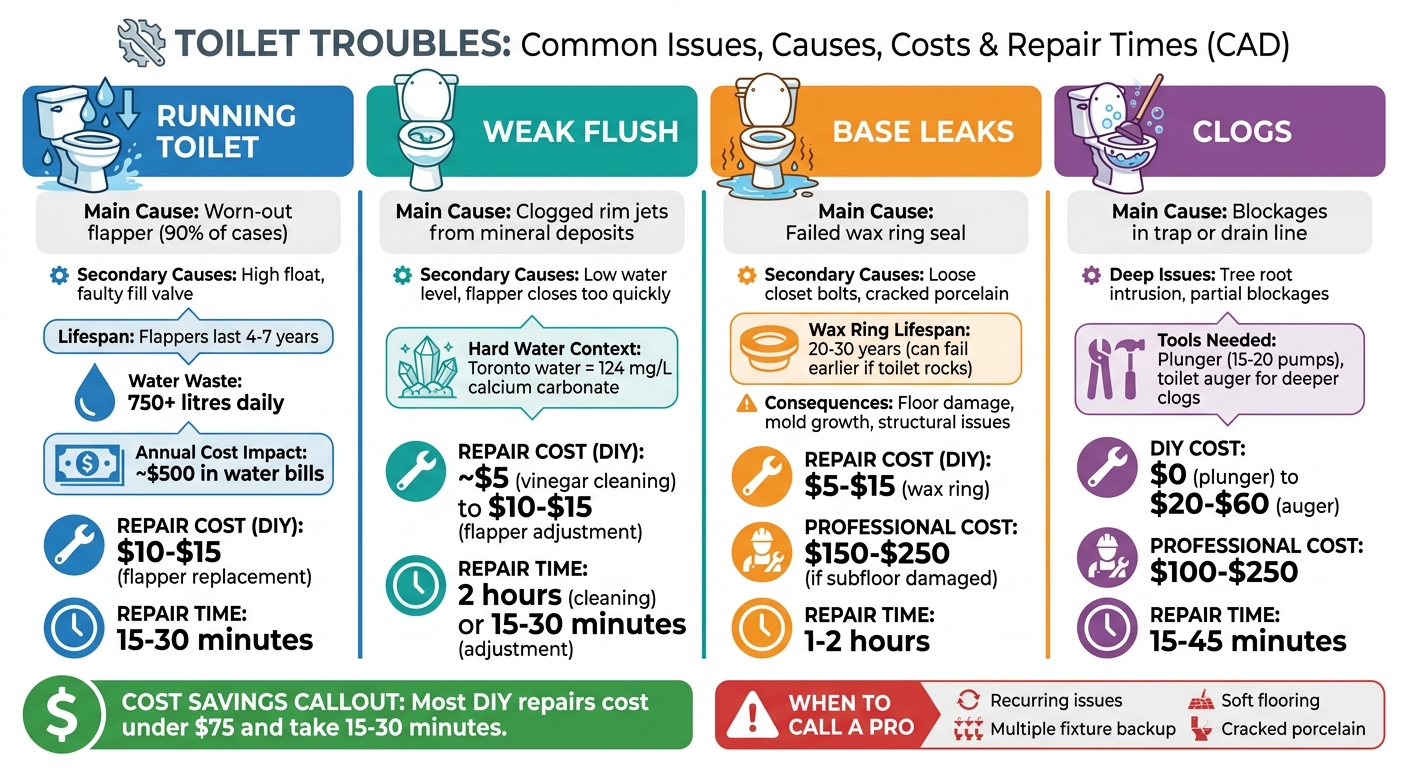
- Running toilets: Often caused by a worn-out flapper. A quick $10–$15 replacement can save you hundreds of dollars in water bills annually.
- Weak flushes: Mineral deposits in rim jets or low water levels are common culprits. Cleaning with vinegar or adjusting the float usually solves the problem.
- Leaks at the base: Typically due to a failed wax ring. Replacing it costs $5–$15 but prevents costly floor damage.
- Clogs: Use a plunger or toilet auger to clear blockages. Avoid multiple flushes to prevent overflows.
Key tools: Toilet plunger, adjustable wrench, flathead screwdriver, and toilet auger. Most repairs take 15–30 minutes and cost under $75.
If DIY fixes don’t work, or if you notice recurring issues like sewer odours or water backing up into other fixtures, it’s time to call a plumber. Acting quickly can save water, prevent damage, and avoid bigger repairs later.
Keep reading for step-by-step guides and maintenance tips to keep your toilet in top shape.
Common Toilet Problems: Causes, Costs, and Repair Times
Contents
- 1 How to Repair Toilet Tank Components | Ask This Old House
- 2 Common Toilet Problems and Their Causes
- 3 Tools and Materials You’ll Need
- 4 How to Fix Common Toilet Problems
- 5 How to Replace a Wax Ring or Repair the Flange
- 6 When to Call a Professional Plumber
- 7 Ensuring Your Toilet Stays Problem-Free
- 8 Conclusion
- 9 FAQs
- 10 Related Blog Posts
How to Repair Toilet Tank Components | Ask This Old House
sbb-itb-1e3c609
Common Toilet Problems and Their Causes
Running toilets are a frequent issue, often caused by worn-out flappers, high floats, or malfunctioning fill valves. These problems can lead to phantom flushes, where water slowly leaks from the tank into the bowl. Flappers, which typically last 4 to 7 years, can deteriorate faster when exposed to chloramine-treated municipal water. Interestingly, about 90% of running toilet cases are linked to faulty flappers.
Weak flushes are usually the result of clogged rim jets. These small holes, responsible for creating the necessary swirl action during a flush, can become blocked by mineral deposits. This is especially common in areas like Toronto, where hard water contains an average of 124 mg/L of calcium carbonate. Another common cause is insufficient water in the tank, often due to an incorrectly adjusted float. If your tank takes more than 3 minutes to refill – when it should take 1–2 minutes – mineral buildup in the fill valve is likely the culprit.
Base leaks are a more serious problem and can point to issues such as a failed wax ring seal, loose closet bolts, or even a cracked porcelain base. Wax seals can naturally wear out over time, but they may fail prematurely if the toilet rocks or was improperly installed. As Mike Thompson, a Master Plumber, explains:
"Wax rings last 20-30 years but can fail earlier if the toilet rocks (breaks the seal) or from improper original installation".
Recurrent clogs might indicate deeper plumbing issues, such as tree root intrusion in older drain lines or partial blockages further down the system. On the other hand, a loose or unresponsive handle is often caused by a broken lift chain, a cracked lift arm, or a corroded handle assembly. These handle-related issues are generally easy to address with basic repairs.
Now that you know the common problems and their causes, it’s time to gather the tools and materials you’ll need to handle these fixes.
Tools and Materials You’ll Need
Before diving into any toilet repair, it’s a good idea to gather all the tools and materials you’ll need. Most fixes are straightforward and require only basic hand tools and affordable parts. With the right equipment, many repairs can be completed in just 15–30 minutes.
Required Tools
Start with the basics:
- A toilet plunger is essential for tackling clogs. It’s a must-have in any home.
- An adjustable wrench is handy for loosening or tightening nuts on water supply lines and closet bolts.
- Use a flathead screwdriver for prying off bolt caps and fine-tuning fill valve screws.
- For deeper clogs, a toilet auger (or snake) can reach where the plunger can’t.
- If you’re removing the toilet, a putty knife will help scrape off old wax from the floor flange.
- A wet-dry vacuum is useful for clearing out any leftover water from the tank and bowl before starting repairs.
| Tool Name | Purpose | Estimated Cost (CAD) |
|---|---|---|
| Toilet Plunger | Clears bowl clogs using rhythmic pressure | $10 – $25 |
| Adjustable Wrench | Loosens/tightens nuts on water supply lines and closet bolts | $15 – $40 |
| Flathead Screwdriver | Pries off bolt caps and adjusts fill valve screws | $5 – $15 |
| Toilet Auger (Snake) | Clears deep obstructions or retrieves items from the trap | $20 – $60 |
| Putty Knife | Scrapes away old wax from the floor flange | $5 – $12 |
| Wet-Dry Vacuum | Removes residual water from the tank and bowl | $60 – $150 |
Required Materials
When it comes to materials, the most common replacement part is the toilet flapper, which prevents water from leaking from the tank into the bowl. Flappers typically last only a few years, so having a spare on hand is a smart move. Other essentials include:
- A wax ring to create a watertight seal between the toilet base and the drain.
- A fill valve to control the tank’s water refill after flushing.
- Closet bolts to secure the toilet to the floor flange.
- Silicone caulk to seal the gap between the toilet base and the floor.
All these items are easy to find at Canadian hardware stores like Home Depot Canada, Rona, Canadian Tire, and Home Hardware. To ensure you purchase the correct parts, take a photo of your tank’s interior or bring the old part with you to the store. This is especially important for flappers, which come in different sizes (usually 2-inch or 3-inch).
| Material | Purpose | Estimated Cost (CAD) | Local Sourcing (Canada) |
|---|---|---|---|
| Wax Ring | Creates a watertight seal between the toilet base and drain | $5 – $10 | Home Depot, Rona, Canadian Tire |
| Toilet Flapper | Seals the tank to prevent water from leaking into the bowl | $7 – $35 | Home Depot, Home Hardware |
| Fill Valve | Controls water level and refills the tank after a flush | $15 – $40 | Rona, Lowe’s, Canadian Tire |
| Closet Bolts | Secures the toilet base to the floor flange | $5 – $12 | Local hardware stores |
| Silicone Caulk | Seals the gap where the toilet base meets the floor | $8 – $15 | Home Depot, Rona |
How to Fix Common Toilet Problems
With the right tools in hand, many toilet repairs can be tackled quickly – often in less than an hour – saving you the expense of hiring a professional.
How to Fix a Running Toilet
A running toilet is not just annoying; it’s incredibly wasteful. In the Greater Toronto Area, it can waste over 750 litres of water daily, potentially adding around $500 annually to your water bill. The usual culprits are a faulty flapper, an improperly adjusted float, or a defective fill valve.
To confirm the issue, try a dye test: add a few drops of food colouring to the tank and wait 15 minutes without flushing. If the colour seeps into the bowl, the flapper isn’t sealing properly. Replacing the flapper is straightforward. Turn off the water supply, flush to empty the tank, and use a sponge to remove any leftover water. Detach the old flapper from the overflow tube and disconnect the chain from the flush lever. Install the new flapper (which usually costs $10–$15), and reconnect the chain, leaving about ½ inch of slack. This ensures it seals properly without being too loose or tight.
If the flapper isn’t the issue, check the tank’s water level. It should sit about one inch below the top of the overflow tube. If it’s too high, water will constantly drain into the tube. Adjust the float: for a ball float, bend the arm downward; for a float cup, tweak the clip or screw until the water stops at the correct level.
For a faulty fill valve – noticeable by constant hissing or an overfilling tank – replacement is necessary. Turn off the water, disconnect the supply line, and remove the old valve. Install a new universal fill valve (priced between $15–$25), such as Fluidmaster or Korky models, which are widely available. Adjust the valve so its top is about an inch above the overflow tube, reconnect the supply line, and turn the water back on.
"Worn-out flappers are the cause of most toilet leaks." – Mark Carter, Content Writer
Once your toilet is running smoothly, it’s time to tackle clogs.
How to Unclog a Toilet
If your toilet is clogged and the water level is close to the rim, resist the urge to flush again – it could overflow and damage your floor. Instead, place absorbent materials around the base to catch any spills. Then, grab a flange plunger, which has an extended rubber flap designed specifically for toilets.
To use the plunger effectively, wet the rubber cup to ensure a tight seal, position it over the drain hole, and apply steady pressure. Pump 15–20 times in a consistent rhythm while maintaining the seal. This often dislodges blockages near the drain opening. If plunging doesn’t work, it’s time for a toilet auger.
Feed the auger’s curved end into the bowl and guide it past the trap. Turn the handle clockwise while applying gentle pressure to break up deeper clogs in the trapway. Once the blockage clears, retract the cable carefully to avoid splashing or scratching the porcelain. Most clogs can be resolved within 15 to 45 minutes using these tools, saving you the $100–$250 cost of a plumber.
"Plunging does not help? Toilet auger (closet auger) reaches deeper into the trapway. Breaks through what a plunger cannot." – Ryan Pietrzak, Licensed Plumber
If clogs happen frequently or you notice slow drainage in multiple fixtures, the issue might be a blocked roof vent – often caused by bird nests or ice buildup – rather than a simple toilet problem.
Now, let’s look at how to restore a weak flush.
Fixing a Weak Flush
A weak flush often stems from clogged rim jets, a low water level in the tank, or a flapper that closes too quickly. Many Canadian households face this issue due to hard water deposits. For instance, Toronto’s water contains 124 mg/L of calcium carbonate, which can block the small holes under the rim that create the swirling action needed for a strong flush.
To clean the rim jets, inspect the holes, soak them overnight in white vinegar, and use a piece of wire, a small Allen wrench, or a paper clip to clear them. This simple fix costs about $5 and takes around two hours. For the siphon jet (the large opening at the bowl’s base), apply the same vinegar treatment and scrub it with an old toothbrush to remove mineral buildup.
Next, check the tank’s water level. If it’s below the marked line (usually one inch below the overflow tube), adjust the float mechanism. Bend the ball float arm or slide the float cup’s adjustment clip upward until the tank fills properly. This adjustment is quick and free.
Finally, observe the flapper during a flush. It should stay open for at least three seconds to allow the tank to empty sufficiently. If it closes too soon, adjust the chain slack to about ½ inch or replace the flapper with an adjustable model, which costs $10–$15. Modern low-flow toilets in Canada use just 4.8 litres per flush, compared to the 13+ litres used by older models, making it crucial for all components to function efficiently.
How to Replace a Wax Ring or Repair the Flange
Fixing leaks at the base of a toilet is just as crucial as tackling other common toilet problems.
A faulty wax ring can lead to sewage leaks, floor damage, and even mould growth. Signs to watch for include pooling water, persistent sewer odours, a wobbly toilet, or softened, discoloured flooring.
"A leak at the toilet base means unsanitary water is escaping. This can damage subflooring, cause mold growth, and compromise structural integrity. Don’t delay this repair." – Mike Thompson, Master Plumber
Before starting, turn off the water supply and flush the toilet to empty the tank. Remove any leftover water using a sponge or wet-dry vacuum to avoid spills when lifting the toilet, which can weigh between 32–57 kg (70–125 lb). Disconnect the supply line with an adjustable wrench, and remove the anchor bolts at the base. If the bolts are rusted, apply some penetrating oil, like WD-40, to loosen them. Wear gloves to protect yourself from contact with sewage-exposed surfaces.
When lifting the toilet, use your legs for support rather than your back, and place it on old towels or cardboard to prevent damage. Scrape off the old wax from the floor flange and toilet outlet using a putty knife. Inspect the flange – if it’s cracked, rusted, or corroded, install a repair ring or plate. If the flange is more than 6 mm (1/4 inch) below the finished floor, opt for an extra-thick wax ring instead of the standard type.
Insert new anchor bolts into the flange slots, then position the new wax ring (which usually costs $5–$15) on either the flange or the toilet outlet, following the manufacturer’s instructions. Carefully lower the toilet straight down over the bolts without tilting, as tilting could compromise the wax seal. Sit on the toilet to compress the wax ring, then alternately tighten the nuts until the toilet is stable. Avoid overtightening, as this might crack the porcelain base. Finally, reconnect the water supply, turn it on, and check for leaks.
If the flange is severely damaged or the subfloor is rotting, you may need a professional plumber. In the Greater Toronto Area, these repairs typically range from $150–$250. Persistent issues with the toilet base are a clear sign it’s time to call in an expert.
When to Call a Professional Plumber
Sometimes, even the most determined DIY efforts aren’t enough to fix toilet troubles. If you’ve already tried basic fixes – like adjusting the flapper or float – and the issue persists, it’s probably time to call in a licensed plumber.
Certain problems are beyond what a plunger or standard toilet auger can handle. For example, if your plunger doesn’t clear the clog after 10 to 15 attempts, or if water starts backing up into other fixtures like your sink or shower when you flush, you’re likely dealing with a main sewer line issue. These situations demand professional-grade tools and expertise.
"If the plunger doesn’t work after 10–15 attempts, or if multiple fixtures are backing up simultaneously – that’s a main line issue, not a toilet problem." – RenoHouse Team
Other warning signs include leaks around the base of the toilet, especially if the floor feels soft or spongy. This could indicate serious water damage to the subfloor, which needs immediate attention. Recurring clogs may be a symptom of bigger issues like tree root intrusion – common in older Toronto neighbourhoods like The Beaches and High Park – or deteriorating pipes. A drain camera inspection can help pinpoint these hidden problems. Additionally, cracked porcelain in the toilet bowl or tank isn’t something you can fix effectively, and it poses a flooding risk. In such cases, replacement is the safest option.
POM Plumbing Service Company offers a wide range of toilet repair services across Toronto and the GTA. Their services include drain camera inspections, flange repairs, wax ring replacements, and clearing main line blockages. With over 20 years of experience, their licensed and insured professionals ensure all work meets the Ontario Building Code.
If your toilet wobbles even after tightening the bolts or you notice a persistent sewer odour, it’s a sign of deeper structural or component issues that need professional attention. When basic troubleshooting doesn’t solve the problem, plumbers use specialized tools to uncover hidden issues, saving you time and preventing expensive water damage.
Check out the next section for tips on keeping your toilet running smoothly.
Ensuring Your Toilet Stays Problem-Free
Once you’ve completed repairs, keeping up with regular maintenance is key to ensuring your toilet runs smoothly. Preventive care not only helps avoid unexpected repairs but also keeps your toilet functioning efficiently. These simple steps can address common issues and extend the life of your toilet.
Start by cleaning the rim jets monthly using white vinegar. Mineral deposits, especially in areas like Toronto with hard water, can clog the small holes under the rim and weaken your toilet’s flushing power. To clean, pour vinegar around the rim, let it sit for about 30 minutes, and gently scrub with an old toothbrush. Next, inspect the flapper valve for any signs of wear, such as cracks, discolouration, or hardening. Rubber flappers generally need to be replaced every 5 to 7 years. A worn flapper can waste over 750 litres of water daily, potentially adding $20 to $50 – or more – to your monthly water bill.
Once the rim jets are clear and the flapper is in good shape, check the water level in the tank. The water should sit about 2.5 cm (1 inch) below the overflow tube. If it’s too low, the toilet may not flush completely; if it’s too high, water can continuously flow into the overflow. Adjust the float arm or fill valve as necessary. Additionally, make sure the closet bolts are tight to prevent the toilet from wobbling. Finally, avoid flushing non-flushable items, as these are a major contributor to clogs.
For added peace of mind, consider scheduling regular maintenance with POM Plumbing Service Company. With over 20 years of experience serving Toronto and the GTA, their licensed and insured professionals can catch potential problems early, ensure your plumbing complies with local standards, and help you avoid costly water damage.
Conclusion
Toilet repairs don’t have to be overwhelming. Many common problems – like a running toilet, a weak flush, or a minor clog – can often be resolved with basic tools and a bit of patience. Acting swiftly is essential, though. For instance, a running toilet can waste over 750 litres of water daily, potentially increasing your monthly water bill by $20 to $50. Similarly, leaks at the base of the toilet can lead to unsanitary water seepage, which may damage subflooring, encourage mould growth, and result in costly structural repairs.
"A leak at the toilet base means unsanitary water is escaping. This can damage subflooring, cause mold growth, and compromise structural integrity. Don’t delay this repair." – Mike Thompson, Master Plumber
When a repair goes beyond a simple DIY fix, it’s time to bring in the professionals. POM Plumbing Service Company provides expert toilet repair services across Toronto and the GTA, including Mississauga, Brampton, Vaughan, Markham, Richmond Hill, and Oakville. With over 20 years of experience, they offer same-day and 24/7 emergency services to ensure minor issues don’t spiral into major expenses.
Whether it’s replacing a flapper or tackling more complex repairs like wax ring or flange issues, addressing problems early can save water, protect your home, and avoid bigger headaches down the line. Regular maintenance, as outlined earlier, also plays a key role in preventing future issues. By staying proactive, you can keep your plumbing in excellent shape for years to come.
FAQs
How do I know which toilet parts fit my model?
To identify parts that match your toilet model, start by checking the manufacturer’s label. You’ll usually find it inside the tank or at the base of the toilet. This label includes the make and model, which are essential for finding compatible replacements.
For routine repairs, certain parts may work across multiple models, but it’s important to double-check the size and connection type. If you’re uncertain, bringing the old part to a hardware store or referring to your user manual can help prevent buying the wrong replacement.
What causes a toilet to keep clogging?
A toilet can clog for various reasons, often tied to blockages in the drain or trap. Some of the most common culprits include flushing items that shouldn’t go down the toilet, like wipes or hygiene products, or the buildup of mineral deposits in the trap or rim jets. Debris can also play a role. If you have an older toilet with a less efficient flushing system, it might struggle to clear waste properly, causing clogs to happen more often. Performing regular maintenance can go a long way in keeping these problems at bay.
Can I replace a wax ring myself safely?
Replacing a wax ring is manageable if you have some basic plumbing know-how and follow the right steps. Start by turning off the water supply and draining the toilet tank completely. Then, carefully remove the toilet to access the old wax ring. It’s important not to reuse an old ring – always install a new one. For toilets with low flanges, an extra-thick wax ring might be a better choice to ensure a proper seal. If you run into complications, like a cracked flange, or feel unsure at any step, it’s wise to bring in a professional plumber to handle the job.